
摘要
好久没有写过文章了,现在给大家分享下近期比较火的Water Sort Puzzle小游戏,这里是使用的Graphics进行绘制实现,个人认为使用物理+shader进行流体的实现效果会更好且代码相对简单明了,因为只写了2-3天时间没有做过多的优化,这里只进行大体流程的分享该方案并不是最优方案,仅做参考。
版本说明
使用 CocosCreator 的 2.4.3 版本。
开始
效果演示:

介绍:
- 怎么使绘制的形状显示在试管中
- 如何绘制正常时的形状(这里我分为了正常时的形状和倾斜时的形状,正常时形状高度为100)
- 试管倾斜时里面的液体怎么同时进行倾斜
- 考虑倒水的试管怎么出现流动效果,以及中间部分如何衔接,被倒入的试管如何显示液体流下(后续更新 )
- 如果相同颜色的怎么进行一同流入(后续更新)
进入正题:
-
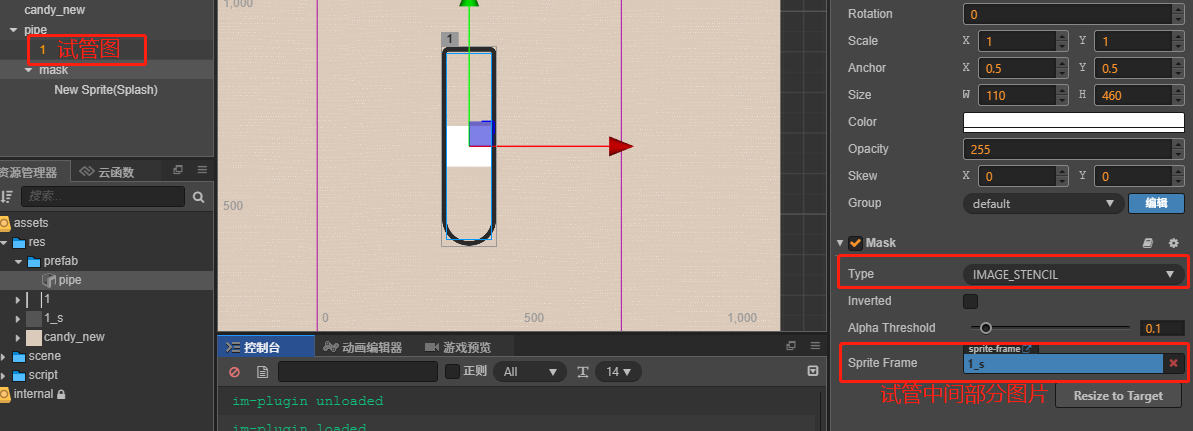
怎么使绘制的形状显示在试管中
这里我使用的是Mask组件进行设置,我们需要准备两张图片一张为试管图,另一张为试管中间部分图片,然后再Mask组件Type类型选择IMAGE_STENCIL模式并把准备的图片拖入SpriteFrame中,mask节点宽高设置为中间图片宽高即可。
-
如何绘制正常时的形状
怎么进行初始化绘制正常时的形状呢?我这里的思路为一个颜色代表一个绘制节点,并对节点名存储在当前脚本定义的Map中用于后面倾斜时的绘制操作
arr = [ { "color":"255,0,0",// 需要绘制的rgb颜色 "tag":"红"// 颜色标签 }, { "color":"67,255,199", "tag":"绿" }, { "color":"67,255,199", "tag":"绿" } ] /** * 绘制正常正方形 * @param arr 接收初始化绘制的数组 */ private _graphics(arr:arr):void{ // this.colorDistanceRadius表示为半径,这里选取的为左边即-(width/2) // this.colorShapeHeight 表示为需要绘制形状的高度 // _x为左边x即绘制开始起点 ,_xx为右边x // _y为高度,循环增加 let _x = this.colorDistanceRadius,_xx = Math.abs(_x),_y = 0; arr.forEach((res,index)=>{ // this.nodeGraphicsMap 当前脚本存储的绘制节点 let ctx,_name = 'g'+index; let _nodeGraphics = this.nodeGraphicsMap.get(_name); if (!_nodeGraphics) { let node = new cc.Node(); node.name = _name; ctx = node.addComponent(cc.Graphics); this.node.addChild(node); _nodeGraphics = {tag:res.tag,graphics:ctx,position:{upperLeft:0,upperRight:0,rightLower:0,leftLower:0}}; this.nodeGraphicsMap.set(node.name,_nodeGraphics); } let _arr = res.color.split(','); let rgb = _arr.map(Number); ctx.fillColor = new cc.Color(rgb[0],rgb[1],rgb[2]); _nodeGraphics.position.leftLower = _y; // 起始点左下 ctx.moveTo(_x,_y); _nodeGraphics.position.rightLower = _y; // 起始点右下 ctx.lineTo(_xx, _y); _nodeGraphics.position.upperRight = _y + this.colorShapeHeight; // 结束右上 ctx.lineTo(_xx, _y + this.colorShapeHeight); _nodeGraphics.position.upperLeft = _y + this.colorShapeHeight; // 结束左上 ctx.lineTo(_x, _y + this.colorShapeHeight); // 填充 ctx.fill(); // 根据当前节点名称存储对象 this.nodeGraphicsMap.set(_name,_nodeGraphics); // _y随着循环进行增加 _y += this.colorShapeHeight; }); } -
试管倾斜时里面的液体怎么同时进行倾斜
首先我们在onLoad方法中进行监听其pipe节点的旋转事件进行绘制旋转时形状倾斜的状态。
这里我把脚本挂载到了mask节点下,所以要监听其父节点。
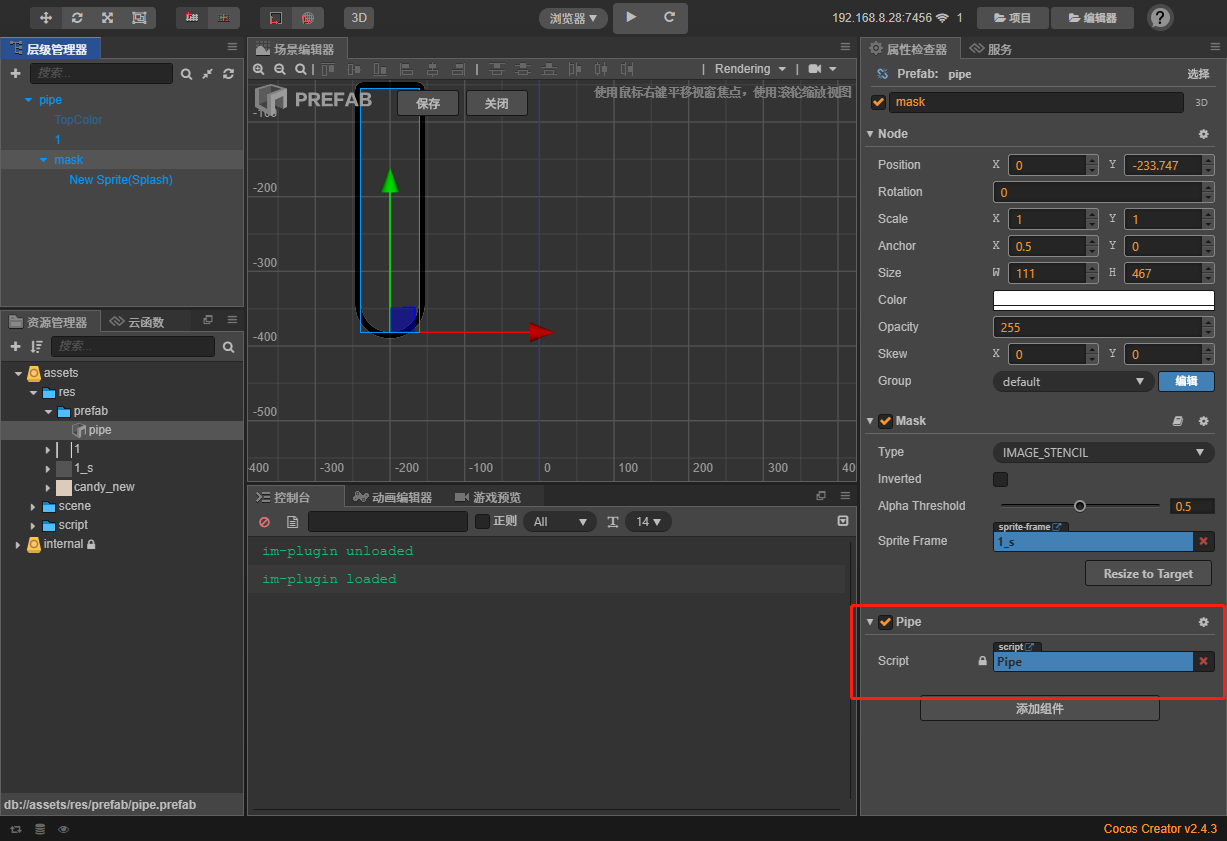
// 监听当节点旋转时
this.node.parent.on(cc.Node.EventType.ROTATION_CHANGED,()=>{
    this._graphicsNodeQuadrangle();
},this);
那要怎么进行倾斜哪?我们已知默认的形状高度为100,那么试管往边倾斜形状哪边就应该高出,具体怎么计算哪,我们就用形状高度-倾斜角度然后在使高度等于一开始定义的高度(注:此方法可能存在面积不相等问题,这里推荐下白玉无冰大佬的一篇文章《水排序中的这个效果怎么实现?》),并重新进行位置的存储
    /**
     * 绘制倒水时的四边形
     */
     private _graphicsNodeQuadrangle():void{
       // 需要判断瓶子朝向 向左 或 向右 朝向那边那边高出
       let _x = this.colorDistanceRadius,_xx = Math.abs(_x),_y = 0,_angle = this.node.parent.angle;
       let _colorShapeHeight = this.colorShapeHeight,_a = _colorShapeHeight,ctx,_nodeGraphics;
		// 高度减去倾斜度
       _a -= Math.abs(_angle);
       // 增大形状倾斜角度
       _a -= 30;
       // 获取到当前节点下的所有已经绘制的数量
       let ar = this.node.children.length-1;
       for (let i = 0; i < ar; i++){
           // 根据名字进行从map中获取
        let _name = 'g'+i;
        if (this.nodeGraphicsMap.get(_name)) {
            _nodeGraphics = this.nodeGraphicsMap.get(_name);
            ctx = _nodeGraphics.graphics;
        }
        let color = ctx.fillColor;
        ctx.clear();
        ctx.fillColor =color;
        // 判断角度
        if( _angle > 0 ){
            _nodeGraphics.position.leftLower = _y;
            // 起始点左下 为负
            ctx.moveTo(_x,_y);
            // 起始点右下 当前 y +(高度-倾斜度 -增加的倾斜度)- 高度
            let _rightLower = (_y + _a) - _colorShapeHeight;
            _nodeGraphics.position.rightLower = _rightLower;
            ctx.lineTo(_xx, _rightLower);
            // 结束右上
            let _upperRight = _y + _a;
            _nodeGraphics.position.upperRight = _upperRight;
            ctx.lineTo(_xx, _upperRight);
            // 结束左上
            let _upperLeft =  _y + _colorShapeHeight;
            _nodeGraphics.position.upperLeft = _upperLeft;
            ctx.lineTo(_x, _upperLeft);

        }else if(_angle < 0){
            let _leftLower = (_y + _a) - _colorShapeHeight;
            _nodeGraphics.position.leftLower = _leftLower;
            // 起始点左下
            ctx.moveTo(_x,_leftLower);
            _nodeGraphics.position.rightLower = _y;
            // 起始点右下
            ctx.lineTo(_xx, _y);
            // 结束右上
            let _upperRight = _y + _colorShapeHeight;
            // 结束左上
            let _upperLeft = _y + _a;
            _nodeGraphics.position.upperRight = _upperRight;
            ctx.lineTo(_xx, _upperRight);

            _nodeGraphics.position.upperLeft = _upperLeft;
            ctx.lineTo(_x, _upperLeft);
        }
        ctx.fill();
        this.nodeGraphicsMap.set(_name,_nodeGraphics);
        _y += _colorShapeHeight;
       }
    }