
(本文基于Cocos2d-x 3.x 版本)
一、文本渲染
由于主流引擎并没有对文字渲染做独立支持,所以在游戏中使用到的文字都是通过转存成一一对应的图像,然后再显示到屏幕上的;在 Cocos2d-x 中也是这样,它使用了 FreeType 的库来处理解析字体文件,将文本转换成字形(glyph),并合并生成对应的Texture 纹理图片,最后通过 OpenGL 完成渲染的过程,也就是说文本最终也是通过纹理的形式显示出来的;
简单描述一下,Cocos2d-x 需要显示一个纹理,除去纹理本身的信息外,还需要定义纹理对应的顶点信息,基本的顶点信息包括纹理坐标(顶点本身坐标)、颜色(顶点显示的颜色,默认为255)、UV坐标(顶点的纹理UV坐标)这三部分;
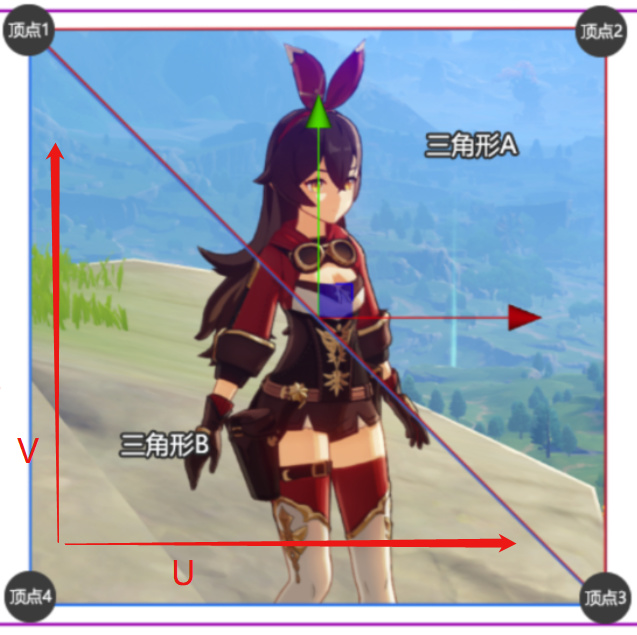
(如上图所示,两个三角形,四个顶点可以完整的显示一个纹理)
在引擎中,纹理渲染结构定义如下:
//! a Vec2 with a vertex point, a tex coord point and a color 4B
struct CC_DLL V3F_C4B_T2F
{
    //! vertices (3F)      三个顶点描述一个三角形
    Vec3     vertices;            // 12 bytes
    //! colors (4B)        RGBA四个颜色值
    Color4B      colors;          // 4 bytes
    // tex coords (2F)     UV坐标
    Tex2F        texCoords;       // 8 bytes
};
二、 CCLabel实现
Cocos2d-x 3.x 中通过 CCLabel 支持四种方式显示文字,具体定义分别是:
enum class LabelType {
    TTF,                    // TTF字体
    BMFONT,                 // 图片字体(BMFont)
    CHARMAP,                // 图集字体(CHARMAP)
    STRING_TEXTURE          // 原生字体渲染(系统字)
    };
除了原生渲染(STRING_TEXTURE)类型是直接生成一张文字图外,与其他三种都会根据对应的文字及字体类型生成FontAtlas 来完成渲染。
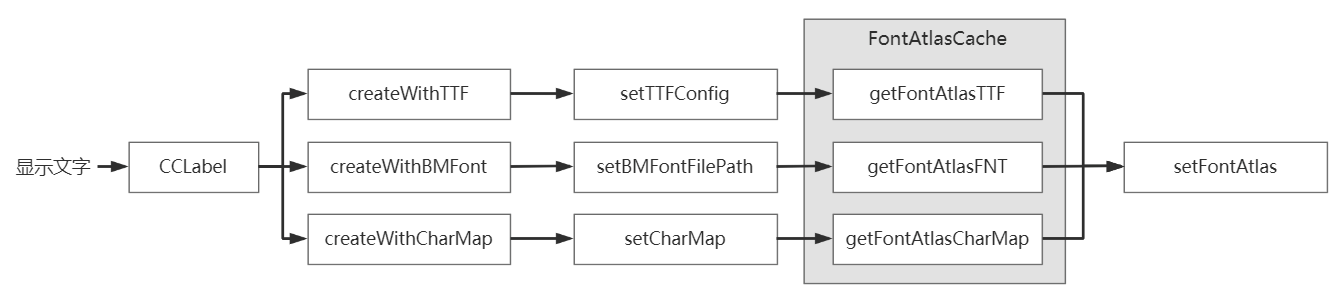
其中图片字(BMFONT)和图集字体(CHARMAP)每个文字都有现成的纹理可以获取到,只有TTF字体需要实时生成字体纹理;
// 生成TTF文字图集
FontAtlas * FontAtlasCache::getFontAtlasTTF(const TTFConfig & config, bool outlineNewFeature)
{
    ....
    //根据文件路径及字形信息成生文字图集的名称
    auto atlasName = generateFontName(config.fontFilePath, fontSize, GlyphCollection::DYNAMIC, useDistanceField, outlineNewFeature);
    ....
    if ( it == _atlasMap.end() )
    {
        // 使用 FreeType 库来生成字形信息
        auto font = FontFreeType::create(config.fontFilePath, fontSize, config.glyphs,
            config.customGlyphs, useDistanceField, config.outlineSize, outlineNewFeature);
        if (font)
        {
        // 根据字形信息生成文字图集(每个文字对应一个纹理)
            auto tempAtlas = font->createFontAtlas();
            ....
        }
    }
    ....
}
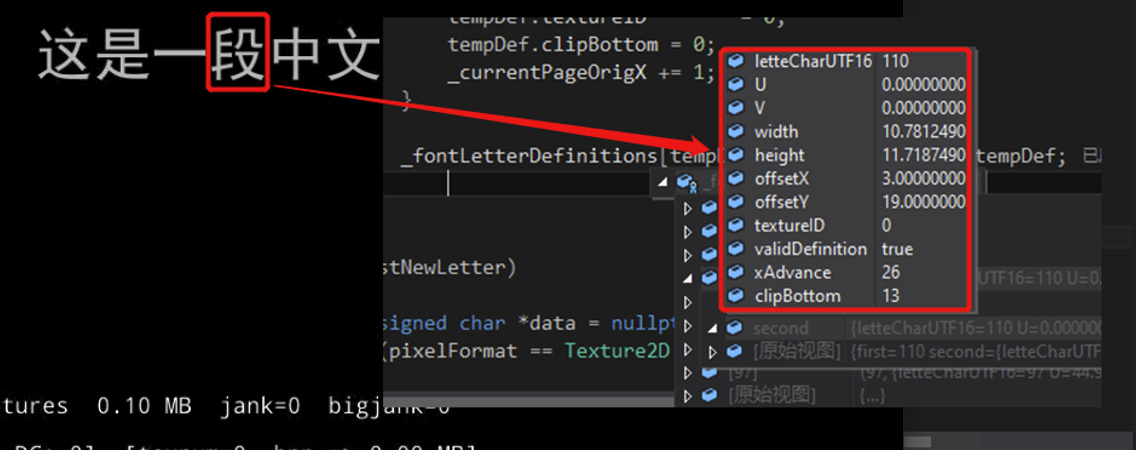
createFontAtlas 方法最终会调用到 FontAtlas::prepareLetterDefinitions 方法最后生成一组文本对应的纹理数据,最终文字渲染被统一成了对对应纹理的渲染操作;
三、 自定义颜色渲染
结合前文,在基于纹理渲染实现文本显示的前提下,可以通过直接修改对应文字的顶点颜色,从而达到显示不同颜色文本内容的效果;
因为数据是现成的,所以只要增加一个顶点颜色改变的方法就可以了,所以我们新增一个 ColorLabel 类实现相应的逻辑:
// ------------- ColorLabel.h 类定义:
class ColorLabel : public cocos2d::Label
{
public:
ColorLabel();
virtual ~ColorLabel();
static ColorLabel * create();
// 设置单个文字颜色
void setCharColor(int index, const cocos2d::Color3B color);
protected:
std::unordered_map<int, cocos2d::Color4B*> _charColors; // 记录每个字的颜色
protected:
virtual void updateColor() override;
};
// ------------- ColorLabel.cpp 具体实现:
// 更新指定位置的文本颜色
void ColorLabel::setCharColor(int index, const Color3B color)
{
if (nullptr == _textureAtlas)
{
return;
}
// 先存到 _charColor map 里,再刷新顶点颜色
_charColors[index] = &Color4B(color.r, color.g, color.b, _displayedOpacity);
updateColor();
}
// 重载基类颜色刷新方法
void ColorLabel::updateColor()
{
if (nullptr == _textureAtlas)
{ // 只处理 _textureAtlas 存在的情况,不存在则表示不是采用纹理方式绘制的文字
return;
}
Color4B color4(_displayedColor.r, _displayedColor.g, _displayedColor.b, _displayedOpacity);
Color4B* currColor;
// 特殊的不透明度预乘纹理
if (_isOpacityModifyRGB)
{
color4.r *= _displayedOpacity / 255.0f;
color4.g *= _displayedOpacity / 255.0f;
color4.b *= _displayedOpacity / 255.0f;
}
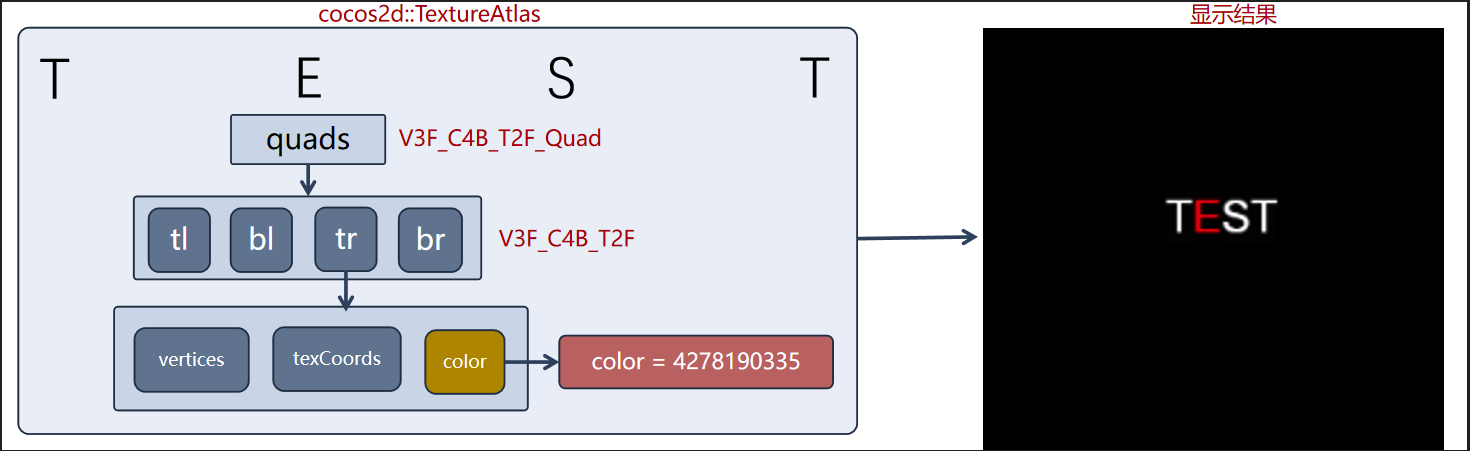
cocos2d::TextureAtlas* textureAtlas;
V3F_C4B_T2F_Quad *quads;
for (const auto& batchNode : _batchNodes)
{
textureAtlas = batchNode->getTextureAtlas(); // 获取文本对应的纹理
quads = textureAtlas->getQuads();
// 获取纹理对应的顶点
auto count = textureAtlas->getTotalQuads();
// 循环四个顶点,重置颜色值
for (int index = 0; index < count; ++index)
{ // 这里先取 _charColor 里修改的颜色值,如果没有再取原本的颜色
currColor = (_charColors.count(index)) ? _charColors.at(index) : &color4;
//if (_currentLabelType == LabelType::STRING_TEXTURE)
//{
// 这里准备处理系统字的颜色渲染
// 系统字会生成一整个纹理,无法取到单个文字的,所以暂时不做处理
//}
//else
//{ // 下面与基类方法处理相同
if (_useGradient) {
Color4B gradientColor(_gradientColor.r, _gradientColor.g, _gradientColor.b, _displayedOpacity);
if (_isOpacityModifyRGB)
{
gradientColor.r *= _displayedOpacity / 255.0f;
gradientColor.g *= _displayedOpacity / 255.0f;
gradientColor.b *= _displayedOpacity / 255.0f;
}
quads[index].bl.colors = gradientColor;
quads[index].br.colors = gradientColor;
}
else {
quads[index].bl.colors = *currColor;
quads[index].br.colors = *currColor;
}
quads[index].tl.colors = *currColor;
quads[index].tr.colors = *currColor;
textureAtlas->updateQuad(&quads[index], index);
}
}
}
同时为了能在编辑器下应用,需要再封装一个 UIColorText 类,来对接处理 ColorLabel 的显示;
// ------------- UIColorText.h 类定义:
class UIColorText : public cocos2d::ui::Text
{
protected:
    // 重载初始化渲染组件方法,方便用 ColorLabel 代替
    virtual void initRenderer() override;
public:
    UIColorText();
    virtual ~UIColorText();
    static UIColorText * create(const std::string& textContent, const std::string& fontName, int fontSize);
    // 开放 ColorLabel 的 setCharColor 方法
    void setCharColor(int index, const cocos2d::Color3B color);
};

// ------------- UIColorText.cpp 具体实现:
// 开放 ColorLabel 的 setCharColor 方法
void UIColorText::setCharColor(int index, const cocos2d::Color3B color)
{
    ColorLabel* pRenderer = dynamic_cast<ColorLabel*>(_labelRenderer);
    if (pRenderer) {
        pRenderer->setCharColor(index, color);
    }
}

void UIColorText::initRenderer()
{
    // 重载基类方法,用 ColorLabel 实例代替
    _labelRenderer = ColorLabel::create();
    addProtectedChild(_labelRenderer, -1, -1);
}
四、表现效果
下面给出简单的调用代码示例:
auto visibleSize = Director::getInstance()->getVisibleSize();
auto origin = Director::getInstance()->getVisibleOrigin();
UIColorText* colorText;
std::string textStr;
int nTop = origin.y + visibleSize.height / 2 + 100;
for (int i = 0; i < 3; i++) {
    // 显示的文本(简单处理)
    textStr = (i == 0) ? "normal piece of text" : ((i == 1) ? "color piece of text" : HelloWorld::StrToUTF8("这是一段中文彩色文本"));
    // 初始化 UIColorText 组件
    colorText = UIColorText::create(textStr, "fonts/simhei.ttf", TITLE_FONT_SIZE);
    colorText->setPosition(Vec2(origin.x + visibleSize.width / 2, nTop));

    // 设置整个文本的颜色(基类原有方法)
    colorText->setColor(ccc3(190, 190, 190));
    // 设置第7个文字的颜色为红色
    colorText->setCharColor(7, ccc3(255, 0, 0));
    this->addChild(colorText, 1);
    _colorTexts.push_back(colorText);
    nTop -= 40;
    }
最终结果呈现如下:
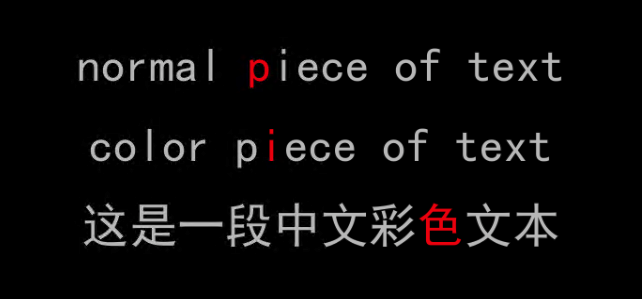
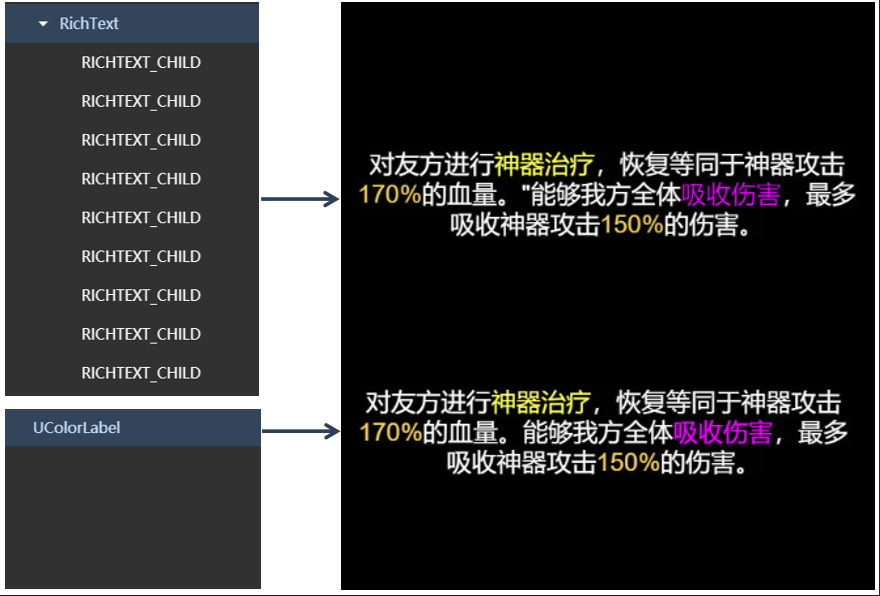
在使用 TTF 显示多颜色的应用场合下,UIColorText 可以实现比较理想的优化效果;特别是对比使用 RichText实现方式( UIColorText 不会像 RichText 那样产生很多子节点,这对于比较复杂的界面首次加载的性能影响是很大的),对比效果图如下:
对于系统字来说,按照当前的优化思路继续扩展,还可以实现很多有意思的表现效果,比如下面是彩色流光显示表现效果:
五、示例和参考
欢迎扫码关注我的公众号,获取 自定义多颜色文本组件示例DEMO,以及更多Cocos干货:
