
在creator2.4之后,官方引擎推出assetmanager这个新的资源管理器,当然assetbundle就是其中的一部分。
首先,推荐使用assetmanager来管理项目的资源,因为很友好,模块化,可移植性,管理的便利性还不错。
AssetBundle介绍
assetbundle是将相关资源整合成一个资源管理单位,在项目中,assetbundle的配置单元是按照文件夹来进行配置的,比如新建一个loadscene的文件夹,这里面可以有脚本,图集、音效、预制件、大图等等。配置的时候,需要指定加载的优先级,creator提供了1-10这几个优先级,内置的四个bundle包占用了 11 、 7、 8、 9,还有1、2、3、4、5、6、10。需要注意的是,数字越小,加载的优先级越低。
AssetBundle的优先级
这里需要处理的是,依赖资源的问题,不过我们可以借鉴unity中assetbundle的处理,比如提取一个公用资源作为单独的一个assetbundle包,然后将这个公用assetbundle的优先级设置为比依赖它的包的优先级都高,这样可以有效解决不同assetbundle包的资源互相依赖的问题,从而减少包体,当然你使用官方推荐的解决方式也是可以的。
AssetBundle的压缩类型
压缩类型,可以直接参考官方文档中的操作进行处理
AssetBundle的使用
使用是比较简单的,按照文档和自己项目的要求规划好资源,进行合理配置就行,如果项目只需要一个resources包,那么在resources下的资源都可以通过cc.resources内部的相关api进行调用使用。如果项目中严格按照新的资源管理器进行模块assetbundle规划的话,可以将rescoures视为一个公用资源的包体或者另外自己建立一个common包,将common包的优先级设置为高于其他模块assetbundle的层级,这样可以保证在加载其他模块时候,能够保证其他模块引用的公用资源已经被提前被加载过了。
项目中的使用
在测试工程中,划分了common、city、resources三个assetbundle包,如图
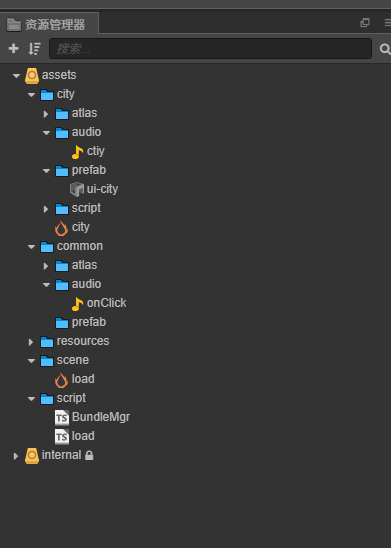
在common包中存放其他模块引用或者依赖的资源,city包中存放city场景相关的资源,load场景是游戏逻辑启动场景,这里使用这个工程演示一下assetbundle的的 使用。
主要演示,从load场景 通过加载citybundle包 切换场景,以及打开city中的ui和音效播放,基本这个流程是符合项目实际使用需要的。bundle包的加载在bundleMgr脚本中
bundleMgr.ts
负责加载bundle包中的资源,和释放相关资源
export type CompletedBundleCallBack = (error: Error, bundle: cc.AssetManager.Bundle) => void;
export type LoadResCompletedCallBack = (error: Error, resources: any) => void;
export type PreLoadResCompletedCallBack = (error: Error, resources: cc.AssetManager.RequestItem[]) => void;
/**
- Copyright © 2020—2020 xxx All rights reserved.
- Autor: Created by LiQ.F on 2020-08-26.
- Desc: 处理bundle资源包的加载
@exg Design:
@exp Use Cases:
*/
export class BundleMgr {
private static instance: BundleMgr = null;
public static getInstance(): BundleMgr {
    if (!this.instance) {
        this.instance = new BundleMgr();
    }
    return this.instance;
}

/**
 * 加载bundle
 * @param name 地址或名称
 * @param onCompleted 加载完成回调
 */
loadBundle(name: string, onCompleted: CompletedBundleCallBack) {
    cc.assetManager.loadBundle(name, onCompleted);
}

/**
 * 加载bundle,通过hash指定的方式
 * @param name
 * @param hashV
 * @param onCompleted
 */
loadBundleByHash(name: string, hashV: string, onCompleted: CompletedBundleCallBack) {
    cc.assetManager.loadBundle(name, { version: `${hashV}` }, onCompleted);
}

/**
 * 获取加载过缓存下来的bundle资源
 * @param name
 */
getBundle(name: string): cc.AssetManager.Bundle {
    return cc.assetManager.getBundle(name);
}

/**
 * 移除加载过缓存下来的bundle资源
 * @param cc.AssetManager.Bundle
 */
removeBundle(name: cc.AssetManager.Bundle) {
    cc.assetManager.removeBundle(name);
}

/**
 * 加载bundle中的资源
 * @param name bundle名
 * @param url 资源路径
 * @param type 资源类型
 * @param loadCompleted
 */
loadRes(name: string, url: string, type: typeof cc.Asset, loadCompleted: LoadResCompletedCallBack) {
    let finishCallBack = (error, bundle: cc.AssetManager.Bundle) => {
        if (!error) {
            bundle.load(url, type, loadCompleted);
        }
    }
    cc.assetManager.loadBundle(name, finishCallBack,);
}


/**
 * 加载bundle中dir中资源
 * @param name bundle名
 * @param url 资源路径
 * @param loadCompleted
 */
loadDirRes(name: string, url: string, type: typeof cc.Asset, loadCompleted: LoadResCompletedCallBack) {
    let finishCallBack = (error, bundle: cc.AssetManager.Bundle) => {
        if (!error) {
            if (type) {
                bundle.loadDir(url, type, loadCompleted);
            } else {
                bundle.loadDir(url, loadCompleted);
            }
        }
    }
    cc.assetManager.loadBundle(name, finishCallBack,);
}


/**
 * 加载bundle中的场景
 * @param name bundle名
 * @param sceneUrl 场景资源路径
 * @param type 资源类型
 * @param loadCompleted
 * @returns 该方法只会加载场景,而不会运行场景,如需运行请使用 `cc.director.runScene`
 */
loadScene(name: string, sceneUrl: string, loadCompleted: LoadResCompletedCallBack) {
    let finishCallBack = (error, bundle) => {
        if (!error) {
            bundle.loadScene(sceneUrl, loadCompleted);
        }
    }
    cc.assetManager.loadBundle(name, finishCallBack,);
}


/**
 * 预加载bundle中的资源
 * @param name
 * @param url
 * @param type
 * @param loadCompleted
 */
preloadRes(name: string, url: string, type: typeof cc.Asset, preloadCompleted: PreLoadResCompletedCallBack) {
    let finishCallBack = (error, bundle: cc.AssetManager.Bundle) => {
        if (!error) {
            bundle.preload(url, type, preloadCompleted);
        }
    }
    cc.assetManager.loadBundle(name, finishCallBack,);
}


/**
 * 预加载bundle中dir中的资源
 * @param name
 * @param url
 * @param type
 * @param preloadCompleted
 */
preloadDirRes(name: string, url: string, type: typeof cc.Asset, preloadCompleted: PreLoadResCompletedCallBack) {
    let finishCallBack = (error, bundle: cc.AssetManager.Bundle) => {
        if (!error) {
            bundle.preloadDir(url, type, preloadCompleted);
        }
    }
    cc.assetManager.loadBundle(name, finishCallBack,);
}


/**
 * 释放所有属于asset-bundle的资源
 */
relaseAllBundle(name: string) {
    let bundle = cc.assetManager.getBundle(name);
    if (bundle)
        bundle.releaseAll();
}


/**
 * 释放bundle中的某个资源
 * @param name
 * @param url
 * @param type
 */
relaseBundleRes(name: string, url: string, type: typeof cc.Asset) {
    let bundle = cc.assetManager.getBundle(name);
    if (bundle)
        bundle.release(url, type);
}
}
export let bundleMgr: BundleMgr = BundleMgr.getInstance();
load.ts
加载city包中的场景,并跳转
import { bundleMgr } from “./BundleMgr”;
const { ccclass, property } = cc._decorator;
@ccclass
export class start extends cc.Component {
onClick: cc.Node = null;
onLoad() {
this.onClick = cc.find(“onClick”, this.node);
if (this.onClick) this.onClick.on(“touchend”, this.onClickEvent, this);
}
onClickEvent() {
bundleMgr.loadScene(‘city’, ‘sceneCity’, (error, scene) => {
if (!error) {
cc.director.runScene(scene);
}
})
}
}
sceneCity.ts
场景跳转完,加载bundle中的预制件和脚本,播放音效
import { bundleMgr } from “…/…/script/BundleMgr”;
const { ccclass, property } = cc._decorator;
@ccclass
export class NewClass extends cc.Component {
onLoad() {
console.log(“进入city场景,加载bundle包中的预制件uiCity”);
bundleMgr.loadRes(‘city’, ‘prefab/uiCity’, cc.Prefab, (error, prefab) => {
if (!error) {
this.node.addChild(cc.instantiate(prefab));
}
})
console.log(“加载bundle中的city音效,并播放”)
bundleMgr.loadRes(‘city’, ‘audio/ctiy’, cc.AudioClip, (error, audio) => {
if (!error) {
cc.audioEngine.play(audio, true, 2);
}
})
}
}