Cocos Creator 扩展内置组件
起因
- 项目中很多按钮是拟物设计, 按下时, 子节点不能跟随移动, 看上去很怪。
第一个想到的就是把需要处理的按钮单独再挂一个脚本,后来为什么没这么做, 因为懒,一个一个按钮找,太难了,这时候想到了扩展 cc.Button 组件, 以前也尝试过,但是没有成功,这次借此机会。
扩展 Button 组件
扩展属性检查器
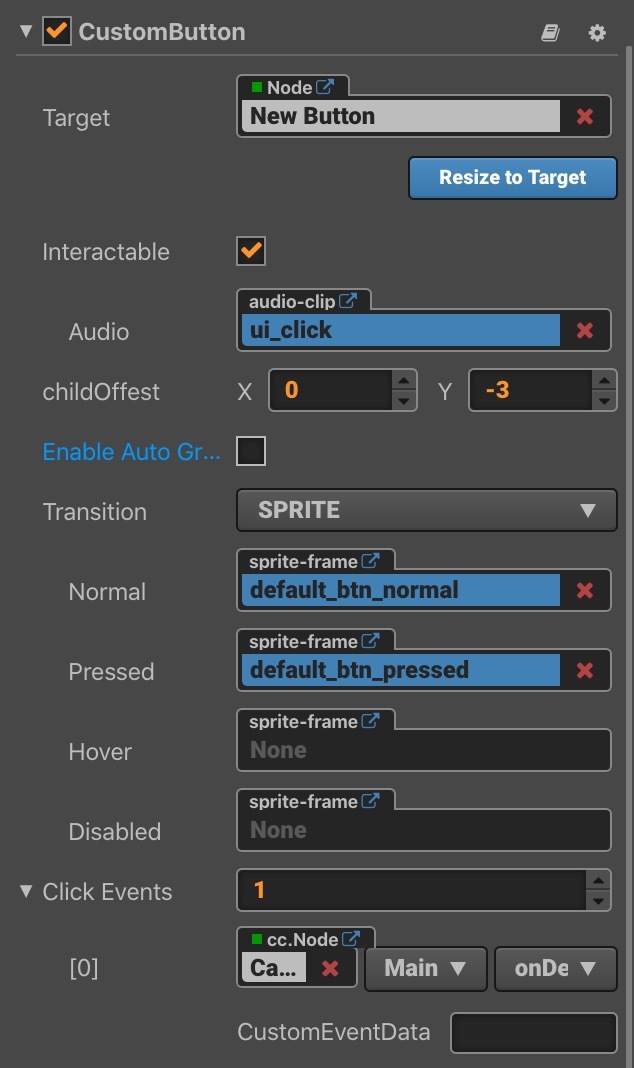
- 说干就干, 名字我都想好了就叫 ‘CustomButton’, 继承自 ‘cc.Button’。
const {ccclass, property} = cc._decorator;
@ccclass
export default class CustomButton extends cc.Button {
  //
}
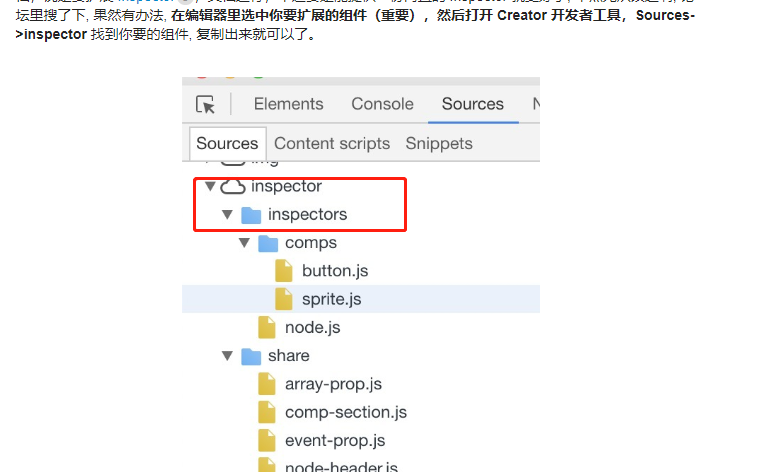
但是这属性检查器里面所有属性都显示出来了,第一次尝试就是因为这原因放弃了,显然哪里出了问题, 查阅文档,说是要扩展 Inspector,文档还行,不过要是能提供一份内置的 Inspector 就更好了, 不然无从改起啊, 论坛里搜了下, 果然有办法, 在编辑器里选中你要扩展的组件(重要),然后打开 Creator 开发者工具,Sources->inspector 找到你要的组件, 复制出来就可以了。
按照官方文档,新建一个插件 ‘custom-component’ 放到项目目录下。在插件根目录新建一个文件夹 ‘button’ 放 inspector.js ,照着葫芦画瓢修改一下, 增加自己组件需要的属性:
"use strict";
Vue.component("cc-button", {
template: `
    <ui-prop v-prop="target.target"
    :multi-values="multi"
    ></ui-prop>
    <div class="horizontal layout end-justified" style="padding:5px 0;margin-bottom:5px;">
    <ui-button class="blue tiny"
        @confirm="resetNodeSize"
        v-disabled="_checkResizeToTarget(target.target, multi)"
    >
        Resize to Target
    </ui-button>
    </div>
    <ui-prop
    v-prop="target.interactable"
    :multi-values="multi"
    >
    // 扩展触发音效支持
    </ui-prop>
    <ui-prop indent=1
        v-prop="target.audioClip"
        :multi-values="multi"
    ></ui-prop>
    // 扩展按下时支持子节点位置变化
    <div v-if="_checkTransition(target.transition, 2, multi)">
    <ui-prop name="childOffest" type="cc.Vec2" step="1"
        :multi-values="multi"
        v-value="target.childOffest.value"
        v-values="target.childOffest.values"
        v-readonly="target.childOffest.readonly"
        tooltip=${Editor.T("custom-component.childOffset")}
    ></ui-prop>

    </div>
    <ui-prop
    v-prop="target.enableAutoGrayEffect"
    v-show="_autoGrayEffectEnabled()"
    :multi-values="multi"
    ></ui-prop>
    <ui-prop
    v-prop="target.transition"
    :multi-values="multi"
    ></ui-prop>
    <div v-if="_checkTransition(target.transition, 1, multi)">
    <ui-prop indent=1
        v-prop="target.normalColor"
        :multi-values="multi"
    ></ui-prop>
    <ui-prop indent=1
        v-prop="target.pressedColor"
        :multi-values="multi"
    ></ui-prop>
    <ui-prop indent=1
        v-prop="target.hoverColor"
        :multi-values="multi"
    ></ui-prop>
    <ui-prop indent=1
        v-prop="target.disabledColor"
        :multi-values="multi"
    ></ui-prop>
    <ui-prop indent=1
        v-prop="target.duration"
        :multi-values="multi"
    ></ui-prop>
    </div>
    <div v-if="_checkTransition(target.transition, 2, multi)">
    <ui-prop indent=1
        v-prop="target.normalSprite"
        :multi-values="multi"
    ></ui-prop>
    <ui-prop indent=1
        v-prop="target.pressedSprite"
        :multi-values="multi"
    ></ui-prop>
    <ui-prop indent=1
        v-prop="target.hoverSprite"
        :multi-values="multi"
    ></ui-prop>
    <ui-prop indent=1
        v-prop="target.disabledSprite"
        :multi-values="multi"
    ></ui-prop>
    </div>
    <div v-if="_checkTransition(target.transition, 3, multi)">
    <ui-prop indent=1
        v-prop="target.duration"
        :multi-values="multi"
    ></ui-prop>
    <ui-prop indent=1
        v-prop="target.zoomScale"
        :multi-values="multi"
    ></ui-prop>
    </div>
    <cc-array-prop :target.sync="target.clickEvents"></cc-array-prop>
`,
props:
{
    target: { twoWay: !0, type: Object }, multi: { type: Boolean },
},
methods:
{
    T: Editor.T,
    resetNodeSize() {
        const t = { id: this.target.uuid.value, path: "_resizeToTarget", type: "Boolean", isSubProp: !1, value: !0 };
        Editor.Ipc.sendToPanel("scene", "scene:set-property", t);
    },
    _autoGrayEffectEnabled() {
        return !(1 === this.target.transition.value || 2 === this.target.transition.value && this.target.disabledSprite.value.uuid);
    },
    _checkResizeToTarget: (t, n) => !!n || !t.value.uuid,
    _checkTransition: (t, n, i) => i ? t.values.every(t => t === n) : t.value === n,
},
});
扩展脚本代码
TS脚本代码需要做如下操作, 引入 inspector.js 文件。
import GameUtil from "../../util/GameUtil";
const {ccclass, property, inspector, executeInEditMode, menu, help} = cc._decorator;

@ccclass
@executeInEditMode
@menu("i18n:MAIN_MENU.component.ui/Button")
@help("i18n:COMPONENT.help_url.button")
@inspector("packages://custom-component/button/inspector.js")
export default class CustomButton extends cc.Button {
    @property({
        type: cc.AudioClip,
        displayName: "Audio",
        tooltip: CC_DEV && "按钮触发时播放的音频剪辑",
    })
    private audioClip: cc.AudioClip = null;

    @property(cc.Vec2)
    private childOffest: cc.Vec2 = cc.v2(0, 0);

    private btnPressed: boolean = false;

    private btnRect: cc.Rect = null;

    // 这里注意注册和移除监听事件不要放到 onLoad 和 onDestory 里
    // 会导致现已经不显示的按钮, 拦截触摸事件, 导致层级低的按钮, 交互出现异常
    protected onEnable() {
        this.node.on(cc.Node.EventType.TOUCH_START, this.onTouchStart, this);
        this.node.on(cc.Node.EventType.TOUCH_CANCEL, this.onTouchCancel, this);
        this.node.on(cc.Node.EventType.TOUCH_MOVE, this.onTouchMove, this);
        this.node.on(cc.Node.EventType.TOUCH_END, this.onTouchEnd, this);
        super.onEnable();
        if (this.btnPressed) {
        this.subOffset();
        }
        this.btnPressed = false;
    }

    protected onDisable() {
        this.node.off(cc.Node.EventType.TOUCH_START, this.onTouchStart, this);
        this.node.off(cc.Node.EventType.TOUCH_CANCEL, this.onTouchCancel, this);
        this.node.off(cc.Node.EventType.TOUCH_MOVE, this.onTouchMove, this);
        this.node.off(cc.Node.EventType.TOUCH_END, this.onTouchEnd, this);
        super.onDisable();
    }

    private onTouchStart(event: cc.Event.EventTouch) {
        if (!this.interactable || !this.enabledInHierarchy) { return; }
        this.btnPressed = true;
        this.addOffset();
    }

    private onTouchCancel(event: cc.Event.EventTouch) {
        if (!this.interactable || !this.enabledInHierarchy) { return; }
        if (this.btnPressed) {
            this.subOffset();
        }
        this.btnPressed = false;
    }

    private onTouchMove(event: cc.Event.EventTouch) {
        if (!this.interactable || !this.enabledInHierarchy) { return; }
        this.btnRect = this.node.getBoundingBox();
        let pressed = true;
        const nodeVec = this.node.parent.convertToNodeSpaceAR(event.getLocation());
        if (!this.btnRect.contains(nodeVec)) {
            pressed = false;
        }
        if (this.btnPressed && !pressed) {
            this.subOffset();
        }
        if (!this.btnPressed && pressed) {
            this.addOffset();
        }
        this.btnPressed = pressed;
    }

    private onTouchEnd(event: cc.Event.EventTouch) {
        if (!this.interactable || !this.enabledInHierarchy) { return; }
        if (this.btnPressed) {
            this.audioClip && GameUtil.getInstance().playEffect(this.audioClip);
            this.subOffset();
        }
        this.btnPressed = false;
    }

    private addOffset() {
        if (this.transition !== cc.Button.Transition.SPRITE) {
            return;
        }
        if (this.childOffest.equals(cc.Vec2.ZERO)) {
            return;
        }
        for (const child of this.node.children) {
            child.position = child.position.add(this.childOffest);
        }
    }

    private subOffset() {
        if (this.transition !== cc.Button.Transition.SPRITE) {
            return;
        }
        if (this.childOffest.equals(cc.Vec2.ZERO)) {
            return;
        }
        for (const child of this.node.children) {
            child.position = child.position.sub(this.childOffest);
        }
    }
}
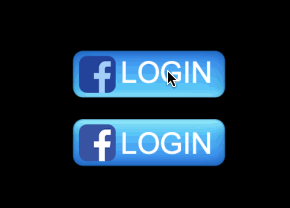
这样按钮支持设置按下时子节点移动多少距离,基本能满足目前的要求了, 同时支持了按钮触发音效,做成 prefab 拖到 creator 自定义组件里,再也不用担心按钮没有触发音效了。
替换内置组件
- 组件扩展好了,但是要怎么替换原来已经在使用的 cc.Button 组件呢?
有个小技巧。在脚本上右键显示资源 UUID 和路径的到如下输出:
51434b23-493e-46dc-a064-9d5ce8a7f692 (51Q0sjST5G3KBknVzop/aS),db://assets/script/view/common/CustomButton.ts
括号里面有个不知道干嘛的 ID, 用 UUID 的前 5 个字符替换括号内前 4 个字符得到一个串 ‘51434sjST5G3KBknVzop/aS’, 用这个串替换项目 fire 和 prefab 中所有的 cc.Button, 如下图

之后重启项目,项目中所有的 Button 组件就都替换为自定义的Button组件了, 对比下效果: