
不是第一次写这个东西了。
不是第一次发相关的帖了。

时隔一年,有点小空,再次打开了cocos。可惜发现以前的代码看不懂了…
重新写了角色跟随,发现自己思路清析了,代码更简单了。留个印记。
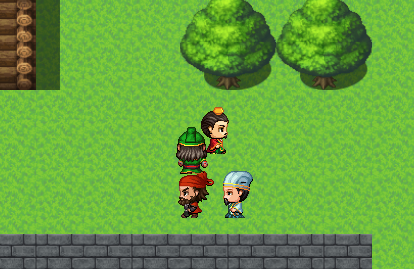
效果图
- 在队长node挂上Player.ts脚本
本脚本主要接收用户输入(键盘事件)—可以优化成触摸方向盘。
控制 moveDir 的值,使队长往某方向移动
移动时发射HeroMove事件,通知队长的Hero.ts脚本
- 在队长、队员node 挂Hero.ts脚本。
实现Node的移动
follow followNode 注意两个值 一般是脚本设置,为了测试,直接在编辑器中拖Node
给队长的followNode设置小弟1 给小弟1的followNode设置小弟2 …
那么 小弟2就会跟随小弟1跟随队长移动了
注意小弟们与队长的层级关系
上代码
Player.ts
import FollowCamera from "./FollowCamera";

const { ccclass, property } = cc._decorator;

@ccclass
export default class Player extends cc.Component {

    moveDir: cc.Vec3 = cc.Vec3.ZERO;
    timer: number = 0;
    timerTotal: number = 1 / 100;//1代表1秒执行一次
    speed: number = 4;//速度

    followCamera: FollowCamera;

    onLoad() {
        cc.systemEvent.on(cc.SystemEvent.EventType.KEY_DOWN, this.onKeyDown, this);
        cc.systemEvent.on(cc.SystemEvent.EventType.KEY_UP, this.onKeyUp, this);

    }

    start() {
        this.followCamera = cc.Camera.main.getComponent(FollowCamera);
        if (this.followCamera) {
            this.followCamera.setTarget(this.node);
        }
    }
    onKeyDown(event: cc.Event.EventKeyboard) {
        switch (event.keyCode) {
            case cc.macro.KEY.w:
                this.moveDir = cc.Vec3.UP
                break;
            case cc.macro.KEY.s:
                this.moveDir = cc.Vec3.UP.neg()
                break;
            case cc.macro.KEY.a:
                this.moveDir = cc.Vec3.RIGHT.neg()
                break;
            case cc.macro.KEY.d:
                this.moveDir = cc.Vec3.RIGHT
                break;
        }
    }

    onKeyUp(event: cc.Event.EventKeyboard) {
        switch (event.keyCode) {
            case cc.macro.KEY.w:
            case cc.macro.KEY.s:
            case cc.macro.KEY.a:
            case cc.macro.KEY.d:
                this.moveDir = cc.Vec3.ZERO;
                this.node.emit("HeroMoveStop");
                break;
        }
    }

    update(dt) {
        if (this.moveDir.equals(cc.Vec3.ZERO)) return;
        this.timer += dt;
        if (this.timer >= this.timerTotal) {
            this.timer = 0;
            this.move()
        }
    }

    move() {
        var v3 = this.node.position.add(this.moveDir.mul(this.speed));
        //TODO 判断是否可以移动到v3 地型检测
        var obj: HeroMoveObj = {
            position: v3,
            dir: this.moveDir
        };
        this.node.emit("HeroMove", obj);
    }

}
Hero.ts
import Helper from "./Lib/Helper";

const { ccclass, property } = cc._decorator;

@ccclass
export default class Hero extends cc.Component {


    @property
    heroName: string = "刘备";

    CSprite: cc.Sprite;
    CAnimation: cc.Animation;


    paths: HeroMoveObj[] = [];//移动路径
    @property
    pathLength: number = 30;//路径存储长度
    /**
     * 跟随者使用本英雄移动路径存储中的第N个位置
     * 12这个值是图块大小32像素除以移动速度4* 3/2得到的一个适合的值
    */
    @property
    pathDiff: number = 12;


    /**
     * 跟随在屁股后面的人
     * 应该是脚本中设置 在开发中拖放方便 先定义一个临时变量
     */
    follow: Hero;

    @property(cc.Node)
    followNode: cc.Node


    onLoad() {
        this.CSprite = this.getComponent(cc.Sprite);
        this.CAnimation = this.getComponent(cc.Animation);

        cc.resources.load("role/" + Helper.getRoleSpriteNameForName(this.heroName), cc.SpriteAtlas, (err, atlas: cc.SpriteAtlas) => {
            var sprites = atlas.getSpriteFrames();
            this.CSprite.spriteFrame = sprites[0];

            for (let name of Helper.dirNames) {
                var clip = cc.AnimationClip.createWithSpriteFrames(sprites.splice(0, 3), 6)
                clip.name = name;
                clip.wrapMode = cc.WrapMode.Loop;

                this.CAnimation.addClip(clip, name)
            }
        })
        this.node.on("HeroMove", this.heroMove, this);
        this.node.on("HeroMoveStop", this.heroMoveStop, this);


        this.paths.push({
            position: this.node.position,
            dir: cc.Vec3.UP
        });

    }

    start() {
        if (this.followNode) {
            this.follow = this.followNode.getComponent(Hero);
        }
    }

    // update (dt) {}


    heroMove(obj: HeroMoveObj) {

        if (!this.CAnimation) {
            return false;
        }


        this.node.position = obj.position;
        this.paths.push(obj);


        //通知跟随都移动到当前英雄的移动路径中的第n个位置
        if (this.follow) {
            var length = this.paths.length;
            var index = 0;
            if (length >= this.pathDiff) {
                index = length - this.pathDiff;
            }
            this.follow.heroMove(this.paths[index]);
        }

        if (this.paths.length > this.pathLength) {
            this.paths.shift();
        }


        var name = Helper.getDirForVec3(obj.dir);
        if (!this.CAnimation.currentClip || this.CAnimation.currentClip.name != name) {
            this.CAnimation.play(name);
        } else {
            var state = this.CAnimation.getAnimationState(name);
            if (state.isPaused) {
                this.CAnimation.playAdditive(name);
            }
        }
    }

    heroMoveStop() {
        this.CAnimation.pause();
        if (this.follow) {
            this.follow.heroMoveStop();
        }
    }


}