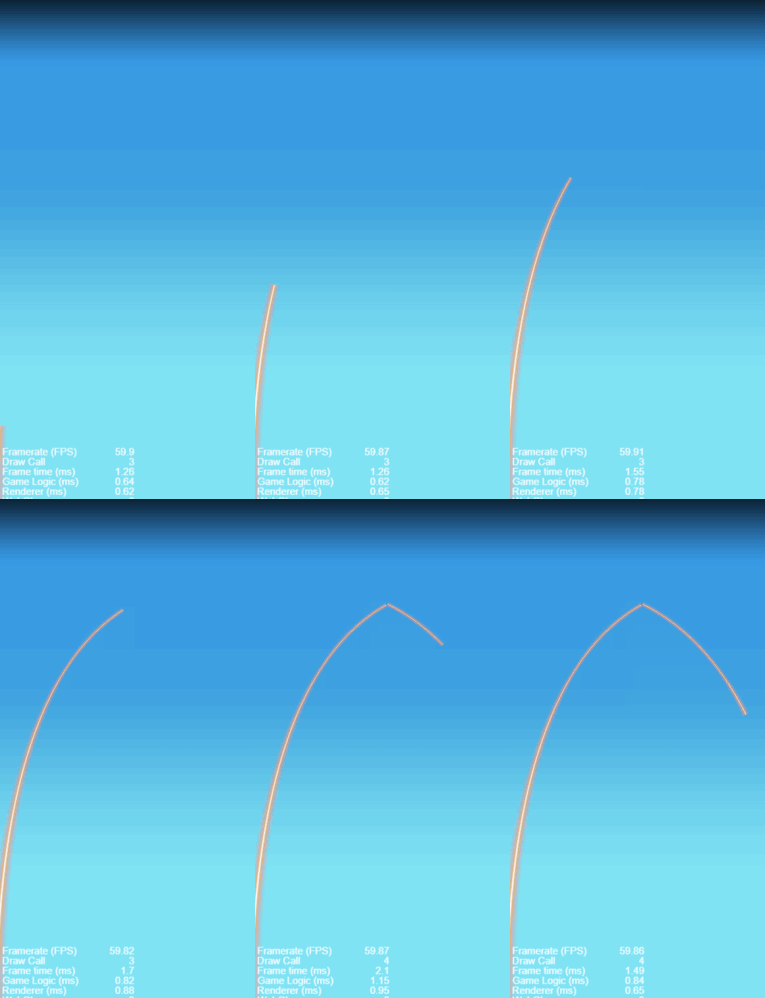
先看效果
代码:
画线.ts.zip (335 字节)
const { ccclass, property } = cc._decorator;
var config1 = [
{ color: cc.color(255, 147, 145, 51), width: 50, widthRatio: -1 },
{ color: cc.color(255, 147, 145, 80), width: 35, widthRatio: -1 },
{ color: cc.color(255, 172, 76, 125), width: 20, widthRatio: -1 },
{ color: cc.color(255, 255, 255, 125), width: 10, widthRatio: -1 },
{ color: cc.color(255, 255, 255, 255), width: 5, widthRatio: -1 },
]
var config2 = [
{ color: cc.color(255, 147, 145, 25), width: 30, widthRatio: 1 },
{ color: cc.color(255, 147, 145, 40), width: 20, widthRatio: 1 },
{ color: cc.color(255, 172, 76, 65), width: 10, widthRatio: 1 },
{ color: cc.color(255, 255, 255, 65), width: 5, widthRatio: 1 },
]
var UpLine = {
startPos: cc.v2(0, 0),
controlPos: cc.v2(0, 900),
endPos: cc.v2(360, 1100),
}
var downLine = {
startPos: cc.v2(360, 1100),
controlPos: cc.v2(400, -200),
endPos: cc.v2(800, 0),
}
var boomLine = {
startPos: cc.v2(0, 0),
controlPos: cc.v2(0, 900),
endPos: cc.v2(294, 1100),
}
var boomChip = [
{
ControlPos: cc.v2(330, 100),
EndPos: cc.v2(600, 0)
}, {
ControlPos: cc.v2(0, 500),
EndPos: cc.v2(0, 0)
},
{
ControlPos: cc.v2(354, -400),
EndPos: cc.v2(700, 0)
},
{
ControlPos: cc.v2(-274, -600),
EndPos: cc.v2(-274, 0)
},
{
ControlPos: cc.v2(-234, -800),
EndPos: cc.v2(-234, 0)
},
{
ControlPos: cc.v2(1100, -500),
EndPos: cc.v2(1100, 0)
},
]
@ccclass
export default class BeamView extends cc.Component {
// @property(cc.Graphics) paint1: cc.Graphics = null;
// @property(cc.Graphics) paint2: cc.Graphics = null;

start() {
    this.BeamBoom();
}

//------------------------------外部引用------------------------------
//上升曲线
public BeamUp() {
    let paint1 = this.GetNewPaint();
    let t = 0
    let inter = 8;
    //画线
    this.GradientCurve(paint1, config1, inter, UpLine.startPos, UpLine.controlPos, UpLine.endPos, t, () => {
        this.BeamDown();
    })

}
//下降曲线
public BeamDown() {
    let paint2 = this.GetNewPaint();
    this.GradientCurve(paint2, config1, 10, downLine.startPos, downLine.controlPos, downLine.endPos, 0);
}

//爆炸曲线
public BeamBoom() {
    let paint3 = this.GetNewPaint();
    this.GradientCurve(paint3, config1, 10, boomLine.startPos, boomLine.controlPos, boomLine.endPos, 1);
    this.GradientCurve(paint3, config2, 10, boomLine.endPos, boomChip[0].ControlPos, boomChip[0].EndPos, 0);
    this.GradientCurve(paint3, config2, 10, boomLine.endPos, boomChip[1].ControlPos, boomChip[1].EndPos, 0);
    this.GradientCurve(paint3, config2, 10, boomLine.endPos, boomChip[2].ControlPos, boomChip[2].EndPos, 0);
    this.GradientCurve(paint3, config2, 10, boomLine.endPos, boomChip[3].ControlPos, boomChip[3].EndPos, 0);
    this.GradientCurve(paint3, config2, 10, boomLine.endPos, boomChip[4].ControlPos, boomChip[4].EndPos, 0);
    this.GradientCurve(paint3, config2, 10, boomLine.endPos, boomChip[5].ControlPos, boomChip[5].EndPos, 0);
}


//----------------------------------绘画封装-----------------------------------

/**
   * 渐变曲线 从p0逐渐画到p2
   * @param paint 画笔
   * @param config 配置
   * @param inter 完成时间
   * @param p0 起点
   * @param p1 控制点
   * @param p2 终点
   * @param t  起始比例
   */
public GradientCurve(paint: cc.Graphics, config, inter: number, p0: cc.Vec2, p1: cc.Vec2, p2: cc.Vec2, t: number = 0, callBack = null) {
    let pt = 0;
    let step = (1 - t) / (inter * 25);
    let pre: cc.Vec2 = p0;
    let width;

    while (pt < t) {//绘制固定区域
        pt += 0.01;
        let pEndPos = this.BesselCurve(pt, p0, p1, p2);
        if (config[0].widthRatio < 0) {
            width = p2.y > p0.y ? 1 - pt : pt
        }
        else {
            width = config[0].widthRatio
        }
        this.DrawLines(paint, config, pre, pEndPos, this.limt(0.3, width, 1));
        pre = pEndPos;
    }
    //绘制动态区域
    let leng = inter * 25;
    let loop = () => {
        pt += step;
        if (pt > 1) {
            this.unschedule(loop);
            callBack && callBack();
        }
        else {
            let pEndPos = this.BesselCurve(pt, p0, p1, p2);
            if (config[0].widthRatio < 0) {
                width = p2.y > p0.y ? 1 - pt : pt
            }
            else {
                width = config[0].widthRatio
            }
            this.DrawLines(paint, config, pre, pEndPos, this.limt(0.3, width, 1));
            pre = pEndPos;
        }
    }
    this.schedule(loop, 0.04, leng + 10)
}


/**
 * 画重叠的直线
 * @param panit 画笔
 * @param start 开始节点
 * @param end 结束节点
 * @param config 配置
 * @param widthRatio 宽度比例
 */
public DrawLines(panit: cc.Graphics, config, start: cc.Vec2, end: cc.Vec2, widthRatio: number) {
    for (let i = 0; i < config.length; i++) {
        this.DrawLine(panit, start, end, config[i].color, config[i].width * widthRatio);
    }
}


/**
 * 画直线
 * @param panit 画笔
 * @param p0  起点
 * @param p1  终点
 * @param color 颜色
 * @param width 宽度
 */
public DrawLine(panit: cc.Graphics, p0: cc.Vec2, p1: cc.Vec2, color: cc.Color, width: number) {
    panit.strokeColor = color;
    panit.lineWidth = width;
    panit.moveTo(p0.x, p0.y);
    panit.lineTo(p1.x, p1.y);
    panit.stroke();
}

/**
 * 获得一条贝塞尔曲线上的点
 * @param t  x比例
 * @param p0 起点
 * @param p1 控制点
 * @param p2 重点
 * @returns 对应的坐标
 */
public BesselCurve(t: number, p0: cc.Vec2, p1: cc.Vec2, p2: cc.Vec2) {
    let a1 = p0.mul((1 - t ** 2));
    let a2 = p1.mul((2 * t * (1 - t)));
    let a3 = p2.mul(t ** 2);
    return a1.add(a2.add(a3));
}


//---------------------------------工具封装-----------------------------------------------------------

/**获得新的笔刷 */
public GetNewPaint() {
    let node = new cc.Node();
    this.node.addChild(node);
    return node.addComponent(cc.Graphics);
}

/**
 * 控制number在min和max之间
 * @param min
 * @param number
 * @param max
 */
public limt(min, number, max) {
    return Math.min(Math.max(min, number), max);
}

onDestroy() {
    this.unscheduleAllCallbacks(); // 销毁所有定时器
}
}
希望能在论坛上多嫖点Graphics代码 


