如何实现全面屏
- 问题描述 :
Cocos游戏适配HarmonyOS NEXT平台后,游戏是如何实现全面屏?
- 解决方案 :
参考@ohos.window (窗口)实现游戏屏幕窗口的全面屏。先调用setWindowLayoutFullScreen()接口,设置游戏主窗口为 全屏布局 ,再调用setWindowSystemBarEnable()接口,不显示屏幕窗口的导航栏、状态栏,从而实现全面屏的效果。样例代码如下:

您可以在适配HarmonyOS NEXT平台后参照这个思路开启/取消游戏的全面屏。
// Get the Main window instance
let windowClass = null;
windowStage.getMainWindow((err, data) => {
  if (err.code) {
    console.error('Failed to obtain the main window. Cause: ' + JSON.stringify(err));
    return;
  }
  windowClass = data;
  console.info('Succeeded in obtaining the main window. Data: ' + JSON.stringify(data));

  // 设置窗口为全屏布局,配合设置导航栏、状态栏是否显示,与主窗口显示保持协调一致。
  let isLayoutFullScreen= true;
  windowClass.setWindowLayoutFullScreen(isLayoutFullScreen, (err) => {
    if (err.code) {
      console.error('Failed to set the window layout to full-sceen mode. Cause:' + JSON.stringify(err));
      return;
    }
    console.info('Succeeded in setting the window layout to full-screen mode.');
  });

  // 设置状态栏和导航栏是否显示。例如,需全部显示,该参数设置为['status', 'navigation'];不设置,则默认不显示。
  let isVisible = [];
  windowClass.setWindowSystemBarEnable(isVisible, (err) => {
    if (err.code) {
      console.error('Failed to set the system bar to be invisible. Cause:' + JSON.stringify(err));
      return;
    }
    console.info('Succeeded in setting the system bar to be invisible.');
  });
});
如何拉起软键盘
- 问题描述 :
若游戏项目使用了Cocos Creator引擎中的editbox组件,在适配HarmonyOS NEXT平台后,游戏是通过基础工程中的哪个HarmonyOS NEXT组件拉起软键盘的?
- 解决方案 :
自定义Dialog,在Dialog上展示TextInput组件和按钮,TextInput基础组件是ArkTS封装的单行文本输入框组件,可以通过触摸拉起软键盘,TextInput的详细说明可参见TextInput基础组件。样例代码如下:
@CustomDialog
export struct EditBoxDialog {
  private showMessage: string = ''
  private inputMessage: string = ''
  onTextChange: (msg: string) => void
  accept: (msg: string) => void
  controller: CustomDialogController
  cancel: () => void
  confirm: () => void

  build() {
    Column() {
      Row() {
        TextInput({ text: this.showMessage })
          .backgroundColor('#ffffff')
          .layoutWeight(1)
          .onChange((value) => {
            if (this.onTextChange) {
              this.onTextChange(value);
            }
            this.inputMessage = value;
          })
          .onSubmit((value) => {
            if (this.accept) {
              this.accept(this.inputMessage);
            }
            this.controller.close();
          })
        Blank(8).width(16)
        Button('完成').onClick(() => {
          if (this.accept) {
            this.accept(this.inputMessage);
          }
          this.controller.close();
        })
      }.padding({ left: 8, right: 8, top: 8, bottom: 8 })
      .backgroundColor(Color.Gray)
    }
    .width('100%')
    .justifyContent(FlexAlign.End)
  }
}
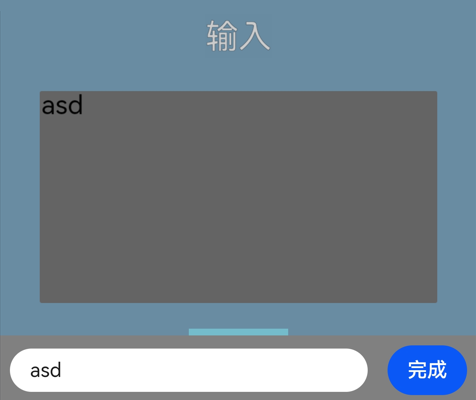
游戏拉起软键盘的效果如图所示:
如何播放视频
- 问题描述 :
若游戏项目使用了Cocos Creator引擎中的video组件,在适配HarmonyOS NEXT平台后,游戏是通过基础工程中的哪个HarmonyOS NEXT组件正常播放视频的?
- 解决方案 :
使用video组件可以正常播放视频,因为video组件集成化程度更高,使用简单,更容易调用,video组件的使用指导请参见video组件开发指导,video组件中的通用属性请参见组件通用属性介绍,您可以参考engine-native\templates\openharmony\native\engine\openharmony\entry\src\main\ets\components路径下的CocosVideoPlayer.ets。样例代码如下:
@Component
export struct CocosVideoPlayer {
  @ObjectLink videoInfo: VideoInfo;
  public workPort: PortProxy;
  build() {
    Video({ src: this.videoInfo.url, controller: this.videoInfo.controller, currentProgressRate:this.videoInfo.currentProgressRate })
      .position({ x: this.videoInfo.x, y: this.videoInfo.y })
      .width(this.videoInfo.w)
      .height(this.videoInfo.h)
      .controls(false)
      .autoPlay(false)
      .onStart(() => {
        this.workPort.postMessage("onVideoEvent",{videoTag:this.videoInfo.viewTag, videoEvent:EventType.PLAYING});
      })
      .onPause(() => {
        this.workPort.postMessage("onVideoEvent",{videoTag:this.videoInfo.viewTag, videoEvent:EventType.PAUSED});
      })
      .onFinish(() => {
        this.workPort.postMessage("onVideoEvent",{videoTag:this.videoInfo.viewTag, videoEvent:EventType.COMPLETED});
      })
      .onPrepared((event: {
        duration: number;
      }) => {
        this.videoInfo.duration = event.duration;
        this.workPort.postMessage("onVideoEvent",{videoTag:this.videoInfo.viewTag, videoEvent:EventType.READY_TO_PLAY, args:event.duration});
      })
      .onClick((event: ClickEvent) => {
        this.workPort.postMessage("onVideoEvent",{videoTag:this.videoInfo.viewTag, videoEvent:EventType.CLICKED});
      })
      .onUpdate((event?: {
        time: number;
      }) => {
        this.videoInfo.currentTime = event.time
        this.workPort.postMessage("onVideoEvent",{videoTag:this.videoInfo.viewTag, videoEvent:EventType.UPDATE, args:event.time});
      })
      .onFullscreenChange((event?: {
        fullscreen: boolean;
      }) => {
        if (!event.fullscreen) {
          this.workPort.postMessage("onVideoEvent",{videoTag:this.videoInfo.viewTag, videoEvent:EventType.QUIT_FULLSCREEN});
        }
        this.videoInfo.isFullScreen = event.fullscreen
      })
      .visibility(this.videoInfo.visible ? Visibility.Visible : Visibility.None)
  }
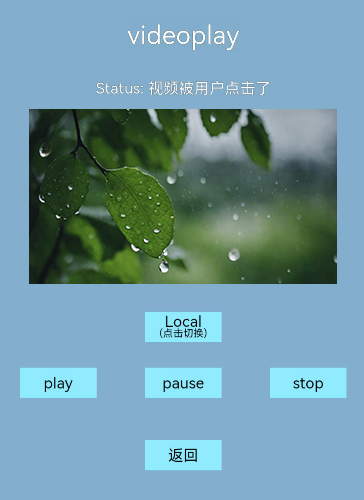
效果图如下:
如何调用对话框?
- 问题描述 :
在游戏中如何调用对话框?
- 解决方案 :
对话框需在ArkTs的主线程中调用HarmonyOS NEXT SDK中UI界面的弹窗接口,UI界面的弹窗接口详情可参见@ohos.promptAction (弹窗)。
- 导入模块。
import promptAction from '@ohos.promptAction'
import promptAction from '@ohos.promptAction'
private pro = new process.ProcessManager();

onBackPress() {
console.log("[LIFECYCLE-Page] cocos onBackPress");
try {
promptAction.showDialog({
title: "提示",
message: "确认退出游戏吗",
buttons: [
{
text: '取消',
color: '#000000'
},
{
text: '确认',
color: '#000000'
}
],
}).then(data => {
console.info('showDialog success, click button: ' + data.index);
if(data.index == 0) {
console.info('showDialog click button cancel');
return;
} else {
console.info('showDialog click button ok');
this.pro.exit(0);
}
}).catch(err => {
console.info('showDialog error: ' + err);
})
} catch (error) {
console.error(`showDialog args error code is ${error.code}, message is ${error.message}`);
};
// If disable system exit needed, remove comment "return true"
return true;
}
游戏拉起 Dialog 对话框的效果如图所示:

如何处理侧滑/按返回键的逻辑?
- 问题描述 :
在游戏中如何定制侧滑或者返回键的逻辑?
- 解决方案
HarmonyOS NEXT平台默认在游戏中 侧滑 、 按手机返回键 会直接触发应用进程的关闭。组件生命周期中提供了onBackPress方法,若游戏中用户侧滑、按返回键时触发(仅@Entry装饰的自定义组件生效)。

若需要禁用侧滑、按返回键后直接关闭游戏的能力,须保留return true。若在侧滑、按返回键时直接退出应用,需注释掉return true。
@Entry
@Component
struct Index {
// ...
  onBackPress() {
    console.log("[LIFECYCLE-Page] cocos onBackPress");
    this.workPort.postMessage("backPress", "");
    // If disable system exit needed, remove comment "return true"
    // return true
  }
// ...
}
若想执行自定义的JS逻辑,可在Cocos Creator的游戏JS代码中加上 cc.SystemEvent.EventType.KEY_UP 监听事件,样例如下:
cc.systemEvent.on(cc.SystemEvent.EventType.KEY_UP, function(e) {
switch (e.keyCode) {
case cc.macro.KEY.back:
case cc.macro.KEY.backspace:
//游戏定制逻辑
if (!t.alterNode || !t.alterNode.isValid) {
    t.alterNode = cc.instantiate(t.alter);
    t.node.addChild(t.alterNode);
  }
}
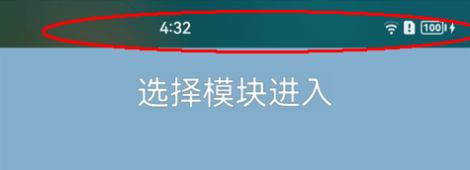
如何修改状态栏的背景色和字体颜色
- 问题描述 :
游戏过程中下滑并展示状态栏时,状态栏的黑色字体与游戏背景重色。
- 解决方案 :
通过如下方式修改状态栏背景色和字体颜色,让用户在游戏过程中清晰地看到状态栏的文字:
- 方式一:在初始化修改状态栏背景色和字体颜色 。您可以初始化时根据参数的不同修改背景颜色或字体颜色。
let windowClass = null;
windowStage.getMainWindow((err, data) => {
    if (err.code) {
        console.error('Failed to obtain the main window. Cause: ' + JSON.stringify(err));
        return;
    }
    windowClass = data;
    ...
    // 设置状态栏颜色和字体颜色
    let sysBarProps: window.SystemBarProperties = {
        // 状态栏颜色
        statusBarColor: '#ff292929',
        // 状态栏内容颜色
        statusBarContentColor: '#ffffff',
    };
    windowClass.setWindowSystemBarProperties(sysBarProps, (err: BusinessError) => {
        let errCode: number = err.code;
        if (errCode) {
            console.error('Failed to set the system bar properties. Cause: ' + JSON.stringify(err));
            return;
        }
        console.info('Succeeded in setting the system bar properties.');
    })
})
- 方法二:动态修改状态栏背景色和字体颜色 。您可以使用EventHub事件实现通知和传参功能,具体实现步骤如下:
- 在EntryAbility.ts -> onForeground()方法添加监听事件,并更改windowClass变量声明变为EntryAbility类全局变量。
onForeground() {
    // Ability has brought to foreground
    nativeAppLifecycle.onShow();
    // callback被emit触发时,调用方是EventHub对象,如果要修改callback中this的指向,可以使用箭头函数。
    // 改变系统栏属性
    this.context.eventHub.on("changeSystemBar", (e:window.SystemBarProperties)=>{
        this.windowClass.setWindowSystemBarProperties(e, (err: BusinessError) => {
            let errCode: number = err.code;
            if (errCode) {
                console.error('Failed to set the system bar properties. Cause: ' + JSON.stringify(err));
                return;
            }
            console.info('Succeeded in setting the system bar properties.');
        });
    });
}
- 在index.ets -> aboutToAppear()方法接收worker线程与ui主线程通信。
case "changeSystemBar": { // 改变状态栏
    getContext(this).eventHub.emit("changeSystemBar", msg.param as window.SystemBarProperties);
    break;
}
- 在游戏业务代码里面发消息动态更改状态栏。
const sysBarProps = {
    // statusBarColor: '#ff00ff',
    statusBarContentColor: '#ffff0000',
};
globalThis.oh.postMessage("changeSystemBar", sysBarProps);
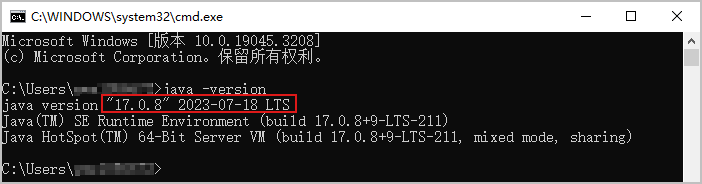
Build Hap时报错code:109
- 问题描述 :
在DevEco Studio中Build Hap调试时,出现如下报错:
ERROR - hap-sign-tool: error: ACCESS_ERROR, code: 109. Details: Init keystore failed: parseAlgParameters failed: ObjectIdentifier() -- data isn't an object ID (tag = 48)co
- 解决方案 :
JDK的版本需大于等于17,请先升级,再配置JAVA环境变量。
Build Hap提示访问npm仓库404
- 问题描述 :
在DevEco Studio中Build Hap时提示访问npm仓库404报错。

- 解决方案 :
- 打开C盘用户目录下的 .npmrc。 若没有该文件,请新建txt文本文档,再将文档名称改为 .npmrc ,代码行复制到文件中后,保存并关闭文件。
strict-ssl=false
sslVerify=false
registry=https://repo.huaweicloud.com/repository/npm/
@ohos:registry=https://repo.harmonyos.com/npm/
- 在当前路径下进入Windows命令行窗口,执行如下命令,验证访问npm库是否正常。
npm info express
若执行结果如下图所示,说明设置成功。

Build Hap时报错JS heap out of memory
- 问题描述 :
在DevEco Studio中Build Hap时出现如下报错:
> hvigor ERROR: Failed :entry:default@CompileArkTS...
> hvigor ERROR: Worker terminated due to reaching memory limit: JS heap out of memory
> hvigor ERROR: BUILD FAILED in 31 min 47 s 749 ms
- 解决方案:
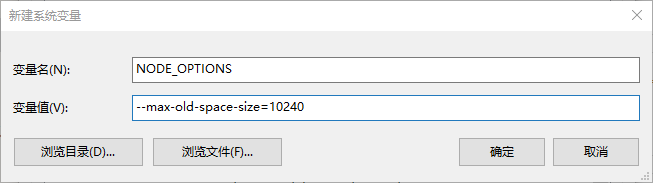
这是因为编译时内存不足,请根据main/index.js的大小设置NODE_OPTIONS的变量值,例如–max-old-space-size=10240,环境变量配置后重启电脑才生效。
Build Hap时出现报错the size of programs is repect to be 22,but is 20?
- 问题描述 :
在DevEco Studio中bulid Hap调试包时,出现如下报错:
the size of programs is expect to be 22 , but is 20

- 解决方案 :
“the size of programs is expect to be 22”表示预期的程序大小是22,“but is 20”表示实际上的程序大小只有20,比预期的要小,这可能意味着程序的某些功能没有完全实现,或者代码被优化得更紧凑,需在DevEco Studio中继续往上查看报错具体的代码位置,显然发现该报错是在ets文件转HarmonyOS系统的abc文件时出现错误,继续查看到是三方代码SDK代码GOBE.js:6390:16这行的报错。我们直接在控制台点击该行报错,定位到具体的文件中。
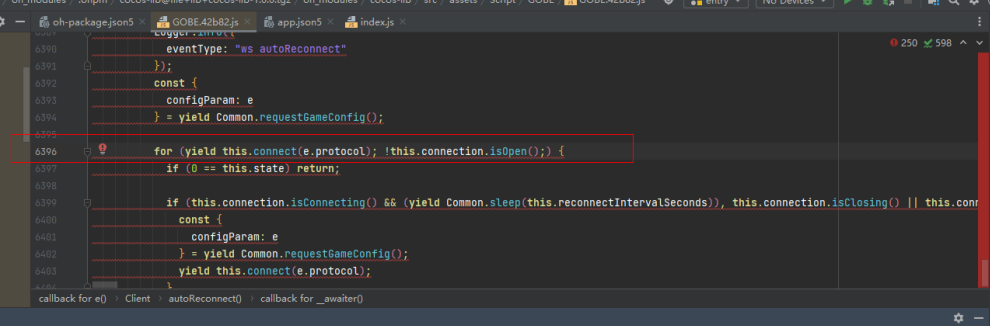
发现该行代码报错,据了解,若 yield 在其它表达式中,需单独括起来,yield所在代码行改成如下。修改完成后,编译运行成功。
for ((yield this.connect(e.protocol)); !this.connection.isOpen();)
DevEco Studio Build Hap包时失败
- 问题描述 :
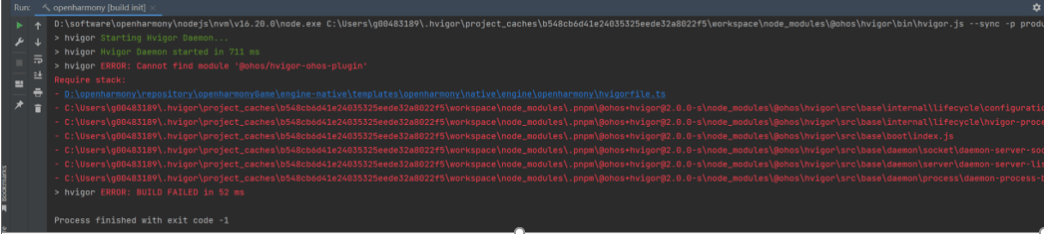
在DevEco Studio中Build Hap时,出现如下报错:
Task assembleApp not found in hvigor node: openharmony.
- 可能原因 :
a.项目编码有问题。
b.本地系统缓存有问题。
c.本地DevEco Studio环境有问题。
定位过程:
a.同一份项目,同事编译成功,排除项目编码的问题。
b.重启电脑,在DevEco Studio中再次编译,出现一样的报错信息,排除系统缓存的问题。
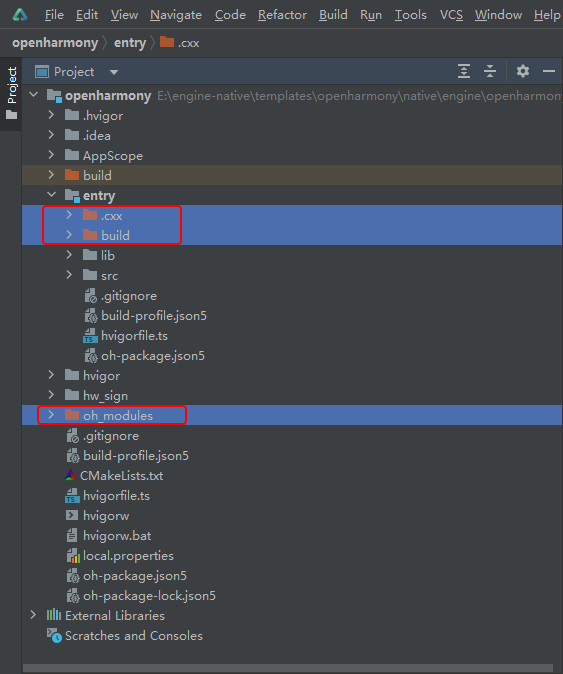
c.删除项目缓存 .cxx 文件夹、 build 文件夹、 oh_modules 文件夹后重新编译,还是出现一样的报错信息。
d.在Deveco Studio中打开另一个HarmonyOS NEXT项目进行编译,又出现了如下报错:
Task assembleApp not found in hvigor node: openharmony.
e.结合报错信息,猜测是 hvigor 缓存问题,删除C盘用户目录下的 .hvigor 文件夹,编译HarmonyOS NEXT工程还是报错。
f.再继续看一下,发现运行后项目目录下也会有个.hvigor目录,删除.hvigor目录,重新编译后成功。
- 问题总结 :
主要是因为DevEco Studio缓存导致的。由于更换了engine-native\templates\openharmony\native\engine\openharmony\entry路径下build-profile.json5文件中arguments的-DRES_DIR/-DCOMMON_DIR/-DCOCOS_X_PATH的路径后进行编译,新老两个路径来回切换,导致hvigor工具出现缓存问题。 卸载重装DevEco Studio,有的同事可以解决此问题,有的同事不可以。能解决此问题的是因为换了项目目录,而不是重装了DevEco解决。
- 解决方案 :
删除本地用户路径下的.hvigor文件夹,也要在DevEco Studio中删除工程目录下.hvigor缓存文件和oh_modules下的.hvigor缓存文件。
DevEco Studio编译时报错xxx has 178 characters, the maximum full path to an object file is 250
- 问题描述 :
拷贝jsb-link文件夹到HarmonyOS NEXT基础工程后,在DevEco Studio中编译工程时出现如下报错:
xxx has 178 characters,the maximun full path to an object file is 250
- 解决方案 :
该报错是因为DevEco Studio限制打开的工程路径最长为250个字符。由于提供的HarmonyOS NEXT基础项目路径本身较长,建议将Cocos Creator引擎代码直接下载到某个盘符的根目录下。
DevEco Studio编译时报错BundleName in the project configuration does not match that in the SigningConfigs
- 问题描述 :
在DevEc oStudio编译HarmonyOS NEXT基础工程时出现如下报错:
BundleName in the project configuration does not match that in the SigningConfigs.
- 解决方案 :
该报错是因为配置签名时的bundleName和app.json5配置文件中的bundleName不一致,我们需将两处的bundleName保持一致。Cocos游戏项目在适配HarmonyOS NEXT平台的过程中,需将bundleName的参数值保持前后一致。
DevEco Studio签名打包报错BundleName in the project configuration does not match that in the SigningConfigs
- 问题描述 :
在DevEco Studio中为HarmonyOS NEXT游戏配置签名信息时,出现如下报错信息:
BundleName in the project configuration does not match that in the SigningConfigs,
- 定位过程 :
- 分析报错信息,原因是 app.json5 文件中的Bundle Name与 Signing Configs 窗口中的Bundle Name不一致: app.json5 文件中的包名是com.lianyun.harmOS.huawei,也是当前HarmonyOS项目的包名。 Signing Configs 窗口中填写的包名是lianyun.harmos.huawei。
- 在DevEco Studio中打开Signing Configs窗口,将Bundle Name修改为当前HarmonyOS项目的包名,再次打包仍旧出现同样的提示错误。
3. 仔细检查 **Signing Configs** 窗口中上传的签名证书,发现 **Profile file(*.p7b)** 证书和 **Certpath file(*.cer)** 证书均与 **Bundle Name** 绑定,之前仅修改Bundle Name,但未重新上传相关联的证书文件。
- 解决方案 :
在Signing Configs窗口除了修改Bundle name,还需重新上传相关联的.p7b和.cer文件。
-
在DevEco Studio中生成证书请求文件(.csr)和密钥库文件(.p12)。
-
在AGC控制台找到当前HarmonyOS项目后:
- 上传证书请求文件(.csr)生成 Certpath file(*.cer) 证书。
- 上传密钥库文件(.p12)生成 Profile file(*.p7b) 证书。
- 在DevEco Studio中的Signing Configs窗口中重新上传当前HarmonyOS项目的证书文件,即可成功生成签名信息。
Cocos Creator构建发布时报错Please make sure java installed and JAVA_HOME is in your environment
- 问题描述 :
在Cocos Creator引擎构建发布项目时,出现如下报错:
Please make sure java installed and JAVA_HOME is in your environment
- 解决方案 :
配置成功后需重启电脑才生效。
- 本地电脑需安装大于等于17版本的JDK。
- 配置系统环境变量JAVA_HOME。
HarmonyOS NEXT应用安装报错install failed due to grant request permissions failed
- 问题描述 :
设备连接DevEco studio,安装HarmonyOS NEXT应用失败,且出现如下报错:
error:install failed due to grant request permissions failed.
- 问题分析 :
出现该问题的原因是默认应用的等级是normal,只能使用normal等级的权限,但是我们项目使用了system_basic或system_core等级的权限,所以出现该报错。
- 解决方案 :
针对该问题,建议我们参考应用/服务签名-HarmonyOS NEXT应用开发申请ACL提权和项目相关配置,即可解决问题。
更多内容请见:鸿蒙游戏开发者服务-鸿蒙游戏中心-游戏分发平台-华为开发者联盟
社群交流: