
感谢群内大佬 honmono 的分享,也欢迎同学们入群交流
QQ群:521643513
也也请关注我的公众号:
Mac 下 cocos 引擎源码位于 CocosCreator.app/Contents/Resources/engine/cocos2d/
以下使用 CocosEngine 代替该路径
// 演示 //
1效果预览
// 演示 //
1效果预览
2单击线段添加顶点
3双击顶点删除
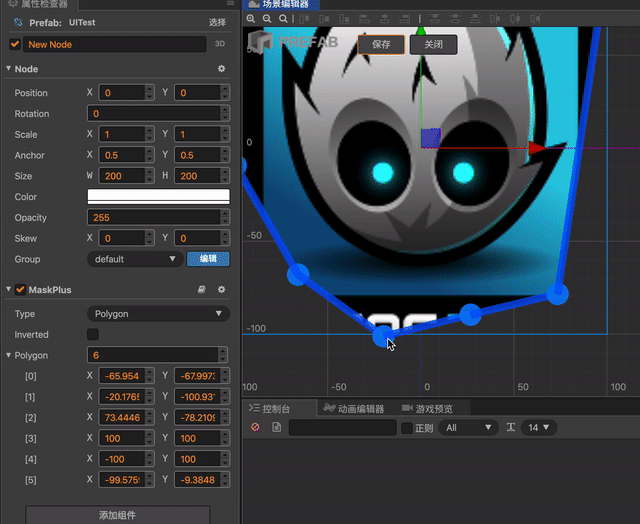
4 反向遮罩

// 实现 //
1 浅析 cc.Mask
打开 CCMask.js 源码(位于 CocosEngine/core/components/CCMask.js)
CCMask 在 _activateMaterial 内调用了 _createGraphics 方法,创建了 Graphics 组件
_createGraphics () {
    if (!this._graphics) {
        this._graphics = new Graphics();
        cc.Assembler.init(this._graphics);
        this._graphics.node = this.node;
        this._graphics.lineWidth = 0;
        this._graphics.strokeColor = cc.color(0, 0, 0, 0);
    }
},
通过 _updateGraphics 方法,根据不同的 MaskType 进行不同的绘制,对应源码
_updateGraphics () {
    let node = this.node;
    let graphics = this._graphics;
    // Share render data with graphics content
    graphics.clear(false);
    let width = node._contentSize.width;
    let height = node._contentSize.height;
    let x = -width * node._anchorPoint.x;
    let y = -height * node._anchorPoint.y;
    if (this._type === MaskType.RECT) {
        graphics.rect(x, y, width, height);
    }
    else if (this._type === MaskType.ELLIPSE) {
        let center = cc.v2(x + width / 2, y + height / 2);
        let radius = {
            x: width / 2,
            y: height / 2
        };
        let points = _calculateCircle(center, radius, this._segments);
        for (let i = 0; i < points.length; ++i) {
            let point = points[i];
            if (i === 0) {
                graphics.moveTo(point.x, point.y);
            }
            else {
                graphics.lineTo(point.x, point.y);
            }
        }
        graphics.close();
    }
    if (cc.game.renderType === cc.game.RENDER_TYPE_CANVAS) {
        graphics.stroke();
    }
    else {
        graphics.fill();
    }
},
所以我们只需要扩展一个 MaskType 的枚举类型,并且在 _updateGraphics 内做相应的判断即可实现多边形遮罩
2 扩展多边形遮罩组件
创建一个新的脚本 MaskPlus.ts 文件
- 定义一个新的枚举类型 MaskPlusType
export enum MaskPlusType {
    RECT = 0,
    ELLIPSE = 1,
    IMAGE_STENCIL = 2,
    Polygon = 3,
}
- 创建一个类 MaskPlus,让其继承 cc.Mask,然后重写 _updateGraphics 方法和 type 类型,加入枚举类型为 Polygon 的判断,代码如下
扩展type类型
static Type = MaskPlusType;
@property({type: cc.Enum(MaskPlusType), override: true})
_type: MaskPlusType = 0;
@property({type: cc.Enum(MaskPlusType), override: true})
get type() {
    return this._type;
}
set type(value) {
    if (this._type !== value) {
        this['_resetAssembler']();
    }
    this._type = value;
    if(this._type === MaskPlusType.Polygon) {
        if(this._polygon.length === 0) {
            let [x, y, width, height] = this.getNodeRect();
            this._polygon.push(cc.v2(x, y), cc.v2(x+width, y), cc.v2(x+width, y+height), cc.v2(x, y+height));
        }
    }

    if (this._type !== MaskPlusType.IMAGE_STENCIL) {
        this.spriteFrame = null;
        this.alphaThreshold = 0;
        this._updateGraphics();
    }
    this['_activateMaterial']();
}
实现多边形遮罩算法
@property({type: [cc.Vec2], serializable: true})
_polygon: cc.Vec2[] = [];
@property({type: [cc.Vec2], serializable: true})
public get polygon() {
    return this._polygon;
}
public set polygon(points: cc.Vec2[]) {
    this._polygon = points;
    this._updateGraphics();
}
_updateGraphics () {
    // 省略
    else if (this['_type'] === MaskPlusType.ELLIPSE) {
        // 省略
    }else if(this['_type'] === MaskPlusType.Polygon) {
        if(this._polygon.length === 0) this._polygon.push(cc.v2(0, 0));
        graphics.moveTo(this._polygon[0].x, this._polygon[0].y);
        for(let i=1; i<this._polygon.length; i++) {
            graphics.lineTo(this._polygon[i].x, this._polygon[i].y);
        }
        graphics.lineTo(this._polygon[0].x, this._polygon[0].y);
    }
    // 省略
}
以上方案就可以实现多边形遮罩的功能,但是直接继承 cc.Mask 组件会导致 creator 面板中属性错乱,接下来我们来处理编辑器面板中的问题
3完善组件在编辑器中的属性展示
如果你还不了解扩展包,那么可以先阅读 cocos 官方的扩展包文档:
https://docs.cocos.com/creator/manual/zh/extension/your-first-extension.html
我们首先了解 creator 属性面板是通过什么方式展示的,还是打开 CCMask.js 源码
editor: CC_EDITOR && {
    menu: 'i18n:MAIN_MENU.component.renderers/Mask',
    help: 'i18n:COMPONENT.help_url.mask',
    inspector: 'packages://inspector/inspectors/comps/mask.js'
},
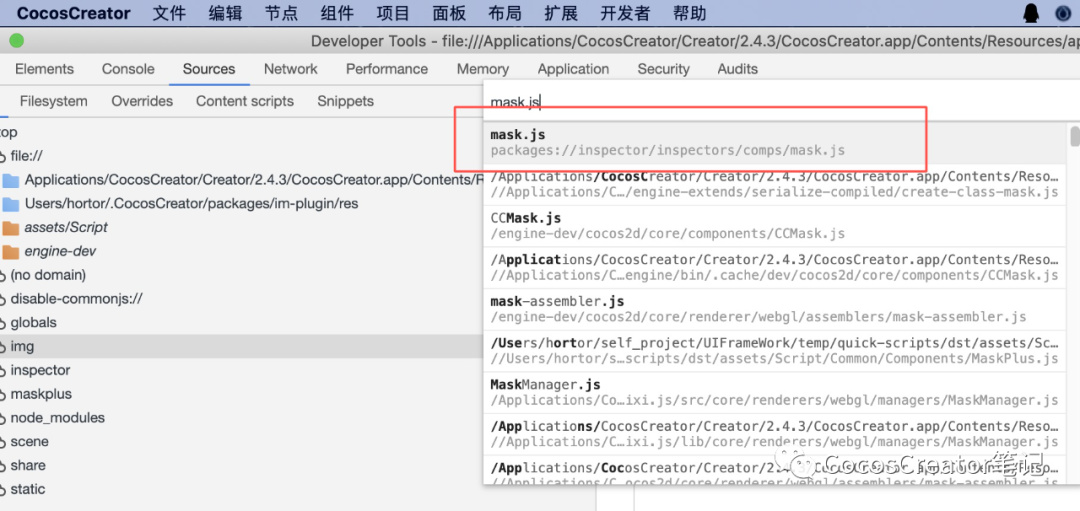
这里的 inspector 对应的内容就是面板中显示的设置,creator 编辑器虽然是不开源的,但是我们可以通过 creator 开发者工具找到 inspector 对应的 mask.js
注意 :要找到该文件,需要先在编辑器中添加 cc.mask 组件
打开菜单栏 -> 开发者 -> 开发者工具, 进入 sources,然后使用快捷键 ctrl + p

将这段代码保存下来,然后我们开始制作扩展包,按照官方提供的方式创建好扩展包后,在目录下创建一个新文件 inspector.js
打开 inspector.js,将刚刚保存的代码复制过来,我们稍加修改
"use strict";
Vue.component("cc-mask",{
    template:
    '\n        <ui-prop\n            v-prop="target.type"\n            :multi-values="multi"    \n        ></ui-prop>\n'+
    '        <ui-prop\n            v-prop="target.inverted"\n            :multi-values="multi"  \n        ></ui-prop>\n'+
    '        <cc-array-prop :target.sync="target.polygon" v-show="isPolygon()"></cc-array-prop>\n' +
    '        <ui-prop min="3"\n            v-show="isEllipseType()"\n            v-prop="target.segements"\n            :multi-values="multi"  \n        ></ui-prop>\n'+
    '        <ui-prop\n            v-show="isImageStencilType()"\n            v-prop="target.alphaThreshold"\n            :multi-values="multi"  \n        ></ui-prop>\n'+
    '        <ui-prop\n            v-show="isImageStencilType()"\n            v-prop="target.spriteFrame"\n            :multi-values="multi"  \n        ></ui-prop>\n'+
    '        <div class="horizontal layout end-justified" style="padding:5px 0;margin-bottom:5px;"\n            v-show="target.spriteFrame.value.uuid && isImageStencilType()"\n        >\n'+
    '            <ui-button\n                v-on:confirm="onAppImageSizeClick"\n            >Resize to Target</ui-button>\n'+
    '        <div>\n  ',
    props:{
        target:{twoWay:!0,type:Object},
        multi:{type:Boolean}},
        methods:{
            isRectType(){return this.target.type.value===cc.Mask.Type.RECT},
            isEllipseType(){return this.target.type.value===cc.Mask.Type.ELLIPSE},
            isImageStencilType(){return this.target.type.value===cc.Mask.Type.IMAGE_STENCIL},
            isPolygon() {return this.target.type.value===cc.MaskPlus.Type.Polygon},
            onAppImageSizeClick(e){
                var t={id:this.target.uuid.value,path:"_resizeToTarget",type:"Boolean",isSubProp:!1,value:!0};
                Editor.Ipc.sendToPanel("scene","scene:set-property",t)
        }
    }
});
扩展了 ui-prop 和 cc-array-prop,然后添加了一个判断是否是多边形枚举的方法 isPolygon,其他的我们不做修改,这个时候可能需要重启编辑器让编辑器更新扩展包
我的个人见解,target 对应的应该就是 maskplus 组件
扩展编辑器做好之后,我们回到 MaskPlus.ts 文件
只需要在 class 上添加一行
@inspector('packages://maskplus/inspector.js')
maskplus 对应的是扩展包文件夹名称
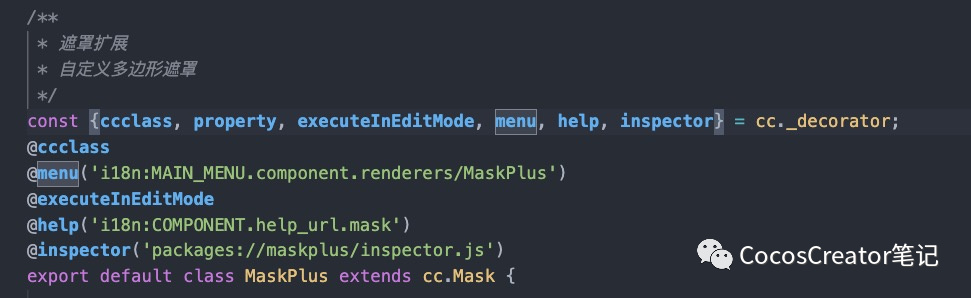
到了这一步后,creator 编辑器的 maskplus 组件的属性面板就能正常显示了,最后我们为 maskplus 添加 Gizmo,实现在编辑器中改变多边形形状
4 使用 Gizmo 实现编辑器编辑顶点效果
如果你还不了解Gizmo,那么可以先阅读cocos官方的Gzimo文档:
https://docs.cocos.com/creator/manual/zh/extension/custom-gizmo.html
Gizmo 使用 svg.js 作为操作工具,而我们要做的就是在编辑器内按照多边形顶点绘制边和点,然后监听点点击事件,做相应的处理
Gizmo 的使用也需要用到扩展包,所以首先还是创建一个扩展包 polygonpoints
package.json 中设置 gizoms 字段,Key 对应的是组件名称,value 对应的是 gizmo 目录
{
"name": "polygonpoints",
"version": "0.0.1",
"description": "",
"author": "denglang",
"gizmos": {
        "MaskPlus": "packages://polygonpoints/main.js"
    }
}
gizmo 的绘制很简单,只是需要知道以下小知识
- this.target 对应的是组件 Component
- 创建圆形使用 this._tool.circle()
- 创建线段使用 this._tool.line()
具体的 svg 使用方法可以参考:
http://documentup.com/wout/svg.js
重写 onCreateRoot 方法
onCreateRoot() {
    // 创建 svg 根节点的回调,可以在这里创建你的 svg 工具
    // this._root 可以获取到 Editor.Gizmo 创建的 svg 根节点
    // 创建一个 svg 工具
    // group 函数文档 : http://documentup.com/wout/svg.js#groups
    this._tool = this._root.group();
    let target = this.target;
    const circles = [];
    const lines = [];
    // 接下来要定义绘画函数
    this._tool.plot = (points, position) => {
        // 移动到节点位置
        this._tool.move(position.x, position.y);
        // 清除原来的点
        circles.forEach(v => v.radius(0));
        lines.forEach(v => v.plot(0, 0, 0, 0));
        for(let i=0; i<points.length; i++) {
            let v = points[i];
            v = Editor.GizmosUtils.snapPixelWihVec2(v.mul(this._view.scale));

            let circle = circles[i], line = lines[i];
            // 初始化
            if(!circle || !line) {
                circle = circles[i] = this._tool.circle()
                .fill({ color: 'rgba(0,128,255,0.9)' })
                .style('pointer-events', 'fill')
                .style('cursor', 'move');
                line = lines[i] = this._tool.line()
                .stroke({ color: 'rgba(0,80,255,0.8)' });
                // 注册点击事件
                this.registerMoveSvg(circle, [i, "circle"], { cursor: 'pointer' });
                this.registerMoveSvg(line, [i, "line"]);
            }
            let nextPoint = i== points.length-1 ? points[0] : points[i+1];
            nextPoint = Editor.GizmosUtils.snapPixelWihVec2(nextPoint.mul(this._view.scale))
            line.plot(v.x, -v.y, nextPoint.x, -nextPoint.y).stroke({ width: 4 * this._view.scale });
            circle.center(v.x, -v.y).radius(6 * this._view.scale);
        }
    };
}
—END—
源码地址
MaskPlus.ts 地址:
扩展包 maskplus:
https://github.com/kirikayakazuto/CocosCreator_UIFrameWork/tree/master/packages/maskplus
扩展包 polygonpoints:
https://github.com/kirikayakazuto/CocosCreator_UIFrameWork/tree/master/packages/polygonpoints
 , 鸦哥牛批~~~