
项目中需要使用tiledmap,从开始使用到现在资源铺量,趟过不少坑:
1. tmx注意事项
- tiledmap只支持1.4版本
- 不支持等角(交错)
- 瓦块图层只支持一种类型的图片,且不要对图片做旋转,镜像等操作
- 图块集请嵌入到地图中,否则不识别
- 不支持将图层组合
- 为了方便美术制作,可以对tmx进行后处理,可让美术使用组,然后用脚本将组打散
- 地图与资源不要放到assetbundle目录下,方便剔除不需要的资源
2. 预览等待加载时间过长(之前发帖)
项目中有900+小图,在预览的时候加上各种资源描述文件有3000+的文件需要下载,最长的时候我需要等待3-5分钟,简直过了忍耐极限。
究其原因是因为cocos只会在发布包中使用图集,在预览的时候直接加载原始图片,因此我们只需要在预览的时候替换成我们自己制作的图集就行了,步骤如下:
- 通过texturepacker将地图资源打成cocos支持的图集,并放到非assetbundle目录下,这样最终才不会打进包中。
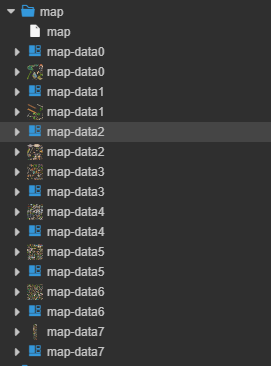
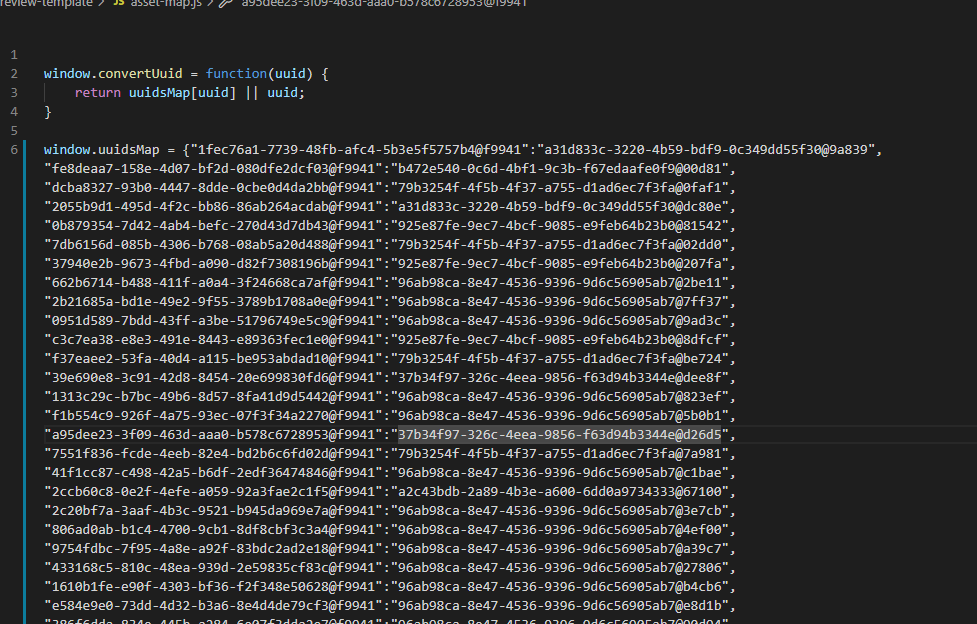
- 用脚本收集需要被替换资源文件的uuid,以及图集的uuid,将映射关系写入js对象中,并在预览模板html中载入
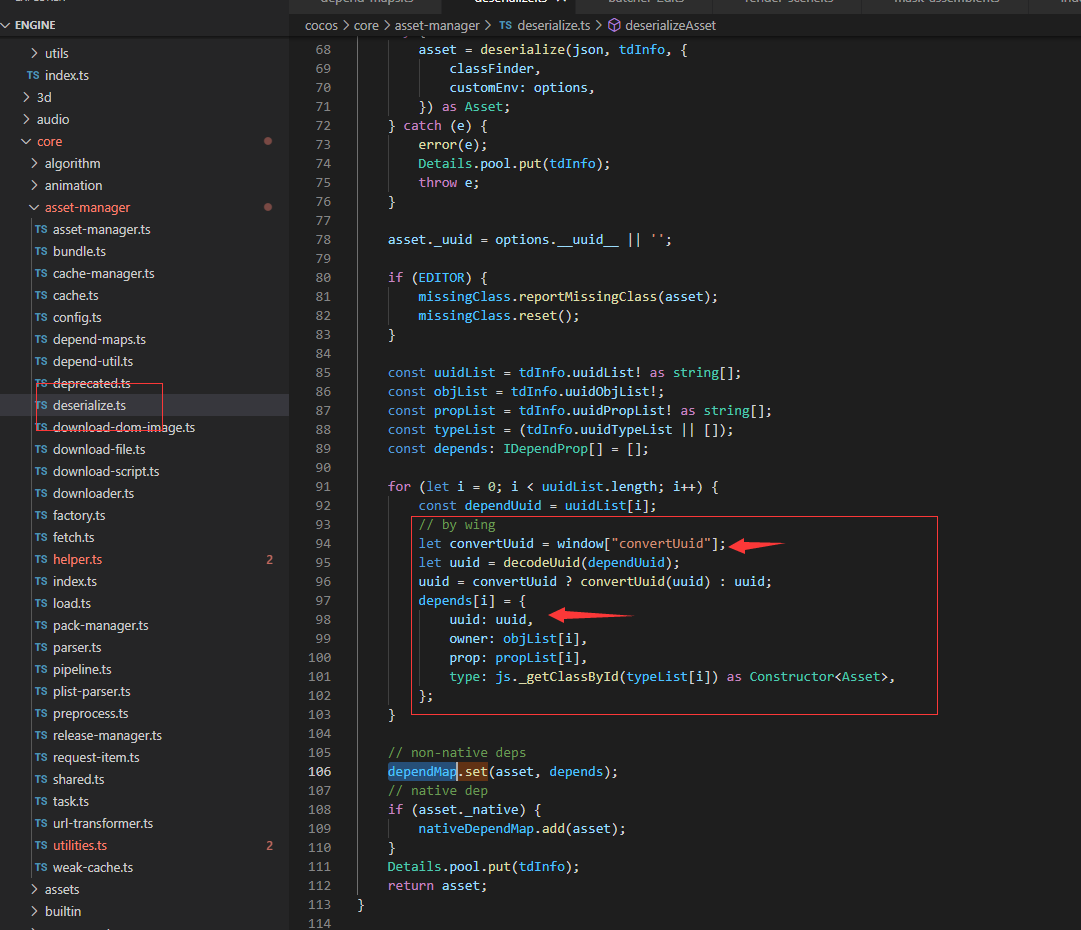
- 修改引擎中deserialize.ts中获取资源依赖的代码,将依赖资源映射到我们生成的图集上:
因为我们只在预览时才注入了convertUuid方法,因此不管你是否剥离引擎,都不会影响编译后的包。
最终预览等待时间控制在了30秒这个可接受的时间内,又节约了不少时间去写bug。
3. drawcall过高
预览时因为图片没有打图集,因此合批肯定会有问题,但我们项目中图片过多,即便是发布后,因为各种交错穿插也会造成高drawcall,最高时有800+;因此通过查看源码与调试工具的帮助,最终找到解决方案如下: - 使用多纹理材质,控制整个地图所有图片在8张2048x2048以内,这样地图中所有元素可以共用一个材质球,shader代码如下:

// Effect Syntax Guide: https://github.com/cocos-creator/docs-3d/blob/master/zh/material-system/effect-syntax.md

CCEffect %{
  name: "tmx-sprite"
  techniques:
  - passes:
    - vert: tmx-sprite-vs:vert
      frag: tmx-sprite-fs:frag
      depthStencilState:
        depthTest: false
        depthWrite: false
      blendState:
        targets:
        - blend: true
          blendSrc: src_alpha
          blendDst: one_minus_src_alpha
          blendDstAlpha: one_minus_src_alpha
      rasterizerState:
        cullMode: none
      properties:
        texture0: { value: white }
        texture1: { value: white }
        texture2: { value: white }
        texture3: { value: white }
        texture4: { value: white }
        texture5: { value: white }
        texture6: { value: white }
        texture7: { value: white }
        alphaThreshold: { value: 0.5 }
}%

CCProgram tmx-sprite-vs %{
  precision highp float;
  #include <cc-global>
  #if USE_LOCAL
    #include <cc-local>
  #endif
  #if SAMPLE_FROM_RT
    #include <common>
  #endif
  in vec3 a_position;
  in vec2 a_texCoord;
  in vec4 a_color;

  out vec4 color;
  out vec2 uv0;

  out float texture_idx;

  vec4 vert () {
    vec4 pos = vec4(a_position, 1);

    #if USE_LOCAL
      pos = cc_matWorld * pos;
    #endif

    #if USE_PIXEL_ALIGNMENT
      pos = cc_matView * pos;
      pos.xyz = floor(pos.xyz);
      pos = cc_matProj * pos;
    #else
      pos = cc_matViewProj * pos;
    #endif

    uv0 = a_texCoord;
    #if SAMPLE_FROM_RT
      CC_HANDLE_RT_SAMPLE_FLIP(uv0);
    #endif
    color = a_color;

    texture_idx = a_color.r;

    return pos;
  }
}%


CCProgram tmx-sprite-fs %{
  precision highp float;
  #include <embedded-alpha>
  #include <alpha-test>

  in vec4 color;
  in vec2 uv0;
  in float texture_idx;

  uniform sampler2D texture0;
  uniform sampler2D texture1;
  uniform sampler2D texture2;
  uniform sampler2D texture3;
  uniform sampler2D texture4;
  uniform sampler2D texture5;
  uniform sampler2D texture6;
  uniform sampler2D texture7;

  vec4 getColor(float idx) {
    idx *= 255.0;
    if(idx < 1.0) {
      return CCSampleWithAlphaSeparated(texture0, uv0);
    } else if(idx < 2.0) {
      return CCSampleWithAlphaSeparated(texture1, uv0);
    } else if(idx < 3.0) {
      return CCSampleWithAlphaSeparated(texture2, uv0);
    } else if(idx < 4.0) {
      return CCSampleWithAlphaSeparated(texture3, uv0);
    } else if(idx < 5.0) {
      return CCSampleWithAlphaSeparated(texture4, uv0);
    } else if(idx < 6.0) {
      return CCSampleWithAlphaSeparated(texture5, uv0);
    } else if(idx < 7.0) {
      return CCSampleWithAlphaSeparated(texture6, uv0);
    } else if(idx < 8.0) {
      return CCSampleWithAlphaSeparated(texture7, uv0);
    }
    return CCSampleWithAlphaSeparated(texture0, uv0);
  }

  vec4 frag () {
    vec4 o = getColor(texture_idx);

    #if IS_GRAY
      float gray = 0.2126 * o.r + 0.7152 * o.g + 0.0722 * o.b;
      o.r = o.g = o.b = gray;
    #endif

    o.a *= color.a;
    ALPHA_TEST(o);
    return o;
  }
}%
- 我发现即便是只使用了一个材质球,cocos也没将sprite合批,通过翻看源码发现,sprite默认按一张图片生成的hash值,因此就算是同一个材质球,使用了多个纹理不会合批,没办法只有注入一段代码,让cocos认为我们的材质球时可以合批的,关键代码如下:
let updateHash = RenderData.prototype.updateHash;
RenderData.prototype.updateHash = function () {
    let inst = this as RenderData;
    if(inst.material && inst.material["__multi_tex__"]) {
        const bid = this.chunk ? this.chunk.bufferId : -1;
        const hashString = `${bid}${this.layer} ${this.blendHash} ${inst.material.hash}`;
        this.dataHash = murmurhash2_32_gc(hashString, 666);
        this.hashDirty = false;
        return;
    }

    return updateHash.call(this);
}
- 补上替换材质球的关键代码,由于color在地图中没用上,我又不想大费周折自己去修改顶点属性,就把color属性给征用了,alpha还是保持原来的作用,毕竟里面还有不少控制透明的动画,然后把红色通道作为了纹理索引:
static updateMaterial(node: Node) {
        node.layer = this._worldLayer;

        let r2d = node.getComponent(Renderable2D);
        if(!r2d) {
            node.children.forEach(n=>{this.updateMaterial(n)});
            return;
        }

        let texture: Texture2D = null;
        if(r2d instanceof Sprite) {
            texture = r2d.spriteFrame.texture as Texture2D;
        }else if(r2d instanceof TiledLayer){
            let layerInfo = r2d["_layerInfo"];
            let tid = layerInfo.tiles.find(i=>i!=0);
            let grid = r2d.texGrids.get(tid);
            if(grid) {
                texture = grid.texture;
            }
        }

        if(!texture) {
            node.children.forEach(n=>{this.updateMaterial(n)});
            return;
        }

        let key = texture["_id"];

        let mat:MatrialItem = this._materials[key];
        if(!mat) {
            console.log("new texture " + key);

            let keys = Object.keys(this._materials);
            if(keys.length > 0) {
                mat = this._materials[keys[keys.length-1]];
                if(mat.textures.length == 8) {
                    mat = null;
                }
            }

            if(!mat) {
                let material = new Material();
                material.initialize({effectAsset: this._commonMat.effectAsset});
                material["__multi_tex__"] = true;

                this._materialCount++;
                material.name = `${this._commonMat.effectAsset.name}Clone(${this._materialCount})`;

                mat = {
                    matIndex: {},
                    material: material,
                    textures: [],
                };
            }
            mat.matIndex[key] = mat.textures.length;

            mat.textures.push(texture);
            this._materials[key] = mat;

            mat.material.setProperty(`texture${mat.matIndex[key]}`, texture);
        }

        r2d.name = mat.material.name;
        r2d.customMaterial = mat.material;
        // a不能为0
        r2d.color = new Color(mat.matIndex[key], 0, 0, 255);
        r2d.markForUpdateRenderData();

        node.children.forEach(n=>{this.updateMaterial(n)});
    }
4. 相机剔除问题
- 瓦块地图会进行剔除,但是如果按自带剔除方法,往往会在边界留一块黑边,类似这样:
因此只需要把可视区域扩大一些就行了:

public _updateCulling (layer: TiledLayer) {
        if (layer.enableCulling) {
            layer.node.updateWorldTransform();
            Mat4.invert(_mat4_temp, layer.node.getWorldMatrix());
            const camera = director.root!.batcher2D.getFirstRenderCamera(layer.node);
            if (camera) {
                _vec3_temp.x = -camera.width*0.5;
                _vec3_temp.y = -camera.height*0.5;
                _vec3_temp.z = 0;
                _vec3_temp2.x = camera.width * 2;
                _vec3_temp2.y = camera.height * 2;
                _vec3_temp2.z = 0;
                camera.screenToWorld(_vec3_temp, _vec3_temp);
                camera.screenToWorld(_vec3_temp2, _vec3_temp2);
                // camera.getScreenToWorldPoint(_vec2_temp, _vec2_temp);
                // camera.getScreenToWorldPoint(_vec2_temp2, _vec2_temp2);
                Vec3.transformMat4(_vec3_temp, _vec3_temp, _mat4_temp);
                Vec3.transformMat4(_vec3_temp2, _vec3_temp2, _mat4_temp);
                layer.updateViewPort(_vec3_temp.x, _vec3_temp.y, _vec3_temp2.x - _vec3_temp.x, _vec3_temp2.y - _vec3_temp.y);
            }
        }
    }
* 优化效果:

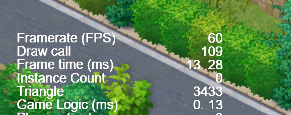
最终效果还没进行相机剔除,我还发现现在即便是一个材质球,有的地方依然会中断合批,所以依然还有优化空间。
- 对象层未进行剔除,即便不在相机范围内,也依然会进行渲染,大家可以根据项目需求选择是否需要剔除,或者选择自己的剔除方式。