
前沿
- 看了一下,距离上一篇文章的输出已经时过半年了,很久没有输出了。了解的朋友们可能知道宗宝闲余时间再尝试一个新的挑战。
- 今天宗宝给大家分享一个**3D文本【Lable3D】**的实现,这也是3D游戏开发中比较常用的功能之一
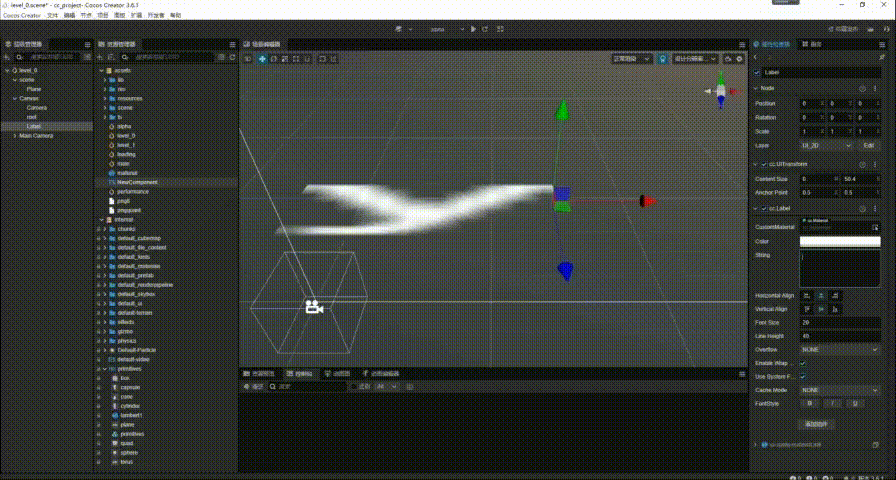
效果展示
- 先给大家看看效果吧
实现原理
1.出发点
-
首先确定的了,咱们的目标是想办法实现3D文本的显示功能;那么我们先需要考虑一下问题
-
2d文本,也就是咱们常用的Label组件的实现原理是什么
-
我们在输入文本之后到渲染显示在屏幕上都进过了那些操作,
-
这些操作后最终得到的结构是什么形式的,我们是否可以直接拿来用
2.了解Label实现
抱着上面的疑问,我们的首要任务就是去了解Lable的源码实现,这就是开源引擎最大好多,随时随地可以查看源码,
- 那我们就开始看源码,在看源码的时候,我们会看见下边这个函数
protected _applyFontTexture () {
        this.markForUpdateRenderData();
        const font = this._font;
        if (font instanceof BitmapFont) {
            const spriteFrame = font.spriteFrame;
            if (spriteFrame && spriteFrame.texture) {
                this._texture = spriteFrame;
                if (this.renderData) {
                    this.renderData.textureDirty = true;
                }
                this.changeMaterialForDefine();
                if (this._assembler) {
                    this._assembler.updateRenderData(this);
                }
            }
        } else {
            if (this.cacheMode === CacheMode.CHAR) {
                this._letterTexture = this._assembler!.getAssemblerData();
                this._texture = this._letterTexture;
            } else if (!this._ttfSpriteFrame) {
                this._ttfSpriteFrame = new SpriteFrame();
                this._assemblerData = this._assembler!.getAssemblerData();
                const image = new ImageAsset(this._assemblerData!.canvas);
                const texture = new Texture2D();
                texture.image = image;
                this._ttfSpriteFrame.texture = texture;
            }

            if (this.cacheMode !== CacheMode.CHAR) {
                // this._frame._refreshTexture(this._texture);
                this._texture = this._ttfSpriteFrame;
            }
            this.changeMaterialForDefine();
        }
    }
我们会发现这个函数最终的输出结果会得到一个SpriteFrame(_texture),正常我们理解SpriteFrame不就是一张图片嘛,有了图片我们不久可以随便操作了嘛
3.论证
有了上边的想法,我们就开始先做一个最基础的操作
- 创建一个Label组件
- 创建一个3d的panel节点
- 将Label组件中的texture赋值给panel材质中的贴图
简单写一段测试代码
import { _decorator, Component, Label, MeshRenderer, Texture2D } from 'cc';
const { ccclass, property, executeInEditMode } = _decorator;
@ccclass('NewComponent')
@executeInEditMode
export class NewComponent extends Component {
    @property({ type: Label })
    label: Label = null!;

    @property({ type: MeshRenderer })
    meshRender: MeshRenderer = null!;
    start() {

    }
    update(deltaTime: number) {
        let spriteFrame: any = this.label.spriteFrame!;
        let texture: Texture2D = spriteFrame.texture;
        this.meshRender.material?.setProperty("mainTexture", texture);
    }
}
既然看到了效果,那么说明上边猜想是可行的,通过改变label中的字体后,我们可以拿到它本身所生成的纹理然后渲染到任意的3d物体上;
注意:3d物体的材质因该选择使用透明材质,同时开启mainTexture对应的宏定义
4.进阶
- 你以为得到了结果就结束了嘛,答案肯定不是的,因为这种方式使用起来会有一个明显的问题,我的3d文本必须对应一个2d的Label组件,是不是很麻烦;同时我们还有一个问题没有去得到答案:Label的实现原理是什么,具体有那些操作;
- 带着这个问题我们继续深入源码,我们会在ttfUtils.ts和bmfont.ts脚本中找到答案
- 下边主要是以ttfUtils为主进行展开,因为宗宝主要研究了一下系统字体的实现
在代码中会发现,系统字体的显示主要是使用CanvasRenderingContext2D,通过CanvasRenderingContext2D将文本渲染到canvas上,然后通过canvas生成一张纹理图,最终渲染到屏幕上;

既然了解了大概的原理,那么咱们的Label3D也就轻松的出来了,
 /**
 * 刷新渲染
 */
private updateRenderData(): void {
    if (!this._assemblerData) return;
    this._context = this._assemblerData.context;
    this._canvas = this._assemblerData.canvas;

    this.initTexture2D();
    this.updateFontFormatting();
    this.updateFontCanvasSize();
    this.updateRenderMesh();
    this.updateFontRenderingStyle();
    this.updateTexture();
    this.updateMaterial();
    this.resetRenderData();
}
大致需要一下几个步骤:
1.0 updateFontFormatting 文本格式化
  private updateFontFormatting(): void {
        if (!this._context) return;
        let strs: string[] = this._string.split("\\n");
        this._splitStrings = strs;
        for (let i = 0; i < strs.length; i++) {
            //获取文本的宽度
            let len: number = this._context.measureText(strs[i]).width;
            if (len > this._canvasSize.width) {
                this._canvasSize.width = len;
            }
        }
        this._canvasSize.height = strs.length * this.getLineHeight() + BASELINE_RATIO * this.getLineHeight();
    }
以’\n’ 作为换行符,格式化文本,并且计算文本显示的size
2.0 updateFontCanvasSize 设置canvse
private updateFontCanvasSize(): void {
    this._canvasSize.width = Math.min(this._canvasSize.width, MAX_SIZE);
    this._canvasSize.height = Math.min(this._canvasSize.height, MAX_SIZE);
    if (this._canvas.width != this._canvasSize.width) {
        this._canvas.width = this._canvasSize.width;
    }
    if (this._canvas.height != this._canvasSize.height) {
        this._canvas.height = this._canvasSize.height;
    }
    this._context.font = this.getFontDesc();
}
通过文字显示所需的宽高,更新canvas的的size
3.updateRenderMesh
private updateRenderMesh(): void {
    let rate: number = this._canvas.width / this._canvas.height;
    this._positions = [];
    this._positions.push(-0.5 * rate, -0.5, 0);
    this._positions.push(0.5 * rate, -0.5, 0);
    this._positions.push(-0.5 * rate, 0.5, 0);
    this._positions.push(-0.5 * rate, 0.5, 0);
    this._positions.push(0.5 * rate, -0.5, 0);
    this._positions.push(0.5 * rate, 0.5, 0);
    // this._meshRender.mesh?.updateSubMesh(0, {
    //     positions: new Float32Array(this._positions),
    //     minPos: { x: -0.5 * rate, y: -0.5, z: 0 },
    //     maxPos: { x: 0.5 * rate, y: 0.5, z: 0 }
    // });
    this._meshRender.mesh = utils.MeshUtils.createMesh({
        positions: this._positions,
        uvs: this._uvs,
        minPos: { x: -0.5, y: -0.5, z: 0 },
        maxPos: { x: 0.5, y: 0.5, z: 0 }
    });
    this._meshRender.model?.updateWorldBound();
    this.updateMeshRenderMaterial();
}
根据canvas 的宽高比例更新显示所需网格的顶点数据,这一步主要是保证生成的贴图显示在网格上的时候文字的宽高不会被压缩
4.updateTexture 生成贴图
private updateTexture(): void {
    if (!this._context || !this._canvas) return;
    this._context.clearRect(0, 0, this._canvas.width, this._canvas.height);
    let textPosX: number = 0;
    let textPosY: number = 0;
    for (let i = 0; i < this._splitStrings.length; i++) {
        textPosY = this._startPosition.y + (i + 1) * this.getLineHeight();
        let len: number = this._context.measureText(this._splitStrings[i]).width;
        textPosX = (this._canvas.width - len) / 2;

        this._context.fillText(this._splitStrings[i], textPosX, textPosY);
    }
    let uploadAgain: boolean = this._canvas.width !== 0 && this._canvas.height !== 0;
    if (uploadAgain) {
        this._texture.reset({
            width: this._canvas.width,
            height: this._canvas.height,
            mipmapLevel: 1,
        });
        this._texture.uploadData(this._canvas);
        this._texture.setWrapMode(RenderTexture.WrapMode.CLAMP_TO_EDGE, RenderTexture.WrapMode.CLAMP_TO_EDGE);
    }
}
主要代码来了,将文本渲染到canvas中,然后通过canvas生成贴图
5.updateMaterial 更新材质贴图
private updateMaterial(): void {
    if (!this._texture) return;
    if (!this._meshRender) return;
    if (!this._material) return;
    let material: Material = this._meshRender.getMaterialInstance(0)!;
    material.setProperty("mainTexture", this._texture);
}
将生成的贴图显示到咱们的网格上
总结
上边就是宗宝参考引擎代码,实现Label3D的大概思路以及部分代码,希望能给大家带来帮助;宗宝的实现中还有很多不足,比如对齐模式,倾斜,加速,等等,由于时间关系都没有实现,大家都可以自由的扩展奥;
- 如需完整代码:关注公众号:“搬砖小菜鸟”,回复"label3D"即可


