
本教程引擎源代码基于 cocos creator v2.4.10
之前的教程介绍了js engine的实现,在cocos creator v2.x 的架构中,native engine使用的是spine的c++版本,所以这就意味着js engine层面实现的spine换装,无法在native engine中复用。
在引擎渲染架构上,仍旧是基于一个大的buffer的做法,和js engine有雷同的地方,只不过是换成c++重新实现了一遍。
spnie渲染逻辑剖析
spine的渲染入口在SkeletonRenderer.cpp,同样的,阅读顺序可以根据数字标号看
MeshBuffer* MiddlewareManager::getMeshBuffer(int format)
{
    MeshBuffer* mb = _mbMap[format];
    if (!mb)
    {
        mb = new MeshBuffer(format);
        _mbMap[format] = mb;
    }
    return mb;
}
void SkeletonRenderer::render (float deltaTime) {
    auto mgr = MiddlewareManager::getInstance();
    middleware::MeshBuffer* mb = mgr->getMeshBuffer(vertexFormat);
    // 1. 这个vb就是大的buffer,getMeshBuffer和js engine的很像
    middleware::IOBuffer& vb = mb->getVB();
    middleware::IOBuffer& ib = mb->getIB();
    auto& drawOrder = _skeleton->getDrawOrder(); // 和js对应上了,很熟悉的味道
    for (size_t i = 0, n = drawOrder.size(); i < n; ++i) {
        Triangles triangles;
        TwoColorTriangles trianglesTwoColor;
        slot = drawOrder[i];
        if (slot->getAttachment()->getRTTI().isExactly(RegionAttachment::rtti)) {
            RegionAttachment* attachment = (RegionAttachment*)slot->getAttachment();
            attachmentVertices = (AttachmentVertices*)attachment->getRendererObject(); // 都是attachmentVertices
        } else if (slot->getAttachment()->getRTTI().isExactly(MeshAttachment::rtti)) {
            // 5. 同样的可以看到attachment来自slot的相关接口
            MeshAttachment* attachment = (MeshAttachment*)slot->getAttachment();
            // 4. attachmentVertices来自attachment->renderObject,这里用到了类型强制转换
            attachmentVertices = (AttachmentVertices*)attachment->getRendererObject();

            if (!_useTint) {
                triangles.vertCount = attachmentVertices->_triangles->vertCount;
                vbSize = triangles.vertCount * sizeof(V2F_T2F_C4B);// 计算需要的内存大小
                isFull |= vb.checkSpace(vbSize, true);// 提前申请好内存
                // 2. 将vb大的buffer,传递给了triangle.verts,指针指向的是上边新申请的内存位置
                // 也就是说指向的是共享的vb,最终渲染数据的时候也是从这里面拿数据的
                triangles.verts = (V2F_T2F_C4B*)vb.getCurBuffer();
                // 3. 复制顶点数据到大的buffer里面,所以attachmentVertices就是数据的来源
                // triangles.verts指向的是共享的vb
                memcpy(triangles.verts, attachmentVertices->_triangles->verts, vbSize);

                triangles.indexCount = attachmentVertices->_triangles->indexCount;
                triangles.indices = (unsigned short*)ib.getCurBuffer();
                // 将attachmentVertices的indices数据copy到triangles.indices
                memcpy(triangles.indices, attachmentVertices->_triangles->indices, ibSize);
            }else{
                // 暂时不关心这个情况
            }
        }
        // 6. 设置纹理,换肤时,_texture必须指向新的middle::Texture2D
        // 如果attachmentV->_texture->setNativeTexture()修改纹理,会导致所有的骨骼都指向新的纹理
        texture = attachmentVertices->_texture;
        curTextureIndex = attachmentVertices->_texture->getNativeTexture()->getHandle();
        // If texture or blendMode change,will change material.
        if (preTextureIndex != curTextureIndex || preBlendMode != slot->getData().getBlendMode() || isFull) {
            flush();
        }
    }
}
到第5步,我们就很清楚的知道顶点的数据来源是attachmentVertices->_triangles->verts,所以我们只需要在这里做手脚就行了。
在设置AttachmentVertices的时候,就同步设置了uv,至于xy,是在运行时实时计算的
static void setAttachmentVertices(MeshAttachment* attachment) {
    AtlasRegion* region = (AtlasRegion*)attachment->getRendererObject();
    AttachmentVertices* attachmentVertices = new AttachmentVertices(
        (Texture2D*)region->page->getRendererObject(),
        attachment->getWorldVerticesLength() >> 1, // 除以2
        attachment->getTriangles().buffer(),
        attachment->getTriangles().size()
    );
    V2F_T2F_C4B* vertices = attachmentVertices->_triangles->verts;
    for (size_t i = 0, ii = 0, nn = attachment->getWorldVerticesLength(); ii < nn; ++i, ii += 2) {
        // uv不会发生变化,只需要设置一次就好了
        vertices[i].texCoord.u = attachment->getUVs()[ii];
        vertices[i].texCoord.v = attachment->getUVs()[ii + 1];
    }
    attachment->setRendererObject(attachmentVertices, deleteAttachmentVertices);
}
换肤的本质就是在修改uv,从以上代码可以看到uv和attachment->getUVS() / attachment->_uv有关系
而attachment->_uv的更新和下边的uv有关系
this->setRegionU(0);
this->setRegionV(0);
this->setRegionU2(1);
this->setRegionV2(1);
同样,在c++换肤的时候,你也会遇到RegionAttachment/MeshAttachment,以MeshAttachment举例,当设置完毕uv信息后,updateUVs会重新计算attachment->_uvs,注意这里和regionDegress也有关系
Vector<float> _uvs;
void MeshAttachment::updateUVs() {
    if (_uvs.size() != _regionUVs.size()) {
            _uvs.setSize(_regionUVs.size(), 0);
    }

    int i = 0, n = _regionUVs.size();
    float u = _regionU, v = _regionV;
    float width = 0, height = 0;

    switch (_regionDegrees) {
        case 90: {
                float textureWidth = _regionHeight / (_regionU2 - _regionU);
                float textureHeight = _regionWidth / (_regionV2 - _regionV);
                u -= (_regionOriginalHeight - _regionOffsetY - _regionHeight) / textureWidth;
                v -= (_regionOriginalWidth - _regionOffsetX - _regionWidth) / textureHeight;
                width = _regionOriginalHeight / textureWidth;
                height = _regionOriginalWidth / textureHeight;
                for (i = 0; i < n; i += 2) {
                        _uvs[i] = u + _regionUVs[i + 1] * width;
                        _uvs[i + 1] = v + (1 - _regionUVs[i]) * height;
                }
                return;
        }
    }
}
RegionAttachment就不再赘述,这样剖析下来,逻辑已经很清晰了
多实例污染问题
因为copy的时候,rendererObject是在传递指针,也就导致了多实例污染
Attachment* MeshAttachment::copy() {
    if (_parentMesh) return newLinkedMesh();

    MeshAttachment* copy = new (__FILE__, __LINE__) MeshAttachment(getName());
    copy->setRendererObject(getRendererObject());// 反复在传递引用
}
static void deleteAttachmentVertices (void* vertices) {
    delete (AttachmentVertices *) vertices;
}

static void setAttachmentVertices(MeshAttachment* attachment) {
    AtlasRegion* region = (AtlasRegion*)attachment->getRendererObject();
    AttachmentVertices* attachmentVertices = new AttachmentVertices(
        (Texture2D*)region->page->getRendererObject(),
        attachment->getWorldVerticesLength() >> 1, // 除以2
        attachment->getTriangles().buffer(),
        attachment->getTriangles().size()
    );
    V2F_T2F_C4B* vertices = attachmentVertices->_triangles->verts;
    for (size_t i = 0, ii = 0, nn = attachment->getWorldVerticesLength(); ii < nn; ++i, ii += 2) {
        vertices[i].texCoord.u = attachment->getUVs()[ii];
        vertices[i].texCoord.v = attachment->getUVs()[ii + 1];
    }
    attachment->setRendererObject(attachmentVertices, deleteAttachmentVertices);
}
void setRendererObject(void* rendererObject, DisposeRendererObject dispose = NULL) {
    if (_dispose && _rendererObject && _rendererObject != rendererObject)
        _dispose(_rendererObject);// 释放之前的renderObject,这里是delete attachmentVertices

    _rendererObject = rendererObject;
    _dispose = dispose;
}
AttachmentVertices::AttachmentVertices (middleware::Texture2D* texture, int verticesCount, unsigned short* triangles, int trianglesCount) {
    _texture = texture;
    if (_texture) _texture->retain();

    _triangles = new middleware::Triangles();
    _triangles->verts = new middleware::V2F_T2F_C4B[verticesCount];
    _triangles->vertCount = verticesCount;
    _triangles->indices = triangles;
    _triangles->indexCount = trianglesCount;
}
解决办法也只能复制一份AttachmentVertices。
旋转带来的问题
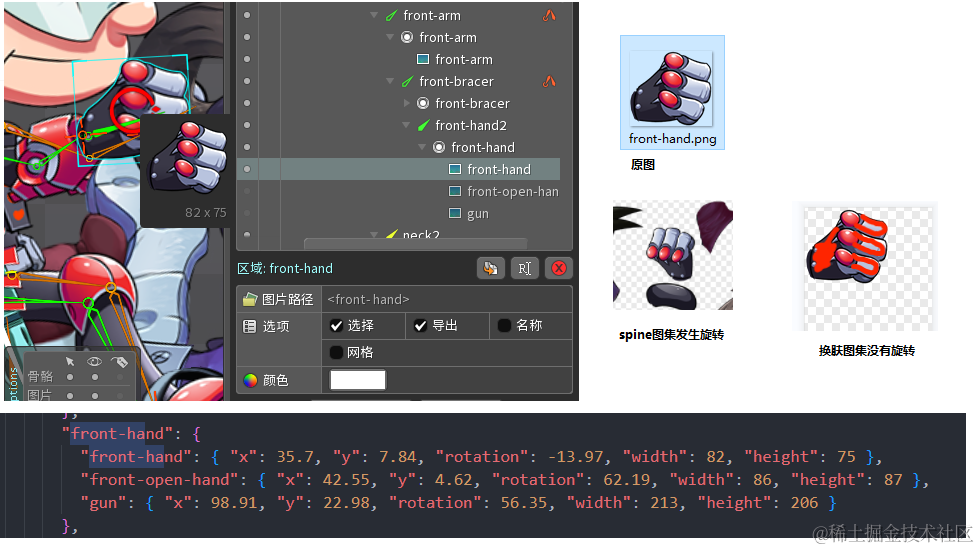
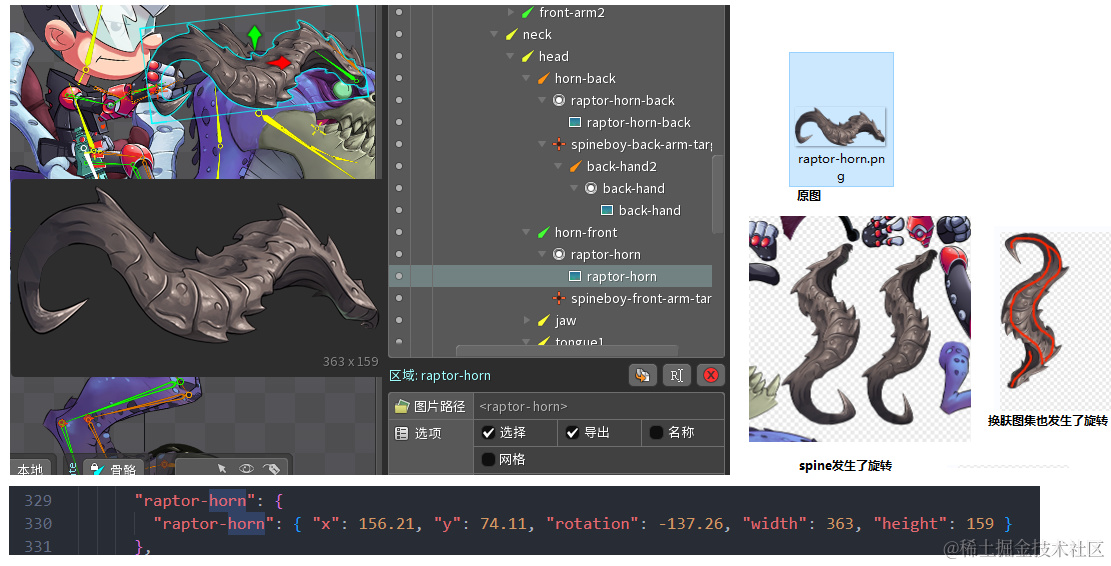
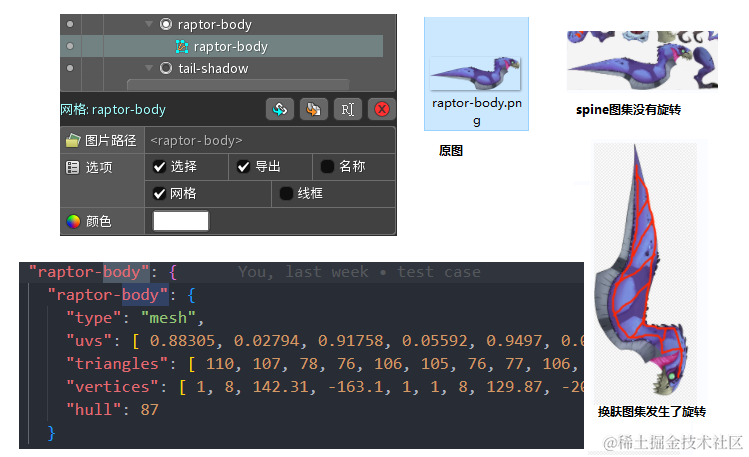
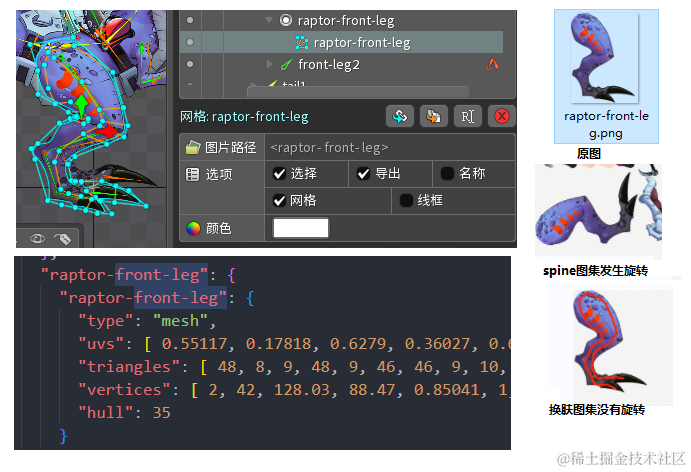
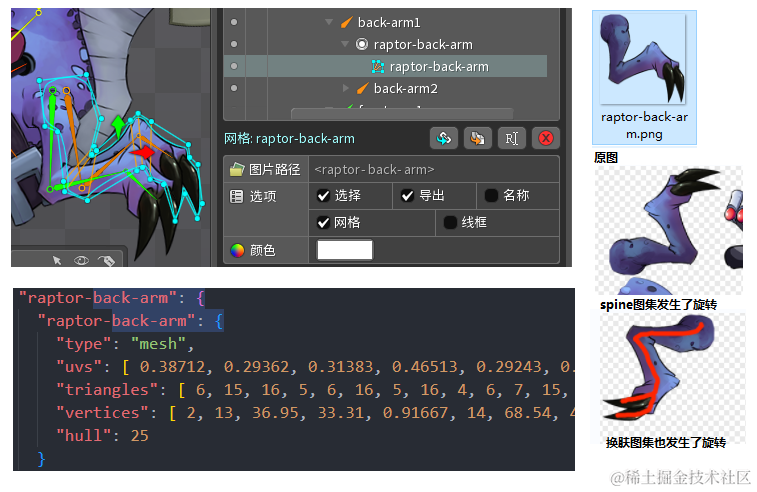
项目中是采用图集plist换肤,当更换多处插槽时,合图有一定的概率降低drawcall,而且合图的方式也有利于组织游戏资源。
plist合图时,会将图片旋转以节省空间,但是这样就导致spine的计算出现了问题。
spine内部在计算顶点的时候,有旋转角度会影响顶点坐标,spin打包的图有旋转,所以生成的顶点也是旋转的,换肤时使用plist图集,里面也是可以控制图片的旋转,所以这就让问题更加复杂了。
一种比较懒的解决办法就是要求spine打包纹理的时候不要旋转,并且plist打包时也不要旋转图片。
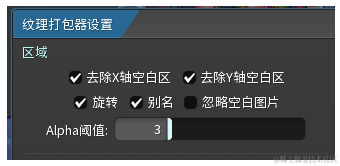
但是这么做只能规避,本质上是可以解决的
spine旋转和plist旋转的关系
直接说结论:
- spine里面的旋转是逆时针90°
- 合图里面的旋转是顺时针90°
- SpriteFrame里面的旋转是顺时针90°
因此,如果plist里面发生了旋转,对spine来说就是270,因为plist的旋转属性是布尔值,所以,plist的旋转相对spine来说,永远都是270
测试例
以spine内置的raptor-pro举例
RegionAttachment测试例子
情况1
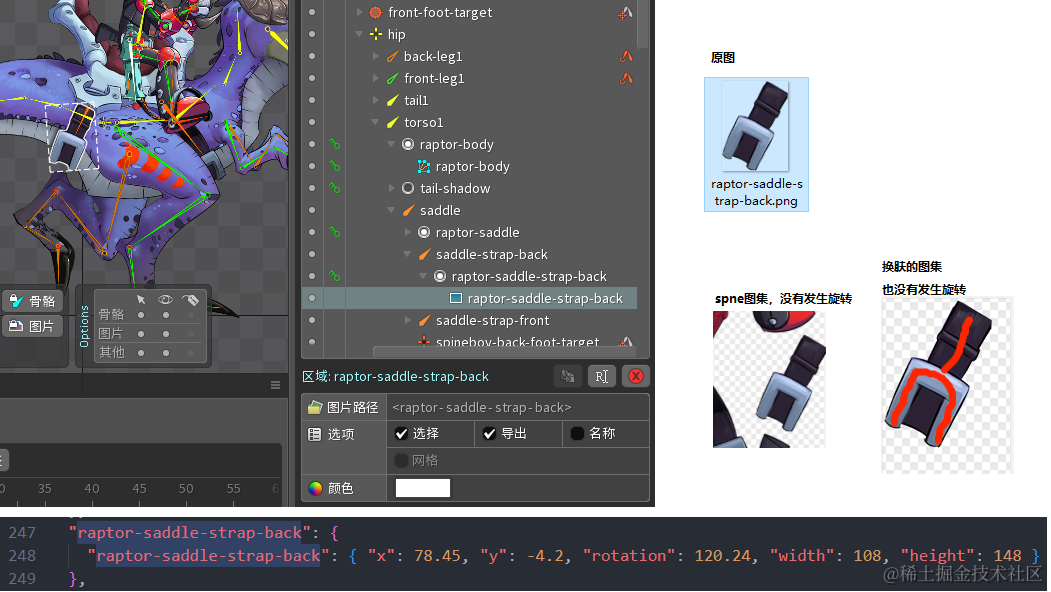
情况2

rotate
rotate其实就是顺时针旋转90°,plist里面的旋转刚好和这个是一致的,当了解到这个算法后,其实可以自己根据rotate和uv进行调整,只要计算出最终合适的uv即可

多试错几次就知道了
ratation
this.rotation包含了原始的旋转数据,不能轻易改变可能会导致位置对不上

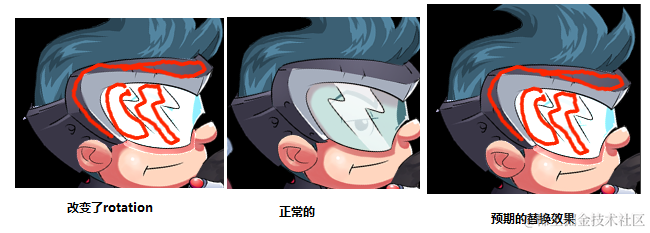
可以看到rotation的改变导致了图片的对齐出现了差异
RegionAttachment.prototype.updateOffset = function () {
    var regionScaleX = this.width / this.region.originalWidth * this.scaleX;
    var regionScaleY = this.height / this.region.originalHeight * this.scaleY;
    var localX = -this.width / 2 * this.scaleX + this.region.offsetX * regionScaleX;
    var localY = -this.height / 2 * this.scaleY + this.region.offsetY * regionScaleY;
    var localX2 = localX + this.region.width * regionScaleX;
    var localY2 = localY + this.region.height * regionScaleY;
    var radians = this.rotation * Math.PI / 180; //ratation是基于弧度,这里换算为了角度
    var cos = Math.cos(radians);
    var sin = Math.sin(radians);
    var localXCos = localX * cos + this.x;
    var localXSin = localX * sin;
    var localYCos = localY * cos + this.y;
    var localYSin = localY * sin;
    var localX2Cos = localX2 * cos + this.x;
    var localX2Sin = localX2 * sin;
    var localY2Cos = localY2 * cos + this.y;
    var localY2Sin = localY2 * sin;
    var offset = this.offset;
    offset[RegionAttachment.OX1] = localXCos - localYSin;
    offset[RegionAttachment.OY1] = localYCos + localXSin;
    offset[RegionAttachment.OX2] = localXCos - localY2Sin;
    offset[RegionAttachment.OY2] = localY2Cos + localXSin;
    offset[RegionAttachment.OX3] = localX2Cos - localY2Sin;
    offset[RegionAttachment.OY3] = localY2Cos + localX2Sin;
    offset[RegionAttachment.OX4] = localX2Cos - localYSin;
    offset[RegionAttachment.OY4] = localYCos + localX2Sin;
};
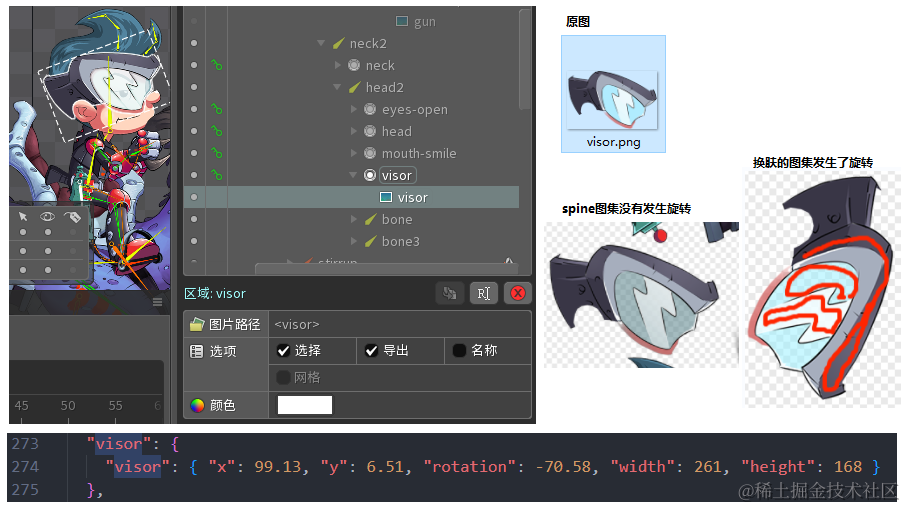
情况3
情况4
MeshAttachment测试例子
情况1
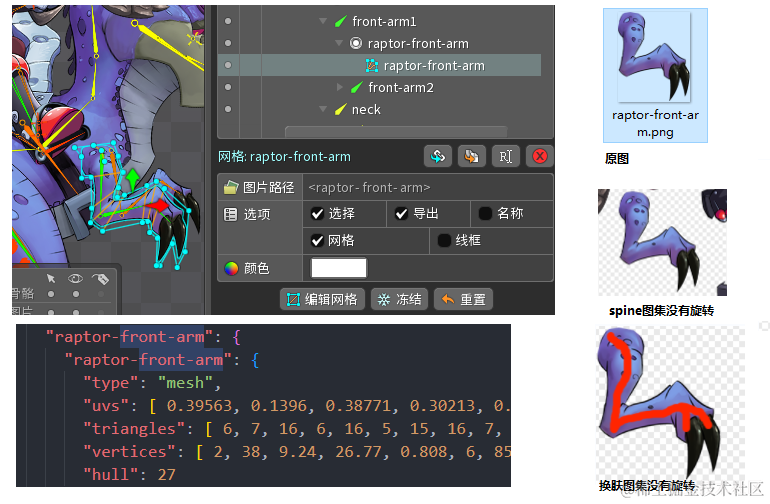
情况2
情况3
情况4
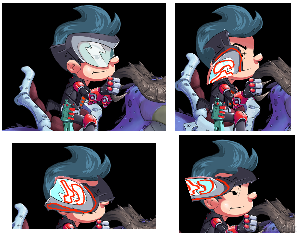
以上就是spine换装时,需要注意的情况,比较多,主要是需要处理顶点旋转带来的问题,还是比较麻烦的。
