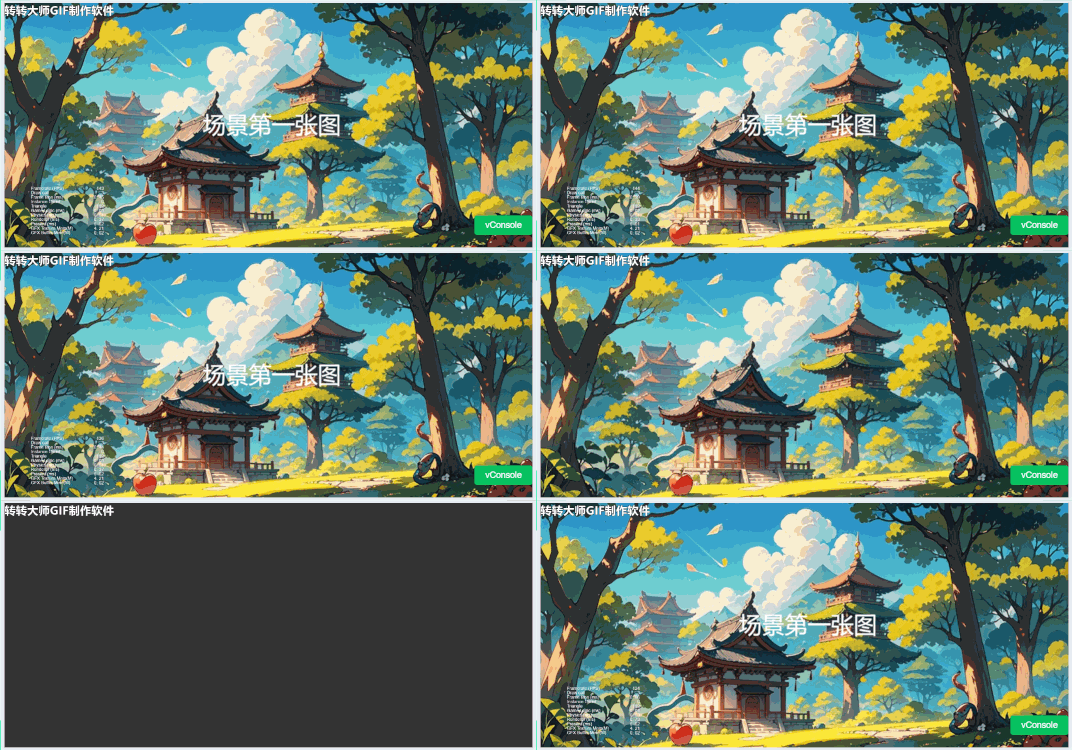
引擎版本:3.7.4
看了论坛大概有两种方案:
- HTML IMG标签定一个图片,进度条什么的到场景完成,在场景里关闭隐藏。
- WEB GL渲染 基于WX
环境现状:
使用引擎3.7.4,游戏横屏,附2个DEMO末尾。麻烦大佬帮我看看啥问题。
方案一:
我用HTML IMG标签,在竖屏的状态下进入游戏,webmobile平台,会先看到竖屏再横屏显示。
html代码如下:
 <div id="GameDiv" cc_exact_fit_screen="true">
    <div class="custom_splash-screen" id="custom_splash-screen">
      <img class="splash-screen-image" src="./splash.jpg" alt="" id="splash-screen-image">
    </div>

    <div id="Cocos3dGameContainer">
      <!-- <canvas id="canvas" oncontextmenu="event.preventDefault()" tabindex="99"></canvas> -->
      <canvas id="GameCanvas" oncontextmenu="event.preventDefault()" tabindex="99"></canvas>
    </div>
  </div>
CSS代码:
.custom_splash-screen {
	z-index: 99;
	position: absolute;
	left: 0;
	top: 0;
	width: 100%;
	height: 100%;
}

.splash-screen-image {
  position: absolute;
	width: 100%;
	height: 100%;
  top: 50%;
  left: 50%;
  transform: translate(-50%, -50%);
  object-fit: cover;
}
其中splash.jpg是一张图横屏。
测试发现:
- 在纯横屏模式没有问题;
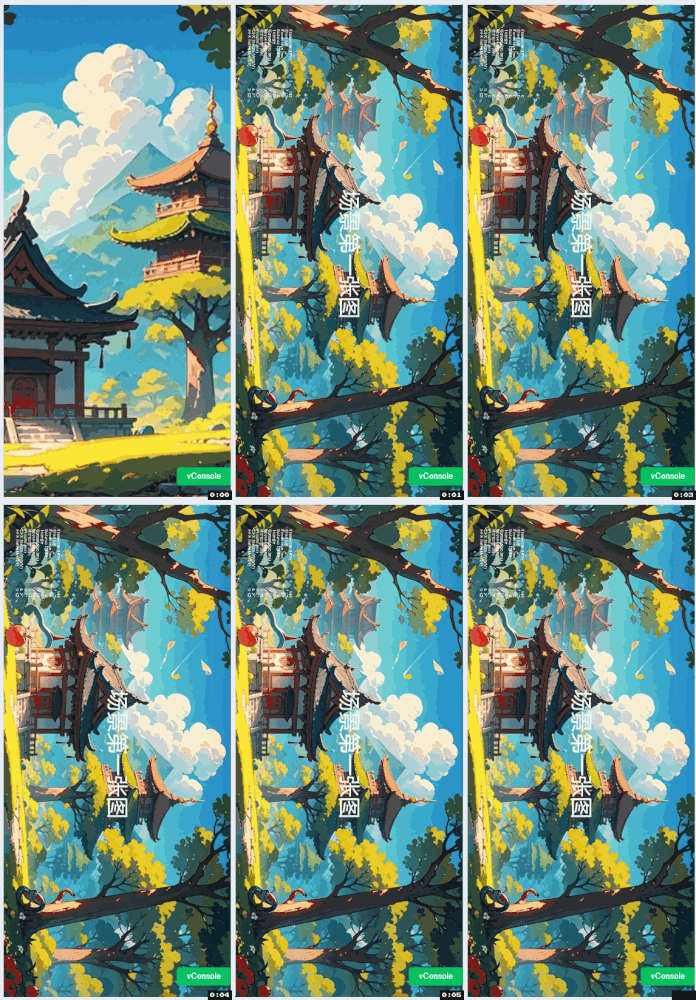
- 在竖屏模式,游戏启动后会先竖屏显示某一部分,然后横屏正常显示。
总觉得有些奇怪,毕竟习惯拿微信扫,或者说手机系统竖向锁定来玩游戏,看到这个情况就多少有点难接受了。
竖屏模式:
方案二:
感觉上述走不通,我尝试用webGL解决,在生成的index.html里,嵌入顶点和片段着色器代码:
代码如下:
  <!-- vertex shader -->
<script  id="vertex-shader-2d" type="x-shader/x-vertex">
  attribute vec2 a_position;
  uniform mat3 u_matrix;
  uniform vec2 u_resolution;

  attribute vec2 a_texCoord;
  varying vec2 v_texCoord;

  void main() {
     // Multiply the position by the matrix.
     vec2 position = (u_matrix * vec3(a_position, 1)).xy;

     // convert the rectangle from pixels to 0.0 to 1.0
     vec2 zeroToOne = position / u_resolution;

     // convert from 0->1 to 0->2
     vec2 zeroToTwo = zeroToOne * 2.0;

     // convert from 0->2 to -1->+1 (clipspace)
     vec2 clipSpace = zeroToTwo - 1.0;

     gl_Position = vec4(clipSpace * vec2(1, -1), 0, 1);

     // pass the texCoord to the fragment shader
     // The GPU will interpolate this value between points.
     v_texCoord = a_texCoord;
  }
  </script>
  <!-- fragment shader -->
  <script  id="fragment-shader-2d" type="x-shader/x-fragment">
  precision mediump float;

  // our texture
  //为什么u_image没有设置还能正常运行?
  //全局变量默认为 0 所以 u_image 默认使用纹理单元 0 。 纹理单元 0 默认为当前活跃纹理,所以调用 bindTexture 会将纹理绑定到单元 0 。
  uniform sampler2D u_image;

  // the texCoords passed in from the vertex shader.
  varying vec2 v_texCoord;

  void main() {
    // 在纹理上寻找对应颜色值
     gl_FragColor = texture2D(u_image, v_texCoord);
  }
  </script>
  <script src="https://webglfundamentals.org/webgl/resources/webgl-utils.js"></script>

  <script src="./firstScreen.js"></script>
firstScreen.js部分,我取的是GameCanvas画布,直接贴代码:
"use strict";

/**
 * create by kevin
 * Date:2024年9月4日 17:12:31
*/
function main() {
  var image = new Image();
  image.src = "splash.jpg";
  image.onload = function () {
    render(image);
  };
}


function render(image) {
  var canvas = document.querySelector("#GameCanvas");
  var gl = canvas.getContext("webgl");

  if (!gl) {
    return;
  }

  // setup GLSL program
  var program = webglUtils.createProgramFromScripts(gl, ["vertex-shader-2d", "fragment-shader-2d"]);

  // look up where the vertex data needs to go.
  var positionLocation = gl.getAttribLocation(program, "a_position");
  var texcoordLocation = gl.getAttribLocation(program, "a_texCoord");
  var matrixLocation = gl.getUniformLocation(program, "u_matrix");

  // Create a buffer to put three 2d clip space points in
  var positionBuffer = gl.createBuffer();

  // Bind it to ARRAY_BUFFER (think of it as ARRAY_BUFFER = positionBuffer)
  gl.bindBuffer(gl.ARRAY_BUFFER, positionBuffer);

  setRectangle(gl, 0, 0, image.width, image.height);

  // provide texture coordinates for the rectangle.
  var texcoordBuffer = gl.createBuffer();
  gl.bindBuffer(gl.ARRAY_BUFFER, texcoordBuffer);
  gl.bufferData(gl.ARRAY_BUFFER, new Float32Array([
    0.0, 0.0,
    1.0, 0.0,
    0.0, 1.0,
    0.0, 1.0,
    1.0, 0.0,
    1.0, 1.0,
  ]), gl.STATIC_DRAW);

  // Create a texture.
  var texture = gl.createTexture();
  gl.bindTexture(gl.TEXTURE_2D, texture);

  /**
   * 这段代码是WebGL API的一部分,用于设置2D纹理对象的参数。WebGL是一个JavaScript API,用于在网页上渲染交互式3D和2D图形,无需使用插件。下面是对这段代码的解释:

    gl.texParameteri(target, pname, param): 这是一个设置纹理参数的函数,其中:

    target 是纹理的目标类型,这里是 gl.TEXTURE_2D,表示2D纹理。
    pname 是要设置的参数的名称。
    param 是要设置的参数值。
    gl.TEXTURE_WRAP_S 和 gl.TEXTURE_WRAP_T: 这两个参数控制纹理在S轴(水平方向)和T轴(垂直方向)的包裹方式。设置为 gl.CLAMP_TO_EDGE 表示纹理坐标超出[0.0, 1.0]范围时,纹理将被拉伸到最近的边缘像素的颜色。

    gl.TEXTURE_MIN_FILTER 和 gl.TEXTURE_MAG_FILTER: 这两个参数控制纹理的过滤方式。gl.NEAREST 表示使用最接近的纹理元素(像素)进行过滤,这通常用于点采样,可以提供最快的渲染速度,但可能在纹理放大时出现明显的锯齿。

    这段代码设置了一个2D纹理,使其在纹理坐标超出边界时不重复纹理图案,而是拉伸到边缘,并使用最近邻点采样,这通常用于需要快速渲染而不追求高质量纹理效果的场景。
   */
  gl.texParameteri(gl.TEXTURE_2D, gl.TEXTURE_WRAP_S, gl.CLAMP_TO_EDGE);
  gl.texParameteri(gl.TEXTURE_2D, gl.TEXTURE_WRAP_T, gl.CLAMP_TO_EDGE);
  gl.texParameteri(gl.TEXTURE_2D, gl.TEXTURE_MIN_FILTER, gl.NEAREST);
  gl.texParameteri(gl.TEXTURE_2D, gl.TEXTURE_MAG_FILTER, gl.NEAREST);

  /**
   * 参数列表:
    gl.TEXTURE_2D: 表示这是2D纹理。
    0: 这是纹理的mipmap级别,0表示基本级别,也就是最大的图像尺寸。
    gl.RGBA: 这指定了纹理的内部格式,RGBA表示纹理包含红色、绿色、蓝色和透明度通道。
    gl.RGBA: 这指定了传入的数据格式,与内部格式相同,表示传入的数据包含红色、绿色、蓝色和透明度通道。
    gl.UNSIGNED_BYTE: 这指定了数据类型,UNSIGNED_BYTE表示数据是以无符号字节格式提供的,这是WebGL中最常见的数据类型。
    image: 这是一个HTMLImageElement对象,表示要上传到纹理的图像。
   */
  gl.texImage2D(gl.TEXTURE_2D, 0, gl.RGBA, gl.RGBA, gl.UNSIGNED_BYTE, image);

  // lookup uniforms
  var resolutionLocation = gl.getUniformLocation(program, "u_resolution");


  webglUtils.resizeCanvasToDisplaySize(gl.canvas);

  // Tell WebGL how to convert from clip space to pixels
  gl.viewport(0, 0, gl.canvas.width, gl.canvas.height);
  // Set a rectangle the same size as the image.
  var newWidth = canvas.width;
  var newHight = canvas.height;

  console.log("result :", newWidth, newHight);
  // let ratioW = gl.canvas.width / image.width;
  // let ratioH = gl.canvas.height / image.height;
  // image.width = gl.canvas.width
  // image.height = gl.canvas.height

  // Clear the canvas
  gl.clearColor(0, 0, 0, 0);
  gl.clear(gl.COLOR_BUFFER_BIT);

  // Tell it to use our program (pair of shaders)
  gl.useProgram(program);

  // Turn on the position attribute
  gl.enableVertexAttribArray(positionLocation);

  // Bind the position buffer.
  gl.bindBuffer(gl.ARRAY_BUFFER, positionBuffer);

  // Tell the position attribute how to get data out of positionBuffer (ARRAY_BUFFER)
  var size = 2;          // 2 components per iteration
  var type = gl.FLOAT;   // the data is 32bit floats
  var normalize = false; // don't normalize the data
  var stride = 0;        // 0 = move forward size * sizeof(type) each iteration to get the next position
  var offset = 0;        // start at the beginning of the buffer
  gl.vertexAttribPointer(
    positionLocation, size, type, normalize, stride, offset);

  // Turn on the texcoord attribute
  gl.enableVertexAttribArray(texcoordLocation);

  // bind the texcoord buffer.
  gl.bindBuffer(gl.ARRAY_BUFFER, texcoordBuffer);

  // Tell the texcoord attribute how to get data out of texcoordBuffer (ARRAY_BUFFER)
  var size = 2;          // 2 components per iteration
  var type = gl.FLOAT;   // the data is 32bit floats
  var normalize = false; // don't normalize the data
  var stride = 0;        // 0 = move forward size * sizeof(type) each iteration to get the next position
  var offset = 0;        // start at the beginning of the buffer
  gl.vertexAttribPointer(
    texcoordLocation, size, type, normalize, stride, offset);

  // set the resolution
  gl.uniform2f(resolutionLocation, gl.canvas.width, gl.canvas.height);
  let scale = [1, 1];
  //计算缩放
  let fixHeight = image.width > image.height;
  let visibleSize = gl.canvas;
  // if (fixHeight) {
  //   if (image.width < visibleSize.width) {
  //     let ratio = visibleSize.width / image.width;
  //     console.log("ratio width1:", ratio);
  //     scale = [ratio, ratio];
  //   }
  // } else {
  //   if (image.height < visibleSize.height) {
  //     let ratio = visibleSize.height / image.height;
  //     console.log("ratio width2:", ratio);
  //     scale = [ratio, ratio];
  //   }
  // }
  let raidio = Math.max(visibleSize.width/image.width,visibleSize.height/image.height)
  scale = [raidio,raidio];

  //平移到屏幕中心
  var translation = [gl.canvas.width / 2, gl.canvas.height / 2];
  var translationMatrix = m3.translation(translation[0], translation[1]);
  var scaleMatrix = m3.scaling(scale[0], scale[1]);

  // make a matrix that will move the origin of the 'image' to its center.
  var moveOriginMatrix = m3.translation(-image.width / 2, -image.height / 2);

  var matrix = m3.multiply(translationMatrix, scaleMatrix);
  matrix = m3.multiply(matrix, moveOriginMatrix);
  // Set the matrix.
  gl.uniformMatrix3fv(matrixLocation, false, matrix);

  // Draw the rectangle.
  var primitiveType = gl.TRIANGLES;
  var offset = 0;
  var count = 6;
  console.log("开始画..");
  gl.drawArrays(primitiveType, offset, count);
}

function setRectangle(gl, x, y, width, height) {
  var x1 = x;
  var x2 = x + width;
  var y1 = y;
  var y2 = y + height;
  gl.bufferData(gl.ARRAY_BUFFER, new Float32Array([
    x1, y1,
    x2, y1,
    x1, y2,
    x1, y2,
    x2, y1,
    x2, y2,
  ]), gl.STATIC_DRAW);
}

var m3 = {
  translation: function (tx, ty) {
    return [
      1, 0, 0,
      0, 1, 0,
      tx, ty, 1,
    ];
  },

  rotation: function (angleInRadians) {
    var c = Math.cos(angleInRadians);
    var s = Math.sin(angleInRadians);
    return [
      c, -s, 0,
      s, c, 0,
      0, 0, 1,
    ];
  },

  scaling: function (sx, sy) {
    return [
      sx, 0, 0,
      0, sy, 0,
      0, 0, 1,
    ];
  },

  multiply: function (a, b) {
    var a00 = a[0 * 3 + 0];
    var a01 = a[0 * 3 + 1];
    var a02 = a[0 * 3 + 2];
    var a10 = a[1 * 3 + 0];
    var a11 = a[1 * 3 + 1];
    var a12 = a[1 * 3 + 2];
    var a20 = a[2 * 3 + 0];
    var a21 = a[2 * 3 + 1];
    var a22 = a[2 * 3 + 2];
    var b00 = b[0 * 3 + 0];
    var b01 = b[0 * 3 + 1];
    var b02 = b[0 * 3 + 2];
    var b10 = b[1 * 3 + 0];
    var b11 = b[1 * 3 + 1];
    var b12 = b[1 * 3 + 2];
    var b20 = b[2 * 3 + 0];
    var b21 = b[2 * 3 + 1];
    var b22 = b[2 * 3 + 2];
    return [
      b00 * a00 + b01 * a10 + b02 * a20,
      b00 * a01 + b01 * a11 + b02 * a21,
      b00 * a02 + b01 * a12 + b02 * a22,
      b10 * a00 + b11 * a10 + b12 * a20,
      b10 * a01 + b11 * a11 + b12 * a21,
      b10 * a02 + b11 * a12 + b12 * a22,
      b20 * a00 + b21 * a10 + b22 * a20,
      b20 * a01 + b21 * a11 + b22 * a21,
      b20 * a02 + b21 * a12 + b22 * a22,
    ];
  },
};

main();
测试如下:
- 在浏览器跑提示:This device does not support WebGL.

原因在于GameCanvas这个节点不知道为啥不支持。如果使用canvas不会有这个问题,但是会有两个画布同时显示,这就尴尬了。论坛的很多方案都是基于微信取得的微信都canvas。但我这个web-mobile平台。 - 横屏模式下没有问题,图片可以正常渲染,虽然显示了This device does not support WebGL,但是渲染后,会闪一下黑屏画面后,切入了正常的场景背景图。
- 竖屏模式依然表现糟糕:图片先竖屏显示,然后横屏,跟着再黑一下,最后显示了正常的场景背景。
横屏:

DEMO-IMG:
HelloWorld-IMG-TEST.zip (4.0 MB)
DEMO-WEBGL
HelloWorld-WEBGL-TEST.zip (4.0 MB)
求大佬看看 


