
起因
事情是这样子的。楼主因为失业在家数月有余,幸得好友拉扯一把,给我介绍了位甲方。于是楼主就怀着忐忑的心情去找甲方爸爸对了需求。

(甲方):我们想要做一个跑酷类的游戏,是类似于这个样子的,巴拉巴拉。

(楼主):没问题,你看我以前做的这个跑酷的游戏,你看这个道具,你看这个关卡。炫酷不。

(甲方):但是我们的预算不多,只准备做一关。不能像你们这个游戏,有策划自己去制作关卡的。而且我们希望每次关卡的跑道都有变化。不是纯直线。

(楼主):作一关也行,我可以制作一些直线,弯道,上下坡,然后在游戏里随机把这些拼接起来做成跑道。

(甲方):而且我们需要在跑道上放置一些金币之类的道具。这些数据是后台配置的,每次打开这个游戏,根据后台传输的数据将金币放到跑道上。

(楼主):如果跑道是弯曲的,而不是直线的,你们配置道具的位置是很费劲的。假设跑道是直的。你们的后台配置的时候直接在纸上比划一下坐标就能算个大概。如果是弯曲的,你们的道具大概率是不在跑道上的啊。

(甲方):你看这样子行不行。进入游戏的时候给你传一个数组[0,1,2,1,2]。这个表示跑道是直,左转,右转,左转,右转。这样子的话这个跑道就确定下来了,那么配置道具的位置就有迹可循了。

(楼主):你的做法理论上可行,但是实际上完全不可行。你们的员工就算配置了跑道的形状,难道他在纸上能算出来这个跑道的曲率,然后算出来道具的位置吗?就算他能算出来,你们想要配置几十上百关,员工不要算吐血吗?

(甲方):那你想想办法呀。

(楼主摸了摸干瘪的钱包):好吧,我回去想想办法
(以上内容纯属虚构,如有雷同。纯属巧合)
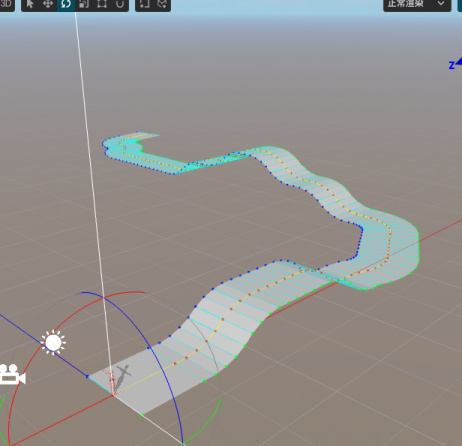
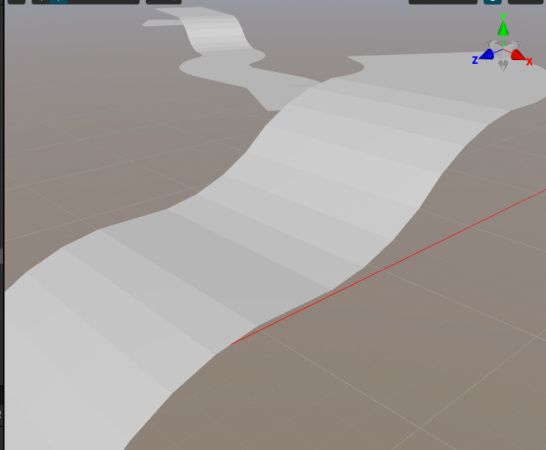
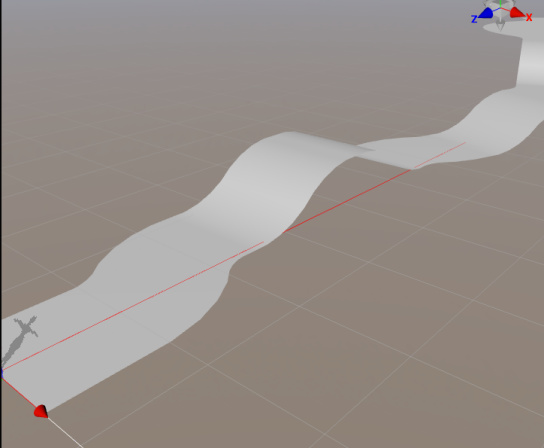
就这样子楼主回家摸索了2天,连最爱的擦边视频都不看了,终于找到了解决方案。效果如下。
这个跑道满足以下条件
-
由直线,左转弯,右转弯,上坡,下坡五种情况组成
-
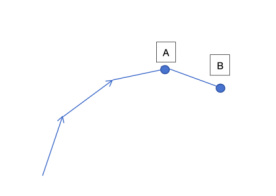
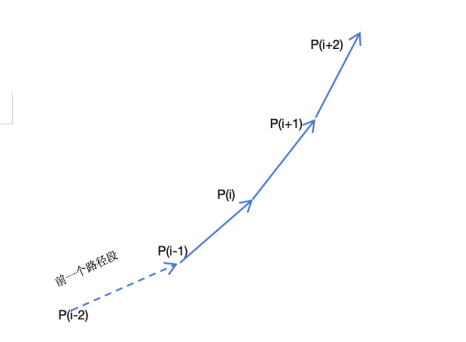
即使有转弯,跑道也能保证其始终向前延伸的。并不会下图这种B点没有前进反而后退的情况。
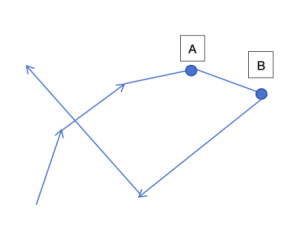
这是为了防止在跑道长度太长的情况下,可能会出现的跑道重叠。如下图所示。
-
策划可以很方便的将道具的位置配置到跑道上,策划只需要将跑道当成一条直线来对待。在知道了跑道的宽度PathWidth,跑道的总长度PathLength的情况,配置物体的X坐标在[-PathWidth/2, PathWidth/2],然后Z坐标为[0, PathLength]即可.对策划的心智负担大大减轻。
-
可以将指定跑道的最高点和最低点,使得跑道在竖直方向上永远为压缩在一个范围内。
本方案已经发布到github。大家可以按结合这个仓库接下来内容的学习。
https://github.com/xiayangqun/CocosPathCreator
解决方案讲解
1.由点到线
我们首先在3D空间中动态生成一条跑线,而这个跑线则由许多的点组成。为了能清晰的在编辑器中检测我们生成的点对不对,我们先制作一个PathPoint预制件。创建一个空节点,然后将以下脚本挂在这个空节点上即可
(注意:这个节点的绘制功能依赖DebugDraw.ts 文件,请从github仓库上自取)
import { _decorator, Color, Component, Node, Vec3 } from "cc";

import { drawCube, drawLineFromTo } from "./DebugDraw";

const { ccclass, property, executeInEditMode } = _decorator;

@ccclass("PathPoint")

@executeInEditMode

export class PathPoint extends Component {

@property({ type: Boolean })

public drawDebug: boolean = true;

public leftVertex:Vec3 = null;

public rightVertex:Vec3 = null;

start() {

}

update(deltaTime: number) {

if(this.drawDebug){

//画自己所在的位置

let selfWorldPos = this.node.worldPosition;

drawCube(selfWorldPos, 0.1, Color.RED);

//画路径线

let next = this.node.getSiblingIndex() + 1;

if(next < this.node.parent!.children.length){

let nextNode = this.node.parent!.children[next];

let nextPos = nextNode.worldPosition;

drawLineFromTo(selfWorldPos, nextPos, Color.YELLOW);

}

}

}

}
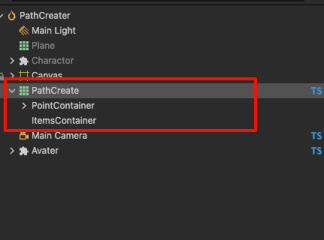
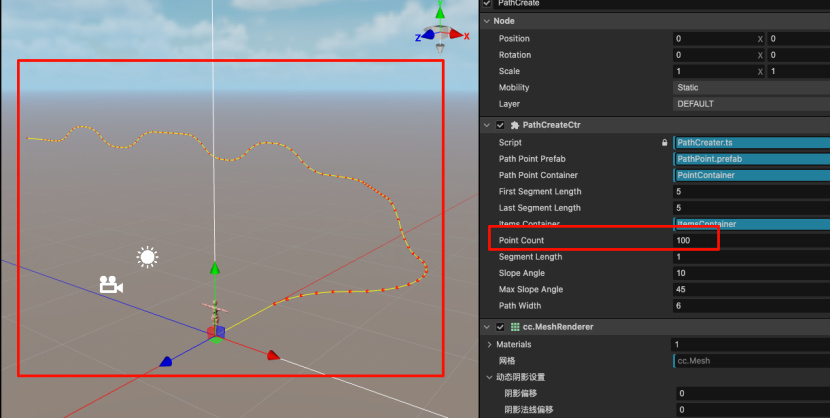
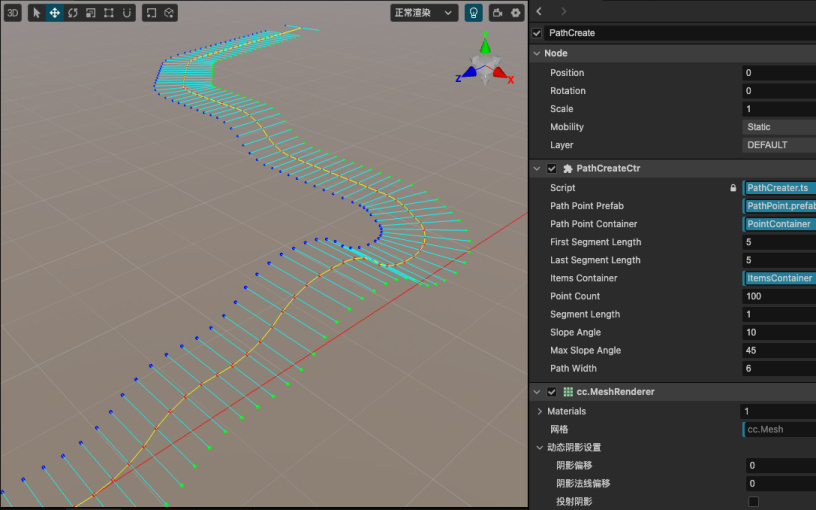
接着,我们在场景上新建空节点 PathCreate,
设置位置为0,0,0。接着在他下边创建2个空的子节点 PointContainer,
ItemsContainer。如图所示
接着我们创建脚本
PathCreateCtrl.ts挂到PathCreate上。我们先定义好以下几个属性。
@ccclass("PathCreateCtr")

export class PathCreateCtr extends Component {

//路径点预制件

@property(Prefab)

pathPointPrefab: Prefab = null;

//路径点节点的容易

@property(Node)

pathPointContainer: Node = null;

//我们希望路径第一段永远是固定长度为firstSegmentLength的直线跑道

@property(CCInteger)

firstSegmentLength: number = 5;

//我们希望路径最后一段永远是固定长度为lastSegmentLength的直线跑道

@property(CCInteger)

lastSegmentLength: number = 5;

@property(Node)

public itemsContainer: Node = null!;

//路径网格

private mesh: Mesh = new Mesh();

//一共会生成多少个路径点

@property({ type: CCInteger })

get pointCount(): number {

return this._pointCount;

}

set pointCount(value: number) {

this._pointCount = value;

this.createPathPoint(value);

}

private _pointCount: number = 10;

//除去开头和结尾的长度,每个路径点之间的直线长度。

//此值越大,则路径越不平滑

@property({ type: CCFloat })

segmentLength: number = 1;

//路径在上坡和下坡的时候,每个路径线段之间的夹角是多少,此值越大,则坡度变化越大

@property({ type: CCFloat })

slopeAngle: number = 15;

//路径线段在上坡和下坡的时候允许的最大的角度是多少。

@property({ type: CCFloat })

maxSlopeAngle: number = 45;

//跑道的宽度

@property({ type: CCFloat })

pathWidth: number = 8;

}
接着我们来实现
createPathPoint函数,我们先摆放好第一个路径段和最后一个路径段的位置。如下代码。
private createPathPoint(newValue: number) {

if (newValue < 3) {

this.pathPointContainer.removeAllChildren();

console.warn("路径点数量不能少于3个");

return;

}

//先生成指定数量的路径点.

let children = this.pathPointContainer.children;

let currentLength = children.length;

let needLength = newValue + 1; // 包括起点

if (needLength > currentLength) {

for (let i = currentLength; i < needLength; i++) {

let newNode = instantiate(this.pathPointPrefab);

newNode.parent = this.pathPointContainer;

}

} else if (needLength < currentLength) {

for (let i = currentLength - 1; i >= needLength; i\--) {

this.pathPointContainer.removeChild(children[i]);

}

}

//由 P0 到 P1的路径段l(0,1)为直线段,长度为 firstSegmentLength

children = this.pathPointContainer.children;

children[0].setPosition(0, 0, 0);

children[1].setPosition(0, 0, -this.firstSegmentLength);

//生成中间的路径点,待定

//最后一段路径为直线,长度为

lastSegmentLength。先计算出前一个路径段的方向,接着延续这个方向即可。

let lastDir = Vec3.subtract(new Vec3(), children[needLength -

2].position, children[needLength - 3].position);

lastDir = lastDir.normalize();

let lastPos = Vec3.scaleAndAdd(new Vec3(), children[needLength -

2].position, lastDir, this.lastSegmentLength

);

children[needLength - 1].setPosition(lastPos);
接下来,我们讨论中间路径生成的情况。中间路径生成分为以下五种情况。
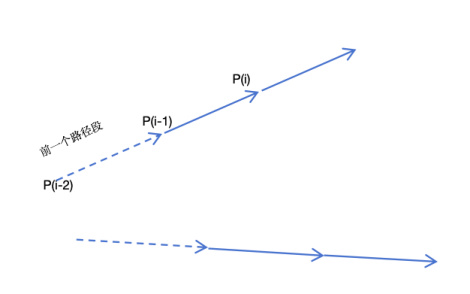
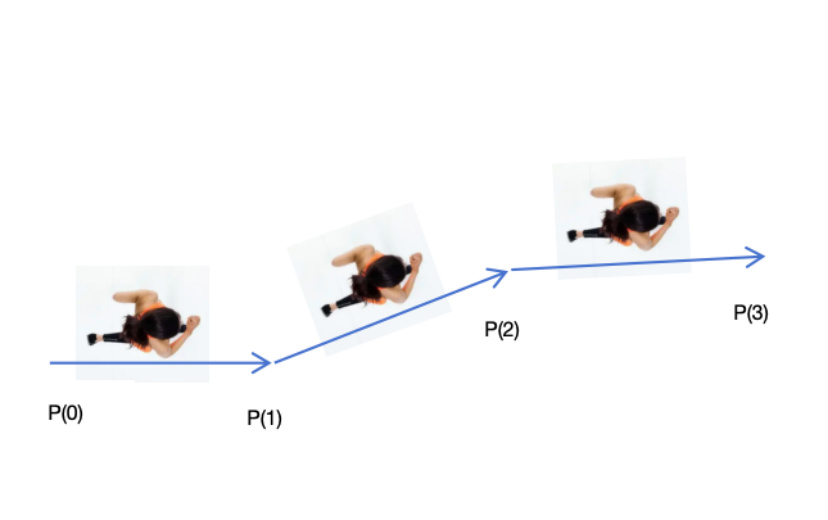
情况0:纯直线。如下图所示。这个时候,P(i)的位置可以通过前一个路径段的方向乘以segmentLength得到。
对应的计算代码如下图所示
let createDirecPath = (fromIndex: number) => {

let dir = Vec3.subtract(new Vec3(), children[fromIndex - 1].position,

children[fromIndex - 2].position);

dir = dir.normalize();

let newPos = Vec3.scaleAndAdd(new Vec3(), children[fromIndex -

1].position, dir, this.segmentLength);

children[fromIndex].setPosition(newPos);

}
如果想要从i开始,连续N个路径点都是直线,则可以用如下代码
let createDirecPathArray = (fromIndex: number, count: number) => {

for (let j = 0; j < count; j++) {

let curIndex = fromIndex + j;

createDirecPath(curIndex);

}

}
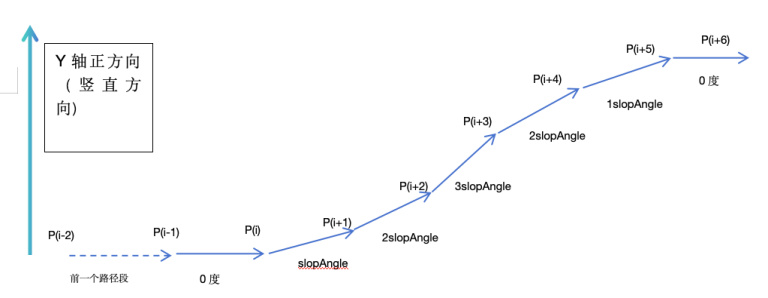
情况1:水平面上的左转线段。如下图所示,从P(i)开始,后续的每个路径线段都在上一个路径线段的方向上水平向左旋转了slopeAngle。在这里,必须保证P(i-2)-P(i-1)这条前置的路径段在Y轴上没有起落,如果这前置路径段在Y轴有落差,则后边的线段就不会是水平的,而是有Y轴既竖直方向上有落差。幸运的是,我们可以保证这一点。
对应的代码如下。这里的Count会有一个最大值限制,是为了防止这N个路径点累计的转弯角度超过90度,让跑道回头了,具体计算过程我们后边会提到。
let createLeftTurnPath = (fromIndex: number, count: number) => {

for (let j = 0; j < count; j++) {

let curIndex = fromIndex + j;

let dir = Vec3.subtract(new Vec3(), children[curIndex - 1].position,

children[curIndex - 2].position);

dir = dir.normalize();

let up = new Vec3(0, 1, 0);

let quat = new Quat();

Quat.fromAxisAngle(quat, up, this.slopeAngle \* Math.PI / 180);

let leftDir = Vec3.transformQuat(new Vec3(), dir, quat);

let newPos = Vec3.scaleAndAdd(new Vec3(), children[curIndex -

1].position, leftDir, this.segmentLength);

//如果弯度过大,导致当前的点z轴坐标大于前一个点的z轴坐标(路径回头了),则重新生成该点为直线。路径点的z应该是越来越小的。因

-Z为前进方向

if (newPos.z > children[curIndex - 1].position.z) {

createDirecPath(curIndex);

}

else {

children[curIndex].setPosition(newPos);

}

}

}
情况2:水平方向的右转线段。这种情况和情况1是相同的,只不过是右转而已。具体代码如下。(理论上,createRightTurnPath和 createLeftTurnPath应该合并为一个函数,不过楼主这里为了思维上清晰一点,没有这么做 )
let createRightTurnPath = (fromIndex: number, count: number) => {

for (let j = 0; j < count; j++) {

let curIndex = fromIndex + j;

let dir = Vec3.subtract(new Vec3(), children[curIndex - 1].position,

children[curIndex - 2].position);

dir = dir.normalize();

let up = new Vec3(0, 1, 0);

let quat = new Quat();

Quat.fromAxisAngle(quat, up, -this.slopeAngle \* Math.PI / 180);

let rightDir = Vec3.transformQuat(new Vec3(), dir, quat);

let newPos = Vec3.scaleAndAdd(new Vec3(), children[curIndex -

1].position, rightDir, this.segmentLength);

//如果弯度过大,导致当前的点z轴坐标大于前一个点的z轴坐标(路径回头了),则重新生成该点为直线

if (newPos.z > children[curIndex - 1].position.z) {

createDirecPath(curIndex);

}

else {

children[curIndex].setPosition(newPos);

}

}

}
情况3:竖直方向上的上坡曲线。如下所示。从P(i)-P(i+6)构成了一个完整的上坡曲线,并且保证在P(i+5)-P(i+6)这条线段最后是水平的。这样子就可以满足之前我提到的情况1的要求。从这个图中我们可以看出组成上坡线段的段数N一定是为单数
具体计算代码如下。
//当当前路径点设置为比前一个路径点在竖直方向上抬高angle度。

let createPitchPath = (fromIndex: number, angle: number) => {

let dir = Vec3.subtract(new Vec3(), children[fromIndex - 1].position,

children[fromIndex - 2].position);

dir = dir.normalize();

let right = Vec3.cross(new Vec3(), dir, Vec3.UP);

right = right.normalize();

let quat = new Quat();

Quat.fromAxisAngle(quat, right, angle \* Math.PI / 180);

let pitchDir = Vec3.transformQuat(new Vec3(), dir, quat);

let newPos = Vec3.scaleAndAdd(new Vec3(), children[fromIndex -

1].position, pitchDir, this.segmentLength);

children[fromIndex].setPosition(newPos);

}

let createNoseUpPitchPath = (fromIndex: number, slopAngle: number,

slopStep: number) => {

createDirecPath(fromIndex);

for (let l = 1; l < slopStep; l++) {

if (l < slopStep / 2) {

createPitchPath(fromIndex + l, slopAngle); //15

} else {

createPitchPath(fromIndex + l, -slopAngle); //15

}

}

//等价于

// createPitchPath(fromIndex + 1, 15); //15

// createPitchPath(fromIndex + 2, 15); //30

// createPitchPath(fromIndex + 3, 15); //45

// createPitchPath(fromIndex + 4, -15); //30

// createPitchPath(fromIndex + 5, -15); // 15

// createPitchPath(fromIndex + 6, -15); // 0

}
情况4:竖直方向上的下坡曲线,和情况3类似。这里不再赘述了。具体代码如下
let createNoseDownPitchPath = (fromIndex: number, slopAngle: number,

slopStep: number) => {

createDirecPath(fromIndex);

for (let l = 1; l < slopStep; l++) {

if (l < slopStep / 2) {

createPitchPath(fromIndex + l, -slopAngle); //15

} else {

createPitchPath(fromIndex + l, +slopAngle); //15

}

}

//等价于

// createPitchPath(fromIndex + 1, -15); //-15

// createPitchPath(fromIndex + 2, -15); //-30

// createPitchPath(fromIndex + 3, -15); //-45

// createPitchPath(fromIndex + 4, 15); //-30

// createPitchPath(fromIndex + 5, 15); // -15

// createPitchPath(fromIndex + 6, 15); // 0

}
5种具体情况讨论完后,我们可以生成中间的路径点了。
let i = 2;

//爬坡或者下坡需要的路径点数量,假设我们的坡度变化为15度,最大坡度为45度,则需要7个路径点来完成一个完整的上坡和下坡

// 0 15 30 45 30 15 0

//如果坡度变化为10度,则需要10个路径点来完成一个完整的上坡和下坡

// 0 10 20 30 40 50 40 30 20 10 0

let slopeCount = Math.floor(this.maxSlopeAngle / this.slopeAngle) \* 2 +

1;

//单次转弯允许的最大段数,这里是为了防止一次转弯就累计到了90度,让路径点回头了

let maxTurnCount = Math.floor(90 / this.slopeAngle);

//路径点的最低高度和最高高度,如果上坡之前发现当前高度已经达到最高了,就不会再上坡了

//同理,下坡也是一样的道理

let minHight = 0 + 1.47;

let maxHight = 5 - 1.47;

while (i < needLength - 1) {

// 0 直线

// 1 左转

// 2 右转

// 3 上坡

// 4 下坡

let randomType = Math.floor(Math.random() \* 5);

if (randomType === 0) {

let dirCectCount = Math.floor(Math.random() \* maxTurnCount);

//如果剩余的路径点不足,则直接创建剩余的所有路径点为直线

if (i + dirCectCount >= needLength - 1) {

dirCectCount = needLength - 1 - i;

}

createDirecPathArray(i, dirCectCount);

i += dirCectCount;

}

else if (randomType === 1) {

//左转,随机N个路径点进行连续左转,只要N不超过maxTurnCount就行

let turnCount = Math.floor(Math.random() \* maxTurnCount);

if (i + turnCount >= needLength - 1) {

turnCount = needLength - 1 - i;

}

createLeftTurnPath(i, turnCount);

i += turnCount;

}

else if (randomType === 2) {

//右转,随机N个路径点进行连续右转,只要N不超过maxTurnCount就行

let turnCount = Math.floor(Math.random() \* maxTurnCount);

if (i + turnCount >= needLength - 1) {

turnCount = needLength - 1 - i;

}

createRightTurnPath(i, turnCount);

i += turnCount;

}

else if (randomType === 3) {

//如果当前高度已经达到最高了,就不会再上坡了,直接创建直线路径

//如果剩余的路径点数量不足以完成一个完整的上坡和下坡,则创建直线路径

if (children[i - 1].position.y < maxHight && i + slopeCount <

needLength - 1) {

createNoseUpPitchPath(i, this.slopeAngle, slopeCount);

i += slopeCount;

}

else {

createDirecPath(i);

}

}

else {

//如果当前高度已经达到最低了,就不会再下坡了,直接创建直线路径

//如果剩余的路径点数量不足以完成一个完整的上坡和下坡,则创建直线路径

if (children[i - 1].position.y > minHight && i + slopeCount <

needLength - 1) {

createNoseDownPitchPath(i, this.slopeAngle, slopeCount);

i += slopeCount;

}

else {

createDirecPath(i);

}

}

}
完成这些代码后,我们在编辑内修改一下属性面板上的PointCount的值。应该可以看到生成了路径点。
2.由线到面
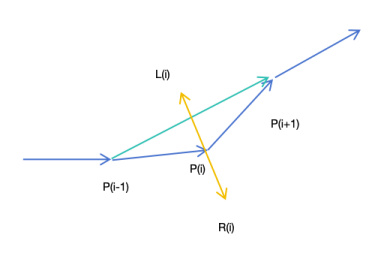
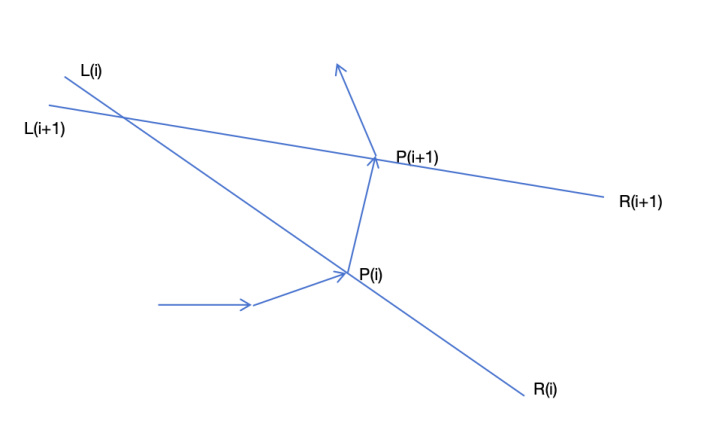
在生成了路径先后,我们就可以将这些点扩展成面了。如下图所示,我们的思路是算出P(i)的切线方向,然后以这个朝向为正方向,做这个正方向的垂直线。左右各平移PathWidth/2个单位。如下图所示。其中:P(0)的切线方向就是P(0)-P(1)这个线段,P(N-1)的切线就是P(N-2)-P(N-1)线段。
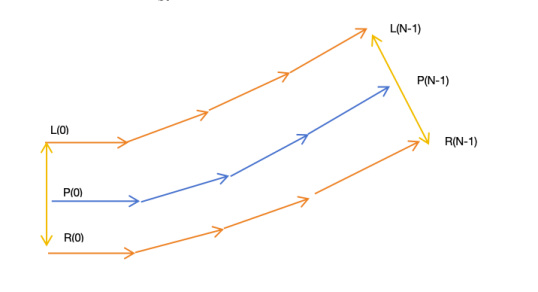
对于中间路径点P(i),我们则将P(i-i)-P(i+1)作为这个点的切线。如下图所示
根据这思路,我们来改造一下代码。修改PathPoint.ts中的update函数如下,用来帮忙画出L(i)和R(i)点
update(deltaTime: number) {

if(this.drawDebug){

//画自己所在的位置

let selfWorldPos = this.node.worldPosition;

drawCube(selfWorldPos, 0.1, Color.RED);

//画左右顶点

if(this.leftVertex){

const worldPoint = new Vec3();

Vec3.transformMat4(worldPoint, this.leftVertex,

this.node.parent.worldMatrix);

drawCube(worldPoint, 0.1, Color.BLUE);

drawLineFromTo(selfWorldPos, worldPoint, Color.CYAN);

}

if(this.rightVertex){

const worldPoint = new Vec3();

Vec3.transformMat4(worldPoint, this.rightVertex,

this.node.parent.worldMatrix);

drawCube(worldPoint, 0.1, Color.GREEN);

drawLineFromTo(selfWorldPos, worldPoint, Color.CYAN);

}

//画路径线

let next = this.node.getSiblingIndex() + 1;

if(next < this.node.parent!.children.length){

let nextNode = this.node.parent!.children[next];

let nextPos = nextNode.worldPosition;

drawLineFromTo(selfWorldPos, nextPos, Color.YELLOW);

}

}

}

在PathCreater.ts中将 set pointCount函数修改如下

set pointCount(value: number) {

this._pointCount = value;

this.createPathPoint(value);

this.createMeshData();

}
接着我们实现createMeshData函数
private createMeshData() {

let children = this.pathPointContainer.children;

let currentLength = children.length;

if (currentLength < 2) {

console.warn("路径点数量不足,无法生成网格");

return;

}

let leftArray: Array<Vec3> = [];

let rightArray: Array<Vec3> = [];

//计算每个路径点的左右顶点位置

for (let i = 0; i < currentLength; i++) {

let pathWidth = this.pathWidth;

let dir: Vec3;

if (i == 0) {

dir = Vec3.subtract(new Vec3(), children[i + 1].position,

children[i].position);

}

else if (i == currentLength - 1) {

dir = Vec3.subtract(new Vec3(), children[i].position, children[i -

1].position);

}

else {

dir = Vec3.subtract(new Vec3(), children[i + 1].position,

children[i - 1].position);

}

dir = dir.normalize();

let right = Vec3.cross(new Vec3(), dir, Vec3.UP);

right = right.normalize();

let leftPoint = Vec3.scaleAndAdd(new Vec3(), children[i].position,

right, -pathWidth / 2);

let rightPoint = Vec3.scaleAndAdd(new Vec3(), children[i].position,

right, pathWidth / 2);

children[i].getComponent(PathPoint).leftVertex = leftPoint;

children[i].getComponent(PathPoint).rightVertex = rightPoint;

leftArray.push(leftPoint);

rightArray.push(rightPoint);

}

}
效果展示
做完这一步后,我们继续在编辑器中测试,应该可以看到如下的结果
3.由面到顶点数据
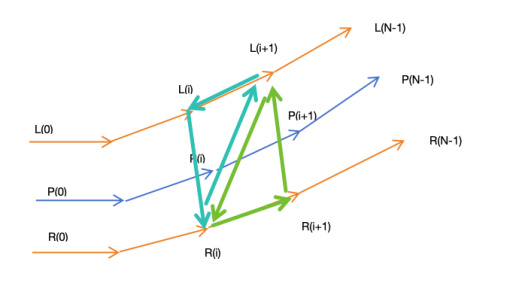
恭喜你,终于充满耐心看到这里了。接下来是激动人心的顶点数据填充环节。对于每一个P(i),我们先判断P(i+1)存在。如果存在就按照如下图的顺序来绘制三角形。这里顶点顺序需要满足右手螺旋定则。我们一次把L(i+1),L(i),R(i)
和 L(i+1), R(i), R(i+1) 2个三角形加入顶点数据集合。
接着我们要算每个顶点的法线,如果没有法线。你会发现你生成的跑道不会有光照。法线的计算也很简单。每个三角形顶点的法线等于与之相邻的两个2的叉乘。
例如R(i)的法线等于 L(i+1)-R(i) 和
L(i)-R(i)的叉乘。这里有个小技巧。因为这里的两个三角形完全共面的,所以只需要计算一个顶点的法线,就可以得到全部的六个法线的。
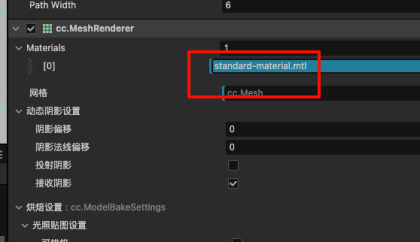
我们需要在PathCreate节点上添加MeshRenderer组件,为它选择一下默认的standard-material材质,如图所示
然后继续在createMeshData里追加代码如下。
let vertices: number[] = new Array((currentLength - 1) \* 6 \* 3);

let normals: number[] = new Array((currentLength - 1) \* 6 \* 3);

let indices: number[] = new Array((currentLength - 1) \* 2 \* 3);

//顶点数据集

for (let i = 0; i < currentLength - 1; i++) {

let verticesStartIndex = i \* 6 \* 3;

//左边三角形

vertices[verticesStartIndex + 0] = leftArray[i].x;

vertices[verticesStartIndex + 1] = leftArray[i].y;

vertices[verticesStartIndex + 2] = leftArray[i].z;

vertices[verticesStartIndex + 3] = rightArray[i].x;

vertices[verticesStartIndex + 4] = rightArray[i].y;

vertices[verticesStartIndex + 5] = rightArray[i].z;

vertices[verticesStartIndex + 6] = leftArray[i + 1].x;

vertices[verticesStartIndex + 7] = leftArray[i + 1].y;

vertices[verticesStartIndex + 8] = leftArray[i + 1].z;

//右边三角形

vertices[verticesStartIndex + 9] = leftArray[i + 1].x;

vertices[verticesStartIndex + 10] = leftArray[i + 1].y;

vertices[verticesStartIndex + 11] = leftArray[i + 1].z;

vertices[verticesStartIndex + 12] = rightArray[i].x;

vertices[verticesStartIndex + 13] = rightArray[i].y;

vertices[verticesStartIndex + 14] = rightArray[i].z;

vertices[verticesStartIndex + 15] = rightArray[i + 1].x;

vertices[verticesStartIndex + 16] = rightArray[i + 1].y;

vertices[verticesStartIndex + 17] = rightArray[i + 1].z;

//法线

let solveNormal = (target: Vec3, p1: Vec3, p2: Vec3) => {

let v1 = Vec3.subtract(new Vec3(), p1, target);

let v2 = Vec3.subtract(new Vec3(), p2, target);

let normal = Vec3.cross(new Vec3(), v1, v2);

normal = normal.normalize();

return normal;

}

let leftArrayN = solveNormal(leftArray[i], rightArray[i],

leftArray[i + 1]);

let rightArrayN = leftArrayN;//solveNormal(rightArray[i],

leftArray[i + 1], leftArray[i]);

let leftNextN = leftArrayN;//solveNormal(leftArray[i + 1],

leftArray[i], rightArray[i]);

let leftNextN2 = leftArrayN; //solveNormal(leftArray[i + 1],

rightArray[i], rightArray[i + 1]);

let rightN2 = leftNextN2;//solveNormal(rightArray[i], rightArray[i +

1], leftArray[i + 1]);

let rightNextN = leftNextN2;//solveNormal(rightArray[i + 1],

leftArray[i + 1], rightArray[i]);

//左边三角形

normals[verticesStartIndex + 0] = leftArrayN.x;

normals[verticesStartIndex + 1] = leftArrayN.y;

normals[verticesStartIndex + 2] = leftArrayN.z;

normals[verticesStartIndex + 3] = rightArrayN.x;

normals[verticesStartIndex + 4] = rightArrayN.y;

normals[verticesStartIndex + 5] = rightArrayN.z;

normals[verticesStartIndex + 6] = leftNextN.x;

normals[verticesStartIndex + 7] = leftNextN.y;

normals[verticesStartIndex + 8] = leftNextN.z;

//右边三角形

normals[verticesStartIndex + 9] = leftNextN2.x;

normals[verticesStartIndex + 10] = leftNextN2.y;

normals[verticesStartIndex + 11] = leftNextN2.z;

normals[verticesStartIndex + 12] = rightN2.x;

normals[verticesStartIndex + 13] = rightN2.y;

normals[verticesStartIndex + 14] = rightN2.z;

normals[verticesStartIndex + 15] = rightNextN.x;

normals[verticesStartIndex + 16] = rightNextN.y;

normals[verticesStartIndex + 17] = rightNextN.z;

//索引数据集

let indicesStartIndex = i \* 2 \* 3;

let vertexIndex = i \* 6;

indices[indicesStartIndex + 0] = vertexIndex + 0;

indices[indicesStartIndex + 1] = vertexIndex + 1;

indices[indicesStartIndex + 2] = vertexIndex + 2;

indices[indicesStartIndex + 3] = vertexIndex + 3;

indices[indicesStartIndex + 4] = vertexIndex + 4;

indices[indicesStartIndex + 5] = vertexIndex + 5;

}

const mesh: Mesh = utils.MeshUtils.createMesh(

{

positions: vertices,

indices: indices,

normals: normals,

},

this.mesh,

);

this.node.getComponent(MeshRenderer).mesh = this.mesh;
继续在编辑器中测试,你会看到如下结果。至此,我们的路径生成已经结束了。
4.法线的优化
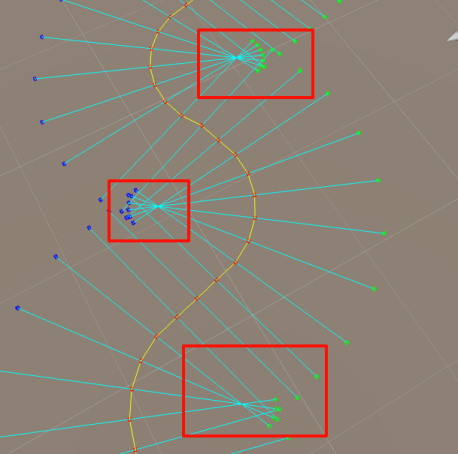
虽然基本网格已经生成了,但是只要仔细观察你就会发现在上坡和下坡的地方,跑道的段落感非常的严重。如下图所示。
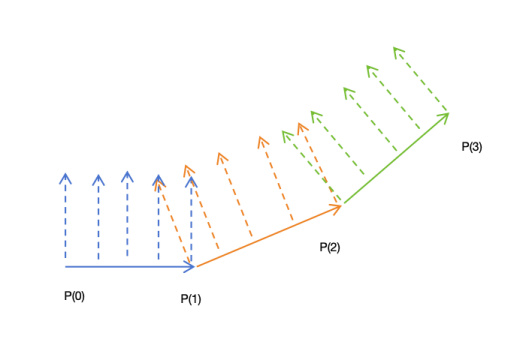
要解释这个现象也不困难。如下图所示,在一个上坡的跑道上,蓝,橙,绿这三条跑道的法线如下图所示,在一条子跑道上,所以点的法线都是同一个方向的。所以在进入下一个子跑道的时候,会有非常明显的明暗转折。
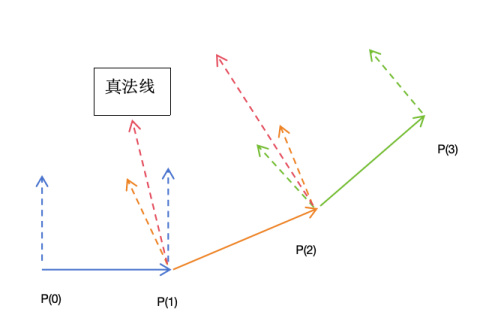
为了让法线的变化具有平滑性,我们应该把P(1)处的法线设置为2个法线的中间位置。如下图所示。
为此我们修改生成法线的相关代码如下
//法线

let solveNormal = (target: Vec3, p1: Vec3, p2: Vec3): Readonly<Vec3>

=> {

let v1 = Vec3.subtract(new Vec3(), p1, target);

let v2 = Vec3.subtract(new Vec3(), p2, target);

let normal = Vec3.cross(new Vec3(), v1, v2);

normal = normal.normalize();

return normal;

}

let curMathNormal = solveNormal(leftArray[i], rightArray[i],

leftArray[i + 1]);

let curTureNormal = new Vec3(curMathNormal);

if (preMathNormal) {

curTureNormal = Vec3.add(new Vec3(), curMathNormal,

preMathNormal).normalize();

preMathNormal = new Vec3(curMathNormal);

}

//左边三角形

normals[verticesStartIndex + 0] = curTureNormal.x;

normals[verticesStartIndex + 1] = curTureNormal.y;

normals[verticesStartIndex + 2] = curTureNormal.z;

normals[verticesStartIndex + 3] = curTureNormal.x;

normals[verticesStartIndex + 4] = curTureNormal.y;

normals[verticesStartIndex + 5] = curTureNormal.z;

//这个点的法线在下个I会为重置

normals[verticesStartIndex + 6] = curMathNormal.x;

normals[verticesStartIndex + 7] = curMathNormal.y;

normals[verticesStartIndex + 8] = curMathNormal.z;

//右边三角形

//这个点的法线在下个I会为重置

normals[verticesStartIndex + 9] = curMathNormal.x;

normals[verticesStartIndex + 10] = curMathNormal.y;

normals[verticesStartIndex + 11] = curMathNormal.z;

normals[verticesStartIndex + 12] = curMathNormal.x;

normals[verticesStartIndex + 13] = curMathNormal.y;

normals[verticesStartIndex + 14] = curMathNormal.z;

//这个点的法线在下个I会为重置

normals[verticesStartIndex + 15] = curMathNormal.x;

normals[verticesStartIndex + 16] = curMathNormal.y;

normals[verticesStartIndex + 17] = curMathNormal.z;

if (i > 1) {

//重置上个子路径的末尾的点的法线

let preVerticesStartIndex = (i - 1) \* 6 \* 3;

normals[preVerticesStartIndex + 6] = curTureNormal.x;

normals[preVerticesStartIndex + 7] = curTureNormal.y;

normals[preVerticesStartIndex + 8] = curTureNormal.z;

normals[preVerticesStartIndex + 9] = curTureNormal.x;

normals[preVerticesStartIndex + 10] = curTureNormal.y;

normals[preVerticesStartIndex + 11] = curTureNormal.z;

normals[preVerticesStartIndex + 15] = curTureNormal.x;

normals[preVerticesStartIndex + 16] = curTureNormal.y;

normals[preVerticesStartIndex + 17] = curTureNormal.z;

}
最终的效果也比较让人满意,可以看到,上下坡不再具有很强的段落感了。
5.可怕的黑影
当楼主以为一切都趋于完美的时候,可怕的事情发生了,如下图所示。在左转弯的地方出现了一大块黑影子。
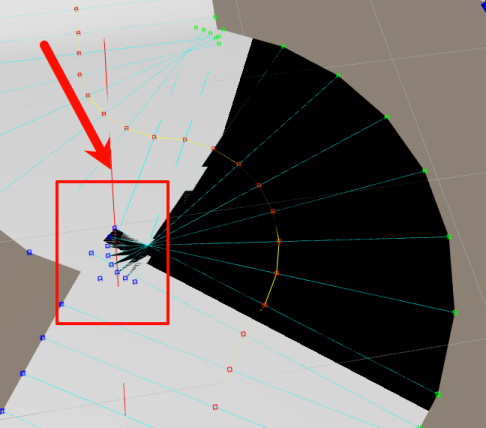
经过仔细观察可以发现,出现这种情况的原因是因为这条跑道的左边顶点出现了出现了类似于扇柄一样的错位。这会导致按照如下图顶点连接起来的三角形L(i+1)-L(i)-R(i)按照右手螺旋定则其正面面向了下边,而不是上边。这导致了黑影
(这种情况下,L(i+1)-L(i)-R(i)构成的三角形面朝上,是正确的)
(这种情况下,L(i+1)-L(i)-R(i)构成的三角形面朝下了)
在这里楼主通过计算相邻的2条L(i)R(i)线段的交点,并且缩短其中一条线段的方式来避免相邻的L(i)R(i)线段中间有交缠如下图所示,但是仍旧不能消除黑影。在这种情况下,可能是因为相邻的面片相互覆盖了。
目前较好的建议是修改 SlopeAngle和
PathWidth的值,这2个值只要满足一定的条件,是不会出现L(i)R(i)相交的情况的。
6.小人跑酷
接着我们介绍小人沿着跑道跑酷的逻辑。小人开跑的时候,会记录一下自己所在的的子跑道的起点和终点路径点。并且根据这个子路径的方向设置好自己的朝向即可。当达到了本条子跑道的终点时候,再将子跑道更新为下一段跑道。如下图所示。
(注意:当小人到达P(1)点时,不要直接将小人的朝向直接设置为P(2)-P(1),这样子转弯会非常突兀。正确的做法保存一个目标角度,在update里按照转角速度去修正自己的角度。这样子会比较圆滑。)
代码见项目中的 AvaterCtrl.ts
7.添加道具
有了路径点作为导航,那么添加道具就十分简单了。当我们填写好vx,
vz的坐标后,假设首段和尾段的子路径不参与计算,那么我们需要计算道具放在哪个子跑道上。使用
let startPointIndex = Math.floor(vz / this.segmentLength) + 1;

let endPointIndex = startPointIndex + 1;

即可计算出子跑道的起点和终点序号。然后根据子跑道的方向算出来物体的朝向即可。

//根据给出的虚拟位置,将物体放置到跑道上

public putItemByVirtualPosition (node:Node, vx:number, vz:number):

boolean {

let startPointIndex = Math.floor(vz / this.segmentLength) + 1;

let endPointIndex = startPointIndex + 1;

if(startPointIndex >= this.pathPointContainer.children.length -1){

//想要投放的物体已经超出了跑道的范围

return false;

}

else{

let startPoint = this.pathPointContainer.children[startPointIndex];

let endPoint = this.pathPointContainer.children[endPointIndex];

let dir = Vec3.subtract(new Vec3(), endPoint.position,

startPoint.position);

dir = dir.normalize();

let remainZ = vz - (startPointIndex - 1) \* this.segmentLength;

let pos = Vec3.scaleAndAdd(new Vec3(), startPoint.position, dir,

remainZ);

node.parent = this.itemsContainer;

node.forward = dir;

node.position = pos;

let right = Vec3.cross(new Vec3(), dir, Vec3.UP).normalize();

node.position = Vec3.scaleAndAdd(new Vec3(), node.position, right, vx);

return true;

}

}
8.课后作业
(1)目前生成的跑道是没有厚度的,你可以添加新的代码让跑道变成如下这个样子吗?
左右具有一个抬起来的边作为马路牙子,
马路牙子上侧颜色可以自定义为蓝色或者别的颜色。
跑道具左右两侧有向下的侧边,具有厚度感。
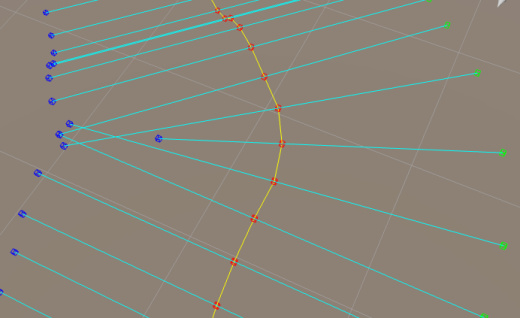
(2)在可怕的黑影这个章节里,其实还有一种思路可以解决这个问题。当slopeAngle和PathWidth足够大的时候,在左转或者右转时一定会出现相邻左转或者右转路径点的所有LR线段都相交于一点。如下图所示
幸运的时候,我们是知道当前那些点是在左转和右转的。你可以重构代码。将每一个左转路径点的L点和右转路径点的R点缩回来一点。使得他们不相交吗?
如果你完成了上边2道课后练习。欢迎你提交pr到本套课程的github仓库哦。
写在最后
楼主目前失业在家数月有余,跪求一份Base上海,正常缴纳社保的非外包职位,如果你感兴趣。请与我联系
vx:18698994250.