spine换装实战总结(基于2.4.7)| 社区征文

背景

最近项目中用到spine的换装需求,官方文档里有提及,但也仅仅能作为思路参考,照搬到项目中并不实用。查找了一些资料,但感觉都不很完善。主要的问题:

  1. 一般都只描述了针对单一外部图片的换装。
  2. 会打断spine的合批渲染。

考虑我们的项目需求:数十个英雄,7,8种装备,有的装备会由多个部件组成(例如肩甲分左右),有的会有序列帧特效,每种的数量上不封顶。这导致:

  1. 一定会需要用图集的方式来管理众多的装备资源。

  2. 在不处理合批渲染的情况下,一个英雄换装后理论上drawcall数量为2n+1,n为更换的部件数,单个英雄轻松上20 +。所以要解决合批渲染的问题,否则drawcall压力非常大。

spriteFrame到region

spine换装的基本原理是更换attachment的region,spine里的region概念和creator中spriteFrame对应。我们使用图集管理装备资源的话,加载后得到也是spriteFrame,所以第一步是根据spriteFrame构建region信息。核心代码:

makeRegionIno(frame: cc.SpriteFrame, key: string): regionInfo {
    let texture = frame.getTexture()
    let rect = frame.getRect()
    let origSize = frame.getOriginalSize()
    let offset = frame.getOffset()
    let rotate = frame.isRotated()

    let info: regionInfo = {
        key: key,
        rect: rect,
        origSize: origSize,
        offset: cc.v2(
            (origSize.width - rect.width) * 0.5 + offset.x,
            (origSize.height - rect.height) * 0.5 + offset.y
        ),
        degrees: rotate ? 270 : 0,
        texture: texture,
    }
    return info
}

其中参数解释:
rect表达了散图在图集中的位置和大小,origSize表达了散图在包含不透明区域时的原始大小。这两个参数在region和spriteFrame里的定义是一致的。
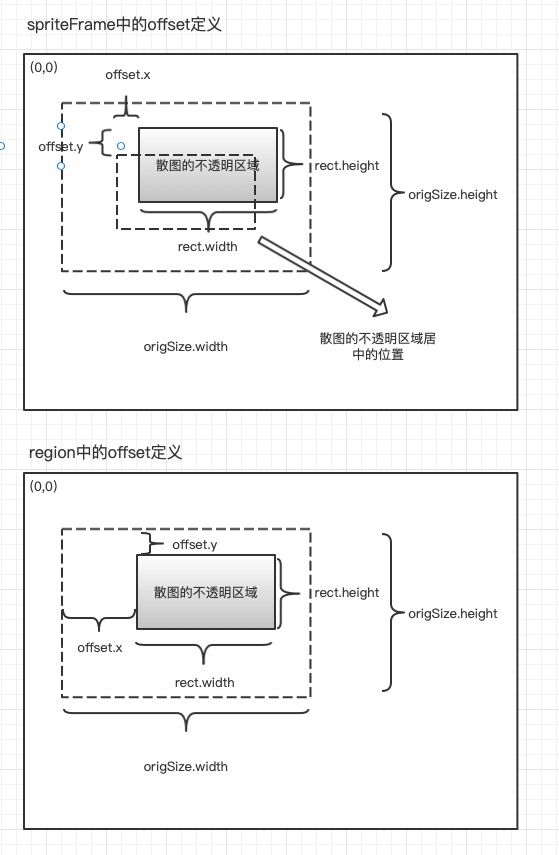
offset则不一样:在spriteFrame里offset描述的是散图的不透明区域偏离中心的量,在region里描述的是偏离左上角的量(图集坐标系以左上角为原点),这里用图示说明一下。

degrees表达散图旋转的角度。这里也不一样:在spine本身导出时打包的图集中散图旋转设定为逆时针方向旋转也就是90度,而一般打包工具多为顺时针方向(这里我用的TexturePacker),也就是270度。degrees参数的使用后面会看到。
texture就是图集的纹理对象。

然后就可以根据构建的region信息来实现换装,核心代码:

 updateRegion(attachment: any, regionInfo: regionInfo) {
    let region = attachment.region

    let texture = regionInfo.texture;
    let rect = regionInfo.rect
    let origSize = regionInfo.origSize
    let offset = regionInfo.offset
    let degrees = regionInfo.degrees

    region.x = rect.x
    region.y = rect.y
    region.width = rect.width
    region.height = rect.height
    region.originalWidth = origSize.width
    region.originalHeight = origSize.height
    region.offsetX = offset.x
    region.offsetY = offset.y

    region.rotate = degrees != 0
    region.degrees = degrees

    if (region.rotate) {
        region.u = rect.x / texture.width
        region.v = rect.y / texture.height
        region.u2 = (rect.x + rect.height) / texture.width
        region.v2 = (rect.y + rect.width) / texture.height
    } else {
        region.u = rect.x / texture.width
        region.v = rect.y / texture.height
        region.u2 = (rect.x + rect.width) / texture.width
        region.v2 = (rect.y + rect.height) / texture.height
    }

    let skeletonTexture = new sp.SkeletonTexture({
        width: texture.width,
        height: texture.height
    });
    skeletonTexture.setRealTexture(texture);
    region.texture = skeletonTexture

    if (attachment instanceof sp.spine.MeshAttachment) {
        attachment.updateUVs()
    } else if (attachment instanceof sp.spine.RegionAttachment) {
        let uvs = attachment.uvs;
        if (region.degrees == 90) {
            uvs[2] = region.u;
            uvs[3] = region.v2;
            uvs[4] = region.u;
            uvs[5] = region.v;
            uvs[6] = region.u2;
            uvs[7] = region.v;
            uvs[0] = region.u2;
            uvs[1] = region.v2;
        } else if (region.degrees == 270) {
            uvs[6] = region.u;
            uvs[7] = region.v2;
            uvs[0] = region.u;
            uvs[1] = region.v;
            uvs[2] = region.u2;
            uvs[3] = region.v;
            uvs[4] = region.u2;
            uvs[5] = region.v2;
        } else {
            uvs[0] = region.u;
            uvs[1] = region.v2;
            uvs[2] = region.u;
            uvs[3] = region.v;
            uvs[4] = region.u2;
            uvs[5] = region.v;
            uvs[6] = region.u2;
            uvs[7] = region.v2;
        }
        attachment.updateOffset()
    }
}

主要过程就是计算region 的 uv,并填充attachment的uvs,这是attachment渲染时使用的顶点序列。
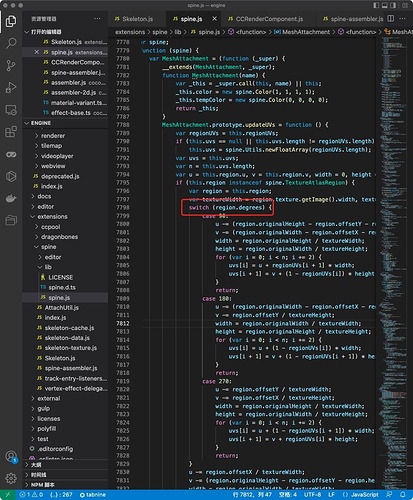
其中要说明的是,当attachment的类型为MeshAttachment时,直接调用updateUVs函数,spine的runtime中已经处理了各种旋转角度的情况,可查阅引擎源码(或直接去官网下载ts版的runtime来看)。


各种旋转角度的处理

但是attachment的类型为RegionAttachment时,runtime库只处理了默认的90度的情况,所以要自己添加270度情况的处理。


只处理了默认90度的情况

对于RegionAttachment的类型,还需要调用updateOffset,这是因为换上去的装备的不透明区域和原来的装备并不一定是完全重合的,也就是region的offset参数可能发生了变化。而MeshAttachment的类型不需要(实际spine也没有实现)是因为spine导出图集时,使用了mesh网格的图片都不会裁剪透明区域(mesh的顶点可能绑定在图片的透明区域)也就是offset都为0。这也意味着如果我们换的是带有mesh的装备,在打图集的时候也不能裁剪透明区域。我这里是把两类装备分别打图集管理。

多纹理材质实现合批

先看源码,spine的渲染数据组装部分:


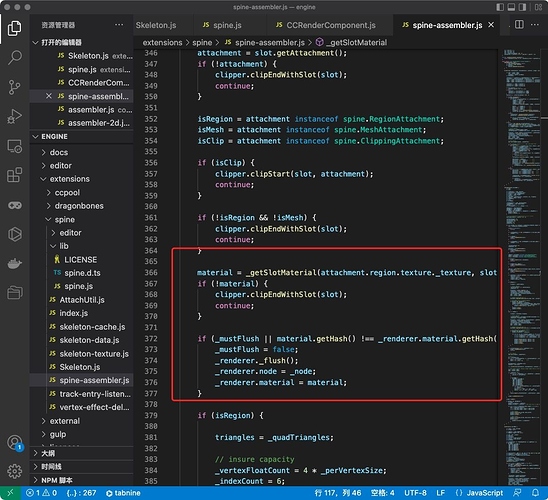
根据attachment信息获取材质


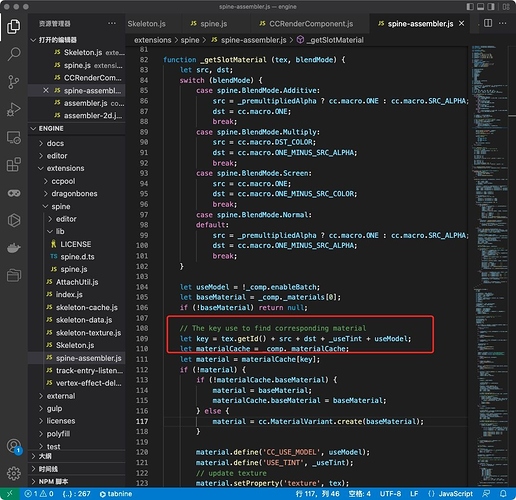
用作材质缓存的key

spine的Assembler在组装渲染数据时,遍历所有待渲染的Attachment,根据tex.getId() + src + dst + _useTint + useModel组成的key来确定是否切换material,也就是不同的纹理就会导致切换材质而断批。我们的思路就是让这个key中不再包含纹理ID,也就不会因为Attachment的纹理不同而断合批。(当然如果spine制作时使用了不同的混合模式还是会断批的)。

这里我用了染色模式下的darkColor的alpha通道来传递纹理序号。这个通道在spine的runtime中是没有用的,引擎这边用他来传递了是否是alpha预乘的信息。alpha预乘对于spine组件来说是个全局的信息,所以我把它拆出来作为一个uniform变量,腾出了这个通道给纹理序号(否则要修改顶点格式,有点兴师动众)。因此,spine的染色模式(_useTint)要确保开启。

核心代码(位于spine-assembler.js):

// 纹理序号,用于对应材质的uniform变量
let _texIdx = 0
function _getSlotMaterial(tex, blendMode) {
    let src, dst;
    switch (blendMode) {
        case spine.BlendMode.Additive:
            src = _premultipliedAlpha ? cc.macro.ONE : cc.macro.SRC_ALPHA;
            dst = cc.macro.ONE;
            break;
        case spine.BlendMode.Multiply:
            src = cc.macro.DST_COLOR;
            dst = cc.macro.ONE_MINUS_SRC_ALPHA;
            break;
        case spine.BlendMode.Screen:
            src = cc.macro.ONE;
            dst = cc.macro.ONE_MINUS_SRC_COLOR;
            break;
        case spine.BlendMode.Normal:
        default:
            src = _premultipliedAlpha ? cc.macro.ONE : cc.macro.SRC_ALPHA;
            dst = cc.macro.ONE_MINUS_SRC_ALPHA;
            break;
    }

    let useModel = !_comp.enableBatch;
    let baseMaterial = _comp._materials[0];
    if (!baseMaterial) return null;

    // The key use to find corresponding material
    // 材质的key不再包含纹理的id
    // let key = tex.getId() + src + dst + _useTint + useModel;
    let key = src + dst + _useTint + useModel;
    let materialCache = _comp._materialCache;
    let material = materialCache[key];

    !_comp.textures && (_comp.textures = {})

    if (!material) {
        if (!materialCache.baseMaterial) {
            material = baseMaterial;
            materialCache.baseMaterial = baseMaterial;
        } else {
            material = cc.MaterialVariant.create(baseMaterial);
        }

        material.define('CC_USE_MODEL', useModel);
        material.define('USE_TINT', _useTint);
        //增加是否alpha预乘的uniform变量
        material.define('PREMULTIPLIED_ALPHA', _premultipliedAlpha);
        // update texture
        // material.setProperty('texture', tex);

        // update blend function
        material.setBlend(
            true,
            gfx.BLEND_FUNC_ADD,
            src, dst,
            gfx.BLEND_FUNC_ADD,
            src, dst
        );
        materialCache[key] = material;
    }

    // 根据纹理id设置序号
    let texID = tex.getId()
    if (_comp.textures[texID] == undefined) {
        let idx = Object.keys(_comp.textures).length
        _comp.textures[texID] = idx

        Object.values(materialCache).forEach(mat => {
            mat.setProperty('texture' + (idx <= 0 ? "" : idx), tex);
        })
    }
    _texIdx = _comp.textures[texID]

    return material;
}

assembler的 fillVertices函数中:

    //将_darkColor的alpha通道用来传递纹理序号
    // _darkColor.a = _premultipliedAlpha ? 255 : 0;
    _darkColor.a = _texIdx;

shader:

CCEffect %{
  techniques:
  - passes:
    - vert: vs
      frag: fs
      blendState:
        targets:
        - blend: true
      rasterizerState:
        cullMode: none
      properties:
        texture: { value: white }
        texture1: { value: white }
        texture2: { value: white }
        texture3: { value: white }
        texture4: { value: white }
        texture5: { value: white }
        texture6: { value: white }
        texture7: { value: white }
        alphaThreshold: { value: 0.5 }
        coverColor: {
          value: [1.0, 1.0, 0.0, 1.0], 
        }
}%

CCProgram vs %{

precision highp float;

#include <cc-global>
#include <cc-local>

in vec3 a_position;
in vec4 a_color;
#if USE_TINT
  in vec4 a_color0;
#endif

in vec2 a_uv0;
out vec2 v_uv0;

out vec4 v_light;
#if USE_TINT
  out vec4 v_dark;
#endif

void main () {
  mat4 mvp;
  
  #if CC_USE_MODEL
    mvp = cc_matViewProj * cc_matWorld;
  #else
    mvp = cc_matViewProj;
  #endif

  v_uv0 = a_uv0;

  v_light = a_color;
  #if USE_TINT
    v_dark = a_color0;
  #endif

  gl_Position = mvp * vec4(a_position, 1);
}

}%

CCProgram fs %{

precision highp float;

uniform sampler2D texture;
uniform sampler2D texture1;
uniform sampler2D texture2;
uniform sampler2D texture3;
uniform sampler2D texture4;
uniform sampler2D texture5;
uniform sampler2D texture6;
uniform sampler2D texture7;
in vec2 v_uv0;

in vec4 v_light;
#if USE_TINT
  in vec4 v_dark;
#endif

// in float texture_idx;

uniform COVER {
  vec4 coverColor;
};

#include <alpha-test>
#include <texture>

void main () {
  vec4 texColor = vec4(1.0);

  #if USE_TINT
    if(v_dark.a<0.003){
      CCTexture(texture, v_uv0, texColor);
    }
    else if(v_dark.a<0.007){
      CCTexture(texture1, v_uv0, texColor);
    }
    else if(v_dark.a<0.011){
      CCTexture(texture2, v_uv0, texColor);
    }
    else if(v_dark.a<0.015){
      CCTexture(texture3, v_uv0, texColor);
    }
    else if(v_dark.a<0.019){
      CCTexture(texture4, v_uv0, texColor);
    }
    else if(v_dark.a<0.023){
      CCTexture(texture5, v_uv0, texColor);
    }
    else if(v_dark.a<0.027){
      CCTexture(texture6, v_uv0, texColor);
    }
    else if(v_dark.a<0.031){
      CCTexture(texture7, v_uv0, texColor);
    }
  #else
    CCTexture(texture, v_uv0, texColor);
  #endif

  vec4 finalColor;

  #if USE_TINT
    finalColor.a = v_light.a * texColor.a;
  #if PREMULTIPLIED_ALPHA
    finalColor.rgb = (texColor.a - texColor.rgb) * v_dark.rgb + texColor.rgb * v_light.rgb;
  #else
    finalColor.rgb = (1.0 - texColor.rgb) * v_dark.rgb + texColor.rgb * v_light.rgb;
  #endif
  #else
    finalColor = texColor * v_light;
  #endif

  finalColor.rgb = finalColor.rgb * (1.0 - coverColor.a) + coverColor.rgb * coverColor.a * finalColor.a;
  
  ALPHA_TEST(finalColor);

  gl_FragColor = finalColor;
}

}%

PS:shader中的coverColor是我用来做受击闪白效果的,可以忽略。

另外需要注意的地方:

  1. 每次发生换装,都要清除一下spine组件上添加的纹理序号缓存,因为换了装备有的纹理不再用了。类似这样:mySpine.textures = null;

  2. 一般多纹理的数量支持上限是8张,这里我们项目通过别的方式保证了不会超过8张,所以assembler的代码中没有再处理。

  3. 目前只支持spine的realtime模式。(后面会尝试private cache模式,以及原生的实现)

效果如下,可以看到换装后drawcall没有变化:


25赞

mark mark

大佬
啥时候出个原生的换装啊。。。
出了@我一下 :sob:

你这里换,会把其他的也换了
按照另外一种实现,在你的方法前面加上
let date = new Date();

    // 记录当前播放的动画

    const animation = this.sp.animation

    const spdata = this.sp.skeletonData;

    let copy = new sp.SkeletonData();

    cc.js.mixin(copy, spdata);

    // @ts-ignore

    copy._uuid = spdata._uuid + "_" + date.getTime() + "_copy";

    let old = copy.name;

    let newName = copy.name + "_copy";

    copy.name = newName;

    copy.atlasText = copy.atlasText.replace(old, newName);

    // @ts-ignore

    copy.textureNames[0] = newName + ".png";

    // @ts-ignore

    copy.init && copy.init();

    this.sp.skeletonData = copy;

    // 继续播放的动画,不然会停止

    this.sp.setAnimation(0, animation, true);

换装就不会改变其他角色的武器了

1赞

谢谢提醒。这个问题项目里资源管理的部分统一处理了,方法类似,用资源副本实例化spine。文章里没写这部分。

补充一下原生的实现:
原生端的spine渲染实现主要在SkeletonRenderer.cpp中,增加一个功能函数(实现和前面文章里的updateRegion函数功能):

bool SkeletonRenderer::replaceAttachmentRegion(Attachment* attachment, cocos2d::middleware::Texture2D * newTexture,cocos2d::renderer:: Rect rect,cocos2d::Size origSize,cocos2d::Vec2 offset,int degrees)
{
    if (attachment == nullptr ) return false;
    
    if (!_nodeProxy || !_effect) {
        return false;
    }
    
    CustomAssembler* assembler = (CustomAssembler*)_nodeProxy->getAssembler();
    if (assembler == nullptr) {
        return false;
    }
    
    AttachmentVertices* attachmentVertices = nullptr;
    if (attachment->getRTTI().isExactly(RegionAttachment::rtti)) {
        attachmentVertices = (AttachmentVertices*) ((RegionAttachment*)attachment)->getRendererObject();
    } else if (attachment->getRTTI().isExactly(MeshAttachment::rtti)) {
        attachmentVertices = (AttachmentVertices*) ((MeshAttachment*)attachment)->getRendererObject();
    }
    CC_SAFE_RELEASE(attachmentVertices->_texture);
    attachmentVertices->_texture = newTexture;
    CC_SAFE_RETAIN(newTexture);
    
    float u,v,u2,v2;
    float texW = newTexture->getNativeTexture()->getWidth();
    float texH = newTexture->getNativeTexture()->getHeight();
    if(degrees!=0){
        u = rect.x/texW;
        v = rect.y/texH;
        u2 = (rect.x+rect.h)/texW;
        v2 = (rect.y+rect.w)/texH;
    }else{
        u = rect.x/texW;
        v = rect.y/texH;
        u2 = (rect.x+rect.w)/texW;
        v2 = (rect.y+rect.h)/texH;
    }
    
    if (attachment->getRTTI().isExactly(RegionAttachment::rtti)) {
        RegionAttachment* _attachment = (RegionAttachment*)attachment;

        _attachment->setRegionWidth(rect.w);
        _attachment->setRegionHeight(rect.h);
        _attachment->setRegionOriginalWidth(origSize.width);
        _attachment->setRegionOriginalHeight(origSize.height);
        _attachment->setRegionOffsetX(offset.x);
        _attachment->setRegionOffsetY(offset.y);
        
        _attachment->setUVsByDegrees(u,v,u2,v2,degrees);
        _attachment->updateOffset();
            
        V2F_T2F_C4B *vertices = attachmentVertices->_triangles->verts;
        for (int i = 0, ii = 0; i < 4; ++i, ii += 2) {
            vertices[i].texCoord.u = _attachment->getUVs()[ii];
            vertices[i].texCoord.v = _attachment->getUVs()[ii + 1];
        }
        
    } else if (attachment->getRTTI().isExactly(MeshAttachment::rtti)) {
        MeshAttachment* _attachment = (MeshAttachment*)attachment ;

        _attachment->setRegionU(u);
        _attachment->setRegionV(v);
        _attachment->setRegionU2(u2);
        _attachment->setRegionV2(v2);
        _attachment->setRegionRotate(degrees!=0);
        _attachment->setRegionDegrees(degrees);
        
        _attachment->setRegionWidth(rect.w);
        _attachment->setRegionHeight(rect.h);
        _attachment->setRegionOriginalWidth(origSize.width);
        _attachment->setRegionOriginalHeight(origSize.height);
        _attachment->setRegionOffsetX(offset.x);
        _attachment->setRegionOffsetY(offset.y);

        _attachment->updateUVs();
        
        V2F_T2F_C4B* vertices = attachmentVertices->_triangles->verts;
        for (size_t i = 0, ii = 0, nn = _attachment->getWorldVerticesLength(); ii < nn; ++i, ii += 2) {
            vertices[i].texCoord.u = _attachment->getUVs()[ii];
            vertices[i].texCoord.v = _attachment->getUVs()[ii + 1];
        }
    }
    
    _textures.clear();
    return true; 
}

其中_attachment->setUVsByDegrees这个函数是新加的,因为spine原生端runTime也没有处理regionAttachment图集旋转270度的情况。实现如下:

void RegionAttachment::setUVsByDegrees(float u, float v, float u2, float v2, int degrees) {
    if (degrees==90) {
        _uvs[URX] = u;
        _uvs[URY] = v2;
        _uvs[BRX] = u;
        _uvs[BRY] = v;
        _uvs[BLX] = u2;
        _uvs[BLY] = v;
        _uvs[ULX] = u2;
        _uvs[ULY] = v2;
    } else if(degrees==270) {
        _uvs[BLX] = u;
        _uvs[BLY] = v2;
        _uvs[ULX] = u;
        _uvs[ULY] = v;
        _uvs[URX] = u2;
        _uvs[URY] = v;
        _uvs[BRX] = u2;
        _uvs[BRY] = v2;
    }else{
        _uvs[ULX] = u;
        _uvs[ULY] = v2;
        _uvs[URX] = u;
        _uvs[URY] = v;
        _uvs[BRX] = u2;
        _uvs[BRY] = v;
        _uvs[BLX] = u2;
        _uvs[BLY] = v2;
    }
}

还有一点,MeshAttachment类中的updateUVs函数,在处理270度情况的时候有bug。修改如下:

void MeshAttachment::updateUVs() {
	if (_uvs.size() != _regionUVs.size()) {
		_uvs.setSize(_regionUVs.size(), 0);
	}

	int i = 0, n = _regionUVs.size();
	float u = _regionU, v = _regionV;
	float width = 0, height = 0;

	switch (_regionDegrees) {
	case 90: {
		float textureWidth = _regionHeight / (_regionU2 - _regionU);
		float textureHeight = _regionWidth / (_regionV2 - _regionV);
		u -= (_regionOriginalHeight - _regionOffsetY - _regionHeight) / textureWidth;
		v -= (_regionOriginalWidth - _regionOffsetX - _regionWidth) / textureHeight;
		width = _regionOriginalHeight / textureWidth;
		height = _regionOriginalWidth / textureHeight;
		for (i = 0; i < n; i += 2) {
			_uvs[i] = u + _regionUVs[i + 1] * width;
			_uvs[i + 1] = v + (1 - _regionUVs[i]) * height;
		}
		return;
	}
	case 180: {
		float textureWidth = _regionWidth / (_regionU2 - _regionU);
		float textureHeight = _regionHeight / (_regionV2 - _regionV);
		u -= (_regionOriginalWidth - _regionOffsetX - _regionWidth) / textureWidth;
		v -= _regionOffsetY / textureHeight;
		width = _regionOriginalWidth / textureWidth;
		height = _regionOriginalHeight / textureHeight;
		for (i = 0; i < n; i += 2) {
			_uvs[i] = u + (1 - _regionUVs[i]) * width;
			_uvs[i + 1] = v + (1 - _regionUVs[i + 1]) * height;
		}
		return;
	}
	case 270: {
        // fix bug
//        float textureHeight = _regionHeight / (_regionV2 - _regionV);
//        float textureWidth = _regionWidth / (_regionU2 - _regionU);

		float textureWidth = _regionHeight / (_regionU2 - _regionU);
		float textureHeight = _regionWidth / (_regionV2 - _regionV);
		u -= _regionOffsetY / textureWidth;
		v -= _regionOffsetX / textureHeight;
		width = _regionOriginalHeight / textureWidth;
		height = _regionOriginalWidth / textureHeight;
		for (i = 0; i < n; i += 2) {
			_uvs[i] = u + (1 - _regionUVs[i + 1]) * width;
			_uvs[i + 1] = v + _regionUVs[i] * height;
		}
		return;
	}
	default: {
		float textureWidth = _regionWidth / (_regionU2 - _regionU);
		float textureHeight = _regionHeight / (_regionV2 - _regionV);
		u -= _regionOffsetX / textureWidth;
		v -= (_regionOriginalHeight - _regionOffsetY - _regionHeight) / textureHeight;
		width = _regionOriginalWidth / textureWidth;
		height = _regionOriginalHeight / textureHeight;
		for (i = 0; i < n; i += 2) {
			_uvs[i] = u + _regionUVs[i] * width;
			_uvs[i + 1] = v + _regionUVs[i + 1] * height;
		}
	}
	}
}

然后是渲染数据组装的部分,在SkeletonRenderer类的render函数中,这个函数超长,主要修改:

取消原来的纹理设置:

if (needUpdate) {
//            renderEffect->setProperty(textureKey, texture->getNativeTexture());
    renderEffect->setBlend(true, BlendOp::ADD, curBlendSrc, curBlendDst,
                   BlendOp::ADD, curBlendSrc, curBlendDst);
}

根据纹理id设置序号,并把序号填入darkclolor的alpha通道:

texture = attachmentVertices->_texture;
curTextureIndex = texture->getNativeTexture()->getHandle();
if(_textures.find(curTextureIndex) == _textures.end()){
    int _texIdx = _textures.size();
    _textures[curTextureIndex] = _texIdx;
    
    int _matIdx = 0;
    EffectVariant* effect = assembler->getEffect(_matIdx);
    while (effect) {
        effect->setProperty(textureKeys[_texIdx], texture->getNativeTexture());
        _matIdx++;
        effect = assembler->getEffect(_matIdx);
    };
}

//        darkColor.a = _premultipliedAlpha ? 255 : 0;
darkColor.a = _textures.find(curTextureIndex)->second;

其中_textures是SkeletonRenderer类新加的成员变量:
std::map<int,int> _textures;

textureKeys是一个常量数组:
static const std::string textureKeys[] ={“texture”,“texture1”,“texture2”,“texture3”,“texture4”,“texture5”,“texture6”,“texture7”};

判断是否断批的地方:

//        texture = attachmentVertices->_texture;
//        curTextureIndex = attachmentVertices->_texture->getNativeTexture()->getHandle();

        // 不再因为纹理不同而断批
        // If texture or blendMode change,will change material.
//        if (( preTextureIndex != curTextureIndex) || preBlendMode != slot->getData().getBlendMode() || isFull) {
//            flush();
//        }
        
        if (preBlendMode != slot->getData().getBlendMode() || isFull) {
            flush();
        }

接下来是ts这边的调用,首先是构建region信息的部分修改如下:

makeRegionIno(frame: cc.SpriteFrame, key: string): regionInfo {
    let texture = frame.getTexture()
    let rect = frame.getRect()
    let origSize = frame.getOriginalSize()
    let offset = frame.getOffset()
    let rotate = frame.isRotated()

    // 匹配原生端字段名
    rect.w = rect.width
    rect.h = rect.height

    let info: regionInfo = {
        key: key,
        rect: rect,
        origSize: origSize,
        offset: cc.v2(
            (origSize.width - rect.width) * 0.5 + offset.x,
            (origSize.height - rect.height) * 0.5 + offset.y
        ),
        degrees: rotate ? 270 : 0,
        texture: texture,
    }

    // 创建原生端的纹理对象
    if (cc.sys.isNative) {
        let medTex = new middleware.Texture2D();
        medTex.setRealTextureIndex(0 - this.textureID);
        medTex.setPixelsHigh(texture.height);
        medTex.setPixelsWide(texture.width);
        medTex.setNativeTexture(texture.getImpl());
        info.texture = medTex
    }

    return info
}

然后再换装的位置直接调用新增的函数,类似这样:

        if (cc.sys.isNative) {
            spine._nativeSkeleton.replaceAttachmentRegion(attachment, regionInfo.texture, regionInfo.rect, regionInfo.origSize, regionInfo.offset, regionInfo.degrees)
        }

最后说明一下:SkeletonRenderer类增加了函数需要进行一下JSB绑定,这个在官方文档中有,这里就不在赘述了。

2赞

等会试试 :14: :14: :14: :14: :14:

大佬
SkeletonRenderer类的render修改
我找不到对应修改的位置
大佬能把这个修改后的文件发出来吗??? :sob:

只看文章提到的部分即可
skeletonRender.zip (13.1 KB)

1赞

好的~
谢谢大佬

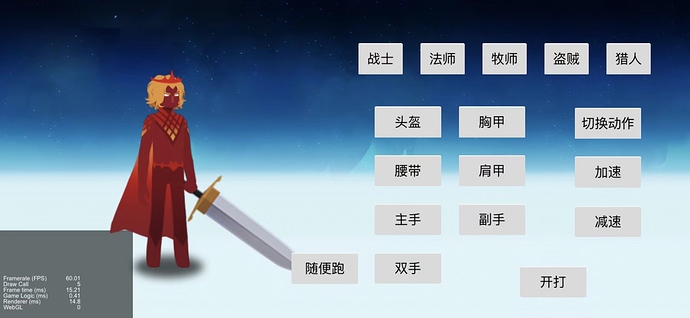
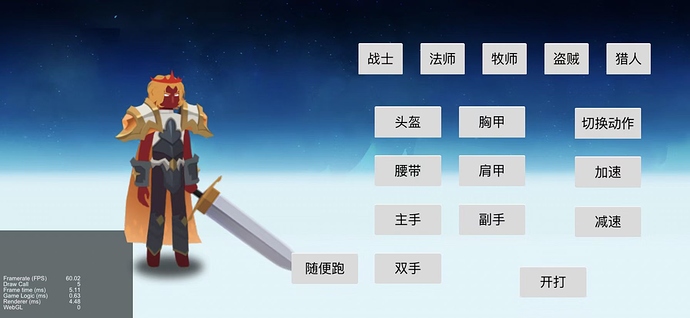
找了很多换装的方法,但是都会出现这个情况
换之前image
换之后image
,这个是什么原因呀

刚好准备要用,先mark一个~感谢分享!

mark~~~

请问下,为啥换材质后sp显示有问题?难道要手动设置sp纹理?不会呀 :sob:
QQ截图20220528100928

大佬大佬。为啥修改能达到降低drawcall?

这部分原生的有人成功的么,为什么我传的数据里面的_privatedata后面三个是空的

这必须 mark一下~~

请问大佬,自动绑定的那块代码该怎么写?

2.x的工具链版本太老,自动绑定要安装的环境太多,直接手写吧

mark mark