
我正在参加Cocos征稿活动。
前言
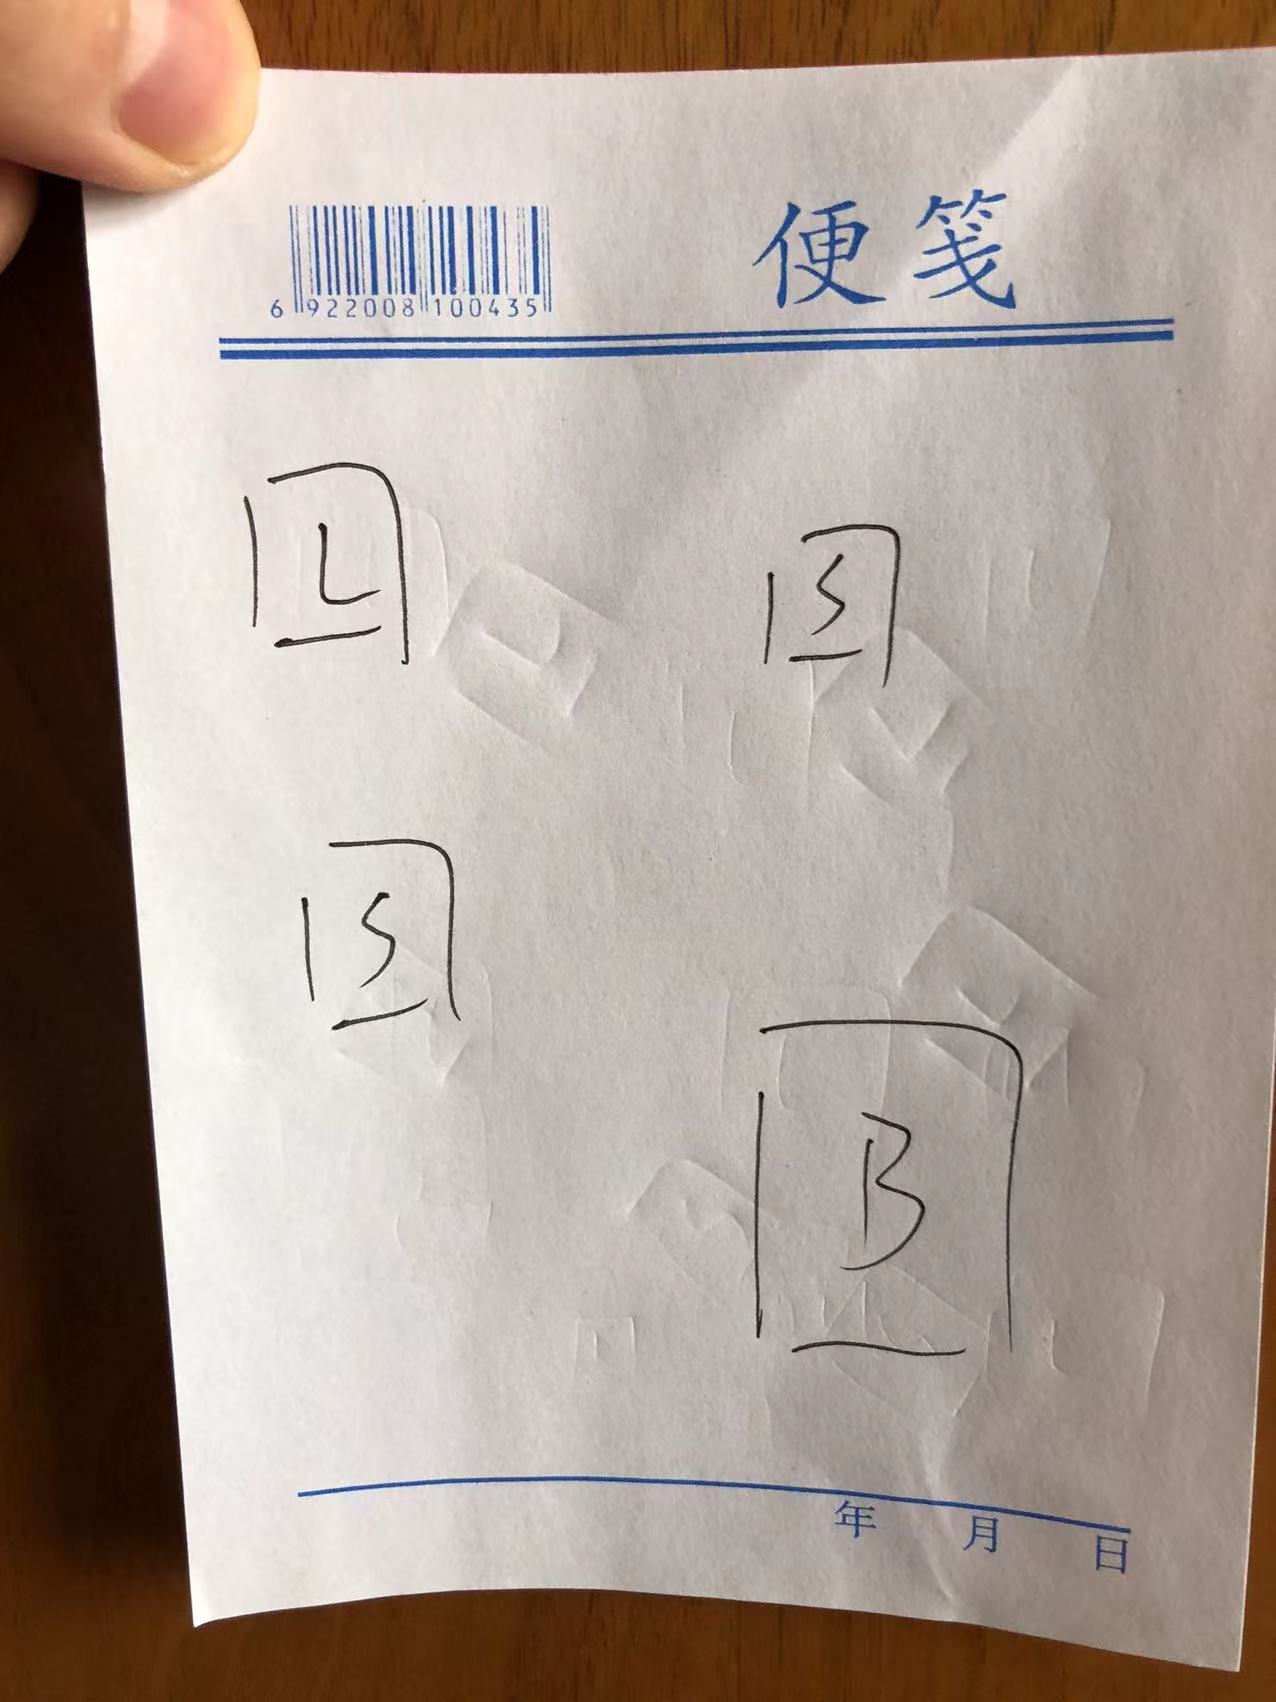
当创作灵感来的时候,我们可能会先把灵感记录在草稿上,之后再去实现它。比方说有一天,我突然来了游戏创作灵感,想着那可以先把一些简单的组件和布局设计出来,于是就在草稿上画了几个框。 L代表Label组件,B代表Button组件,S代表Sprite组件。
几天过去了,就算当时的灵感再好,我也不想打开电脑,所以草稿还是只是草稿。我想着,如果有一个AI能够识别我画的草稿,然后自动生成对应组件以及布局的话该有多好啊。

于是,我决定训练一个AI,准确来说是一个图像目标检测AI模型,我将用它来识别并定位我草稿上的各个方框。
训练AI
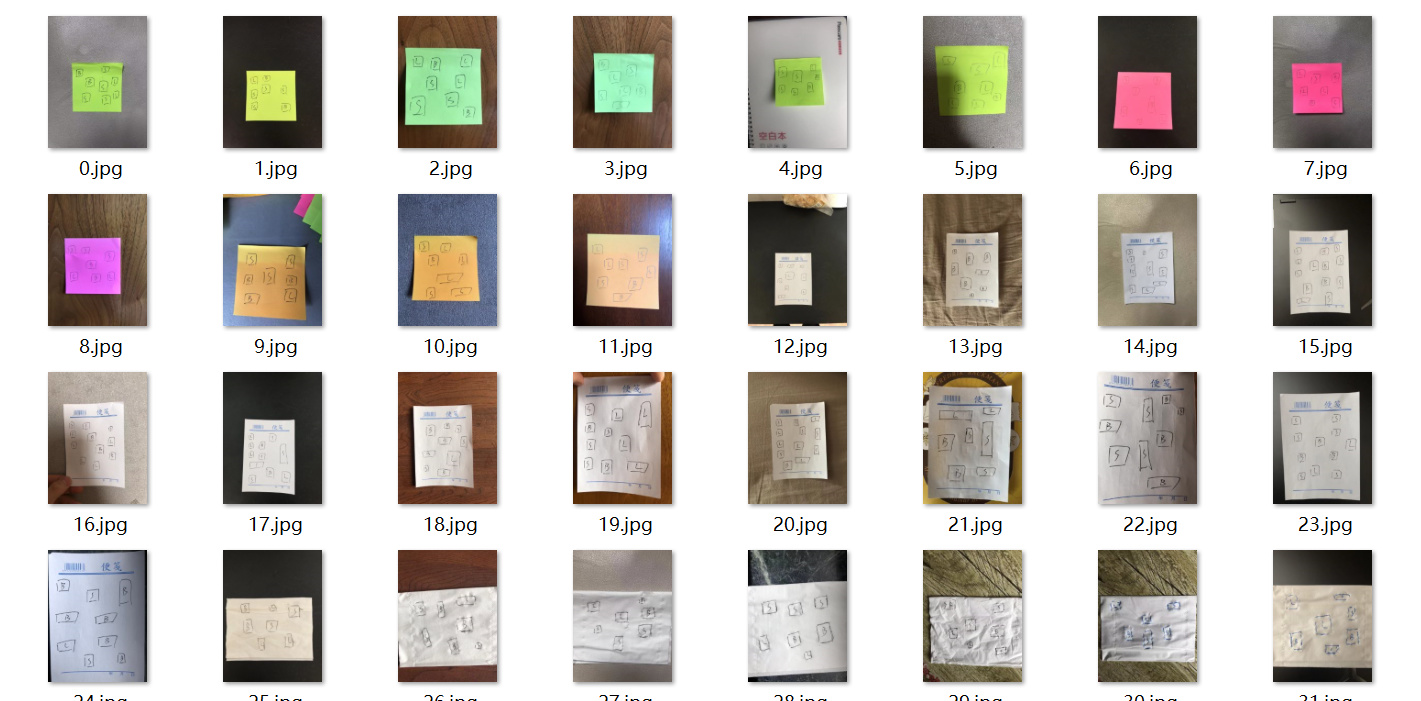
首先第一步,制作数据集,花了我半天时间画了很多大大小小的方框,草稿数量为150张。有在便利贴上画的,有在纸巾上画的,还有在白纸上画的。
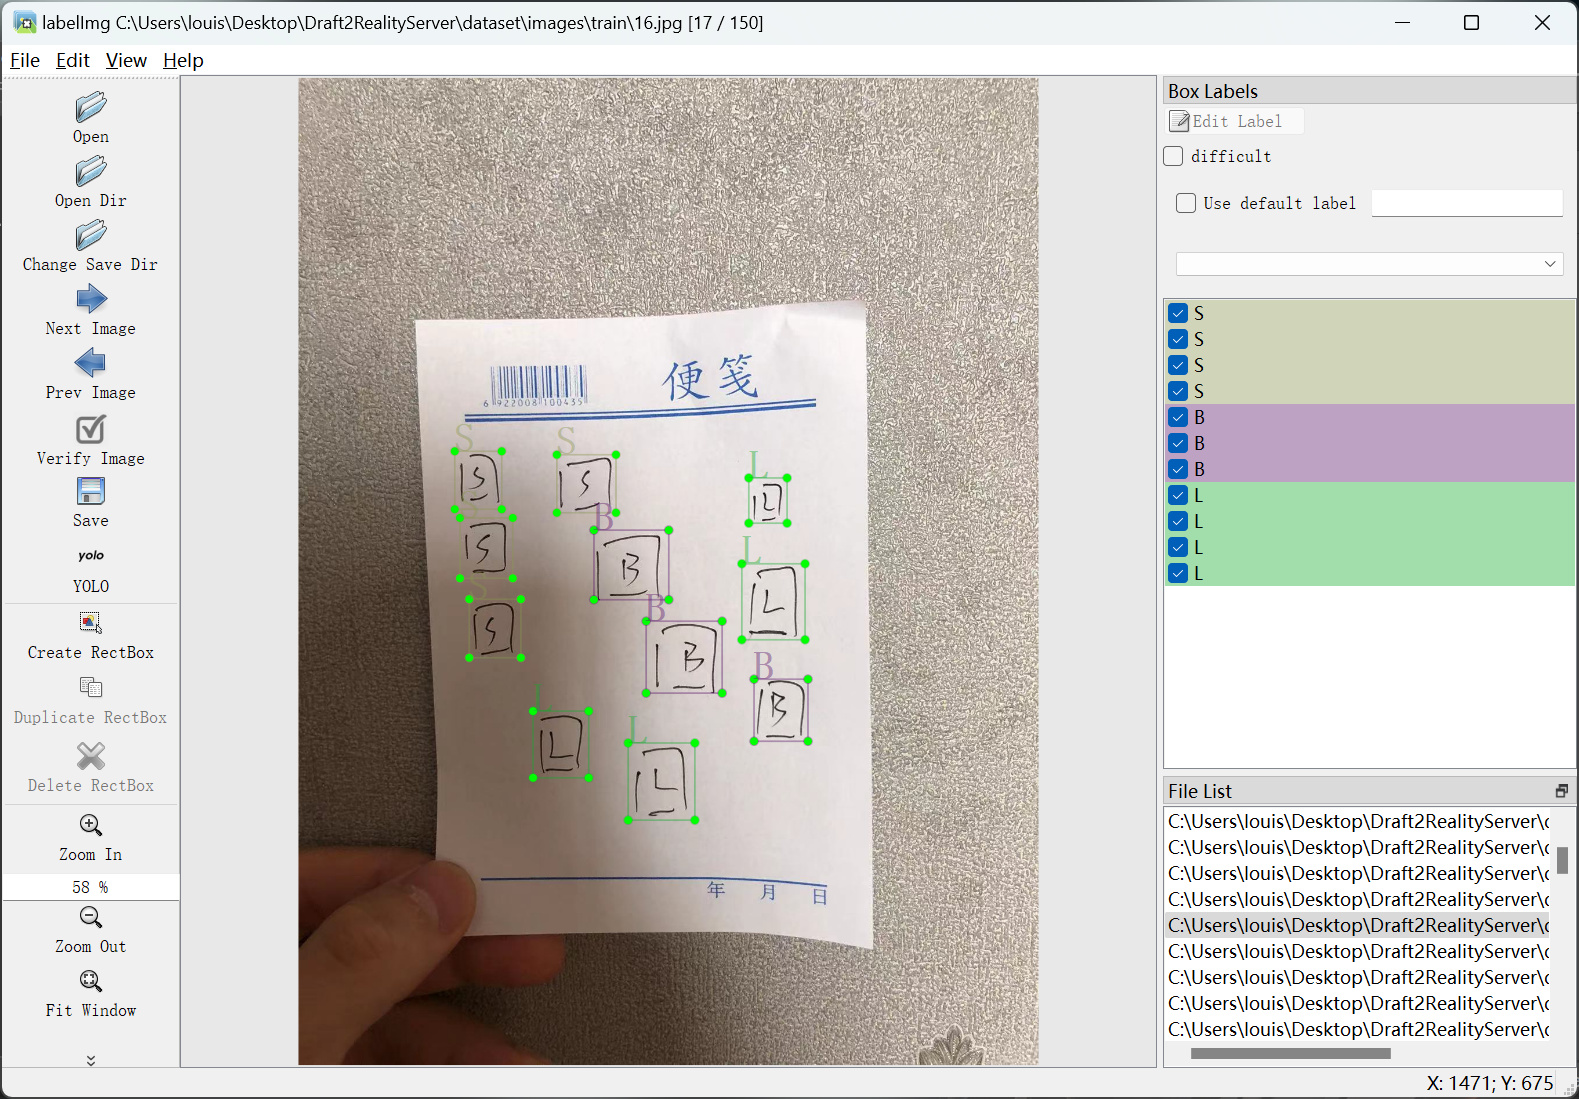
用于训练的图片已经有了,接下来又花了半天时间去进行标注,不得不说想要训练AI,首先就要训练自己的毅力。
训练集已经做好,接下来就是丢给yolov5训练,训练结果如下。

验证之后,识别效果还是可以的,现在AI可以大概率将我画的SLB三个方框识别出来。
注: 由于时间有限,我就先实现三种组件:Sprite,Label以及Button,如果加入更多组件的话就需要更多数据。

从识别结果中提取必要数据
AI在识别之后可以生成一个txt文件,其中保存着各个矩形的数据,如下所示。

1 0.682994 0.452703 0.127743 0.0981199
2 0.683777 0.452115 0.123041 0.0992949
2 0.562696 0.65188 0.12069 0.103995
2 0.5721 0.343713 0.125392 0.0963572
0 0.290752 0.341657 0.111285 0.0887192
1 0.302116 0.543772 0.0979624 0.0851939
1 0.320533 0.73913 0.111285 0.0951821
第一列中的数字0,1,2分别代表Button方框,Sprite方框和Label方框;第二列是矩形中心的x坐标(归一化后的,下同);第二列是矩形中心的y坐标;第三列是矩形宽度;第四列是矩形高度。通过这些数据我们能够得出各个矩形方框在图片上的真实坐标以及大小。代码编写如下:
def get_rect_list_from_detect_result(pic_path, detect_result_path):
    """从预测结果中得出各个矩形的真实大小和位置数据"""
    with open(detect_result_path, "r", encoding="utf-8") as f:
        result = f.readlines()

    pic_width, pic_height = Image.open(pic_path).size
    class_dict = {"0": "B", "1": "S", "2": "L"}
    rect_list = []

    for line in result:
        _class, x_center_norm, y_center_norm, width_norm, height_norm = line.strip().split(" ")
        rect_width = round(float(width_norm)*pic_width, 2)
        rect_height = round(float(height_norm)*pic_height, 2)
        rect_x = round(float(x_center_norm)*pic_width, 2) - rect_width/2
        rect_y = round(float(y_center_norm)*pic_height, 2) - rect_height/2
        rect_list.append({
            "type": class_dict[_class],
            "width": rect_width,
            "height": rect_height,
            "x": rect_x,
            "y": rect_y
        })

    return rect_list
为了在Cocos场景的Canvas画布上生成组件,我们需要先确定画布大小和方向。初始大小我们可以用960和640这两个值,但是方向呢?是采用横向还是竖向?我这里采用的解决方案是:找出草稿上最左边和最右边的矩形,然后得出横向距离,接着找出最上边和最下边的矩形并得出纵向距离。比较横向距离和纵向距离,假如前者大,则画布为横向,反之则为竖向。代码编写如下:
def decide_canvas_size(rect_list):
    """通过各个矩形的最小和最大x/y值来确定画布尺寸"""

    # 获取所有矩形中的最小x值
    min_x = min(rect_list, key=lambda rect: rect["x"])["x"]
    max_x = max(rect_list, key=lambda rect: rect["x"])["x"]
    min_y = min(rect_list, key=lambda rect: rect["y"])["y"]
    max_y = max(rect_list, key=lambda rect: rect["y"])["y"]

    # 根据x和y的距离差判断是要横屏还是竖屏
    distance_x = max_x - min_x
    distance_y = max_y - min_y

    if distance_x >= distance_y:
        canvas_width = 960
        canvas_height = 640
    else:
        canvas_width = 640
        canvas_height = 960

    width_prop = distance_x / canvas_width if canvas_width > distance_x else canvas_width / distance_x
    height_prop = distance_y / canvas_height if canvas_height > distance_y else canvas_height / distance_y

    return canvas_width, canvas_height, width_prop, height_prop
AI在识别时,是以图片左上角为原点的,往右为x轴正方向,往下为y轴正方向。
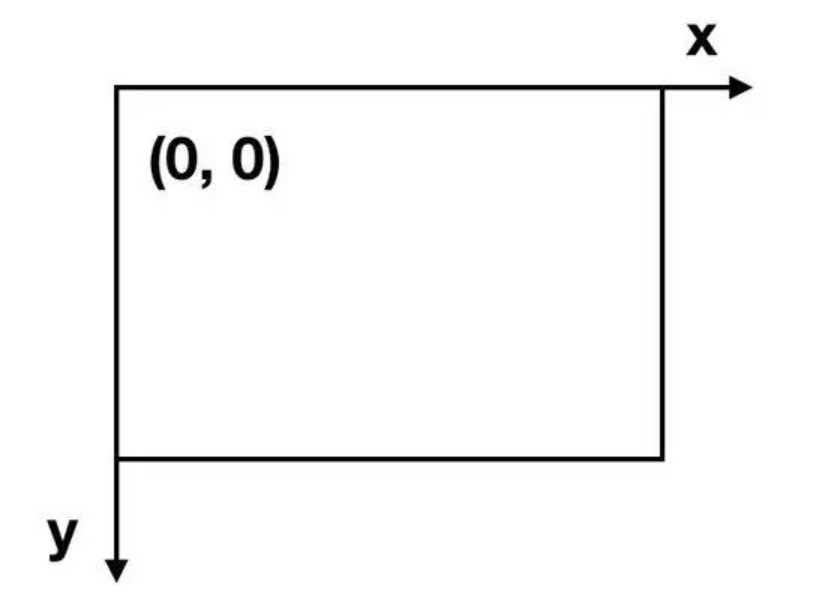
但是Cocos Creator的坐标原点在画布中心,所以我们肯定要将得到的矩形坐标进行转换,否则生成的组件将会都排布在画布右上角。
另外在草稿上画方框时,我们可能是想着让几个矩形对齐,还有几个矩形的大小应该是一样的。但是在画的时候并不会太精准,所以我们还应该将位置和大小相近的矩形进行调整,让它们的x或y值或宽高相等。代码编写如下:
注: 关于其他方面的调整,我就不再赘述了,读者可以看下注释。
def adjust_rect_data(rect_list, canvas_width, canvas_height, width_prop, height_prop):
    """调整各个矩形的值"""
    # 找到最小x和最小y值(也就是找到最左上角的矩形的x和y值)
    # 然后其他将其他矩形的x和y坐标减去最小x和最小y,求出相对距离
    # 所有相对距离包括宽高全部乘以宽高比例
    # 同时将坐标转换为Cocos类型,以画布中心为原点
    min_x = min(rect_list, key=lambda rect: rect["x"])["x"]
    min_y = min(rect_list, key=lambda rect: rect["y"])["y"]

    for rect in rect_list:
        rect["x"] = (rect["x"] - min_x) * width_prop - canvas_width/2
        rect["y"] = canvas_height/2 - (rect["y"] - min_y) * height_prop
        rect["width"] *= width_prop
        rect["height"] *= height_prop

    # 算出下边和右边的空白距离,将所有矩形往下和往右平移空白距离/2个像素点
    max_x = max(rect_list, key=lambda rect: rect["x"])["x"]
    min_y = min(rect_list, key=lambda rect: rect["y"])["y"]
    right_distance = (canvas_width/2 - max_x) / 2
    bottom_distance = abs(-canvas_height/2 - min_y) / 2

    for rect in rect_list:
        rect["x"] += right_distance
        rect["y"] -= bottom_distance

    # 将x或y坐标距离不相差15像素的矩形对齐
    diff = 15
    for rect1 in rect_list:
        for rect2 in rect_list:
            if rect1 == rect2:
                continue

            if abs(rect1["x"] - rect2["x"]) <= diff:
                average_x = (rect1["x"] + rect2["x"]) / 2
                rect1["x"] = average_x
                rect2["x"] = average_x

            if abs(rect1["y"] - rect2["y"]) <= diff:
                average_y = (rect1["y"] + rect2["y"]) / 2
                rect1["x"] = average_y
                rect2["x"] = average_y

            if abs(rect1["width"] - rect2["width"]) <= diff:
                average_width = (rect1["width"] + rect2["width"]) / 2
                rect1["width"] = average_width
                rect2["width"] = average_width

            if abs(rect1["height"] - rect2["height"]) <= diff:
                average_height= (rect1["height"] + rect2["height"]) / 2
                rect1["height"] = average_height
                rect2["height"] = average_height

    # 四舍五入保留整数
    for rect in rect_list:
        rect["x"] = round(rect["x"])
        rect["y"] = round(rect["y"])
        rect["width"] = round(rect["width"])
        rect["height"] = round(rect["height"])

    return rect_list
数据调整完毕后,我们就可以把画布数据和各个矩形数据一同返回。我这里用flask框架开发了一个后端,完整代码如下:
import os
import uuid
from PIL import Image
from pathlib import Path
from flask import Flask, request


app = Flask(__name__)
app.config["UPLOAD_FOLDER"] = str(Path(__file__).parent / "upload")
app.config["SECRET_KEY"] = "SECRET_KEY"


@app.route("/d2r", methods=["POST"])
def draft_to_reality():
    """将草稿转成真实布局所需要的数据格式"""

    # 从前端获取图片
    file = request.files.get("file")
    if not file.filename.endswith(".png") and not file.filename.endswith(".jpg") and not file.filename.endswith("jpeg"):
        return {
            "code": "1",
            "message": "图片格式错误"
        }

    # 保存图片
    pic_path = Path(app.config["UPLOAD_FOLDER"]) / f"{uuid.uuid4()}.jpg"
    file.save(pic_path)

    # 目标识别
    is_ok, detect_result_path = detect(pic_path)
    if not is_ok:
        return {
             "code": "2",
             "message": "图片识别失败"
        }

    # 制作数据
    rect_list = get_rect_list_from_detect_result(pic_path, detect_result_path)
    canvas_width, canvas_height, width_prop, height_prop = decide_canvas_size(rect_list)
    rect_list = adjust_rect_data(rect_list, canvas_width, canvas_height, width_prop, height_prop)
    final_data = make_final_data(rect_list, canvas_width, canvas_height)

    return {
        "code": "0",
        "message": final_data
    }


def detect(pic_path):
    os.system(f"python ./yolov5/detect.py --weights ./yolov5/best.pt --source {pic_path} --save-txt --exist-ok")

    # 如果识别成功,则会生成一个txt文件
    detect_result_path = f"./yolov5/runs/detect/exp/labels/{Path(pic_path).name.split('.')[0]}.txt"
    if Path(detect_result_path).exists():
        return True, detect_result_path
    else:
        return False, None


def get_rect_list_from_detect_result(pic_path, detect_result_path):
    """从预测结果中得出各个矩形的真实大小和位置数据"""
    with open(detect_result_path, "r", encoding="utf-8") as f:
        result = f.readlines()

    pic_width, pic_height = Image.open(pic_path).size
    class_dict = {"0": "B", "1": "S", "2": "L"}
    rect_list = []

    for line in result:
        _class, x_center_norm, y_center_norm, width_norm, height_norm = line.strip().split(" ")
        rect_width = round(float(width_norm)*pic_width, 2)
        rect_height = round(float(height_norm)*pic_height, 2)
        rect_x = round(float(x_center_norm)*pic_width, 2) - rect_width/2
        rect_y = round(float(y_center_norm)*pic_height, 2) - rect_height/2
        rect_list.append({
            "type": class_dict[_class],
            "width": rect_width,
            "height": rect_height,
            "x": rect_x,
            "y": rect_y
        })

    return rect_list


def decide_canvas_size(rect_list):
    """通过各个矩形的最小和最大x/y值来确定画布尺寸"""

    # 获取所有矩形中的最小x值
    min_x = min(rect_list, key=lambda rect: rect["x"])["x"]
    max_x = max(rect_list, key=lambda rect: rect["x"])["x"]
    min_y = min(rect_list, key=lambda rect: rect["y"])["y"]
    max_y = max(rect_list, key=lambda rect: rect["y"])["y"]

    # 根据x和y的距离差判断是要横屏还是竖屏
    distance_x = max_x - min_x
    distance_y = max_y - min_y

    if distance_x >= distance_y:
        canvas_width = 960
        canvas_height = 640
    else:
        canvas_width = 640
        canvas_height = 960

    width_prop = distance_x / canvas_width if canvas_width > distance_x else canvas_width / distance_x
    height_prop = distance_y / canvas_height if canvas_height > distance_y else canvas_height / distance_y

    return canvas_width, canvas_height, width_prop, height_prop


def adjust_rect_data(rect_list, canvas_width, canvas_height, width_prop, height_prop):
    """调整各个矩形的值"""
    # 找到最小x和最小y值(也就是找到最左上角的矩形的x和y值)
    # 然后其他将其他矩形的x和y坐标减去最小x和最小y,求出相对距离
    # 所有相对距离包括宽高全部乘以宽高比例
    # 同时将坐标转换为Cocos类型,以画布中心为原点
    min_x = min(rect_list, key=lambda rect: rect["x"])["x"]
    min_y = min(rect_list, key=lambda rect: rect["y"])["y"]

    for rect in rect_list:
        rect["x"] = (rect["x"] - min_x) * width_prop - canvas_width/2
        rect["y"] = canvas_height/2 - (rect["y"] - min_y) * height_prop
        rect["width"] *= width_prop
        rect["height"] *= height_prop

    # 算出下边和右边的空白距离,将所有矩形往下和往右平移空白距离/2个像素点
    max_x = max(rect_list, key=lambda rect: rect["x"])["x"]
    min_y = min(rect_list, key=lambda rect: rect["y"])["y"]
    right_distance = (canvas_width/2 - max_x) / 2
    bottom_distance = abs(-canvas_height/2 - min_y) / 2

    for rect in rect_list:
        rect["x"] += right_distance
        rect["y"] -= bottom_distance

    # 将x或y坐标距离不相差15像素的矩形对齐
    diff = 15
    for rect1 in rect_list:
        for rect2 in rect_list:
            if rect1 == rect2:
                continue

            if abs(rect1["x"] - rect2["x"]) <= diff:
                average_x = (rect1["x"] + rect2["x"]) / 2
                rect1["x"] = average_x
                rect2["x"] = average_x

            if abs(rect1["y"] - rect2["y"]) <= diff:
                average_y = (rect1["y"] + rect2["y"]) / 2
                rect1["x"] = average_y
                rect2["x"] = average_y

            if abs(rect1["width"] - rect2["width"]) <= diff:
                average_width = (rect1["width"] + rect2["width"]) / 2
                rect1["width"] = average_width
                rect2["width"] = average_width

            if abs(rect1["height"] - rect2["height"]) <= diff:
                average_height= (rect1["height"] + rect2["height"]) / 2
                rect1["height"] = average_height
                rect2["height"] = average_height

    # 四舍五入保留整数
    for rect in rect_list:
        rect["x"] = round(rect["x"])
        rect["y"] = round(rect["y"])
        rect["width"] = round(rect["width"])
        rect["height"] = round(rect["height"])

    return rect_list


def make_final_data(rect_list, canvas_width, canvas_height):
    return {
        "canvas": {
            "width": canvas_width,
            "height": canvas_height
        },
        "rects": rect_list
    }


if __name__ == "__main__":
    app.run()
发送图片并生成最终代码
后端代码已经开发完毕,前端功能的话我们就用Cocos插件来实现,插件界面如下。
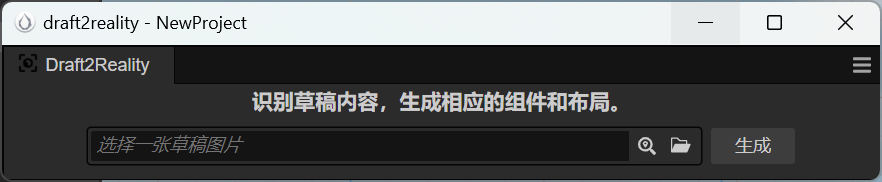
选择一张草稿图片,然后点击生成。

此时后端就会识别上传的图片,然后返回画布和矩形数据。
{
  canvas: { height: 960, width: 640 },
  rects: [
    { height: 93, type: 'S', width: 122, x: 215, y: 128 },
    { height: 208, type: 'B', width: 241, x: 193, y: -165 },
    { height: 119, type: 'S', width: 148, x: -171, y: -56 },
    { height: 119, type: 'L', width: 148, x: -215, y: 165 }
  ]
}
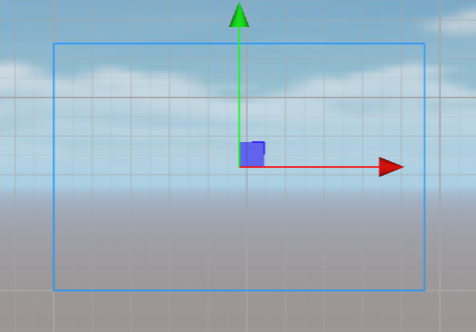
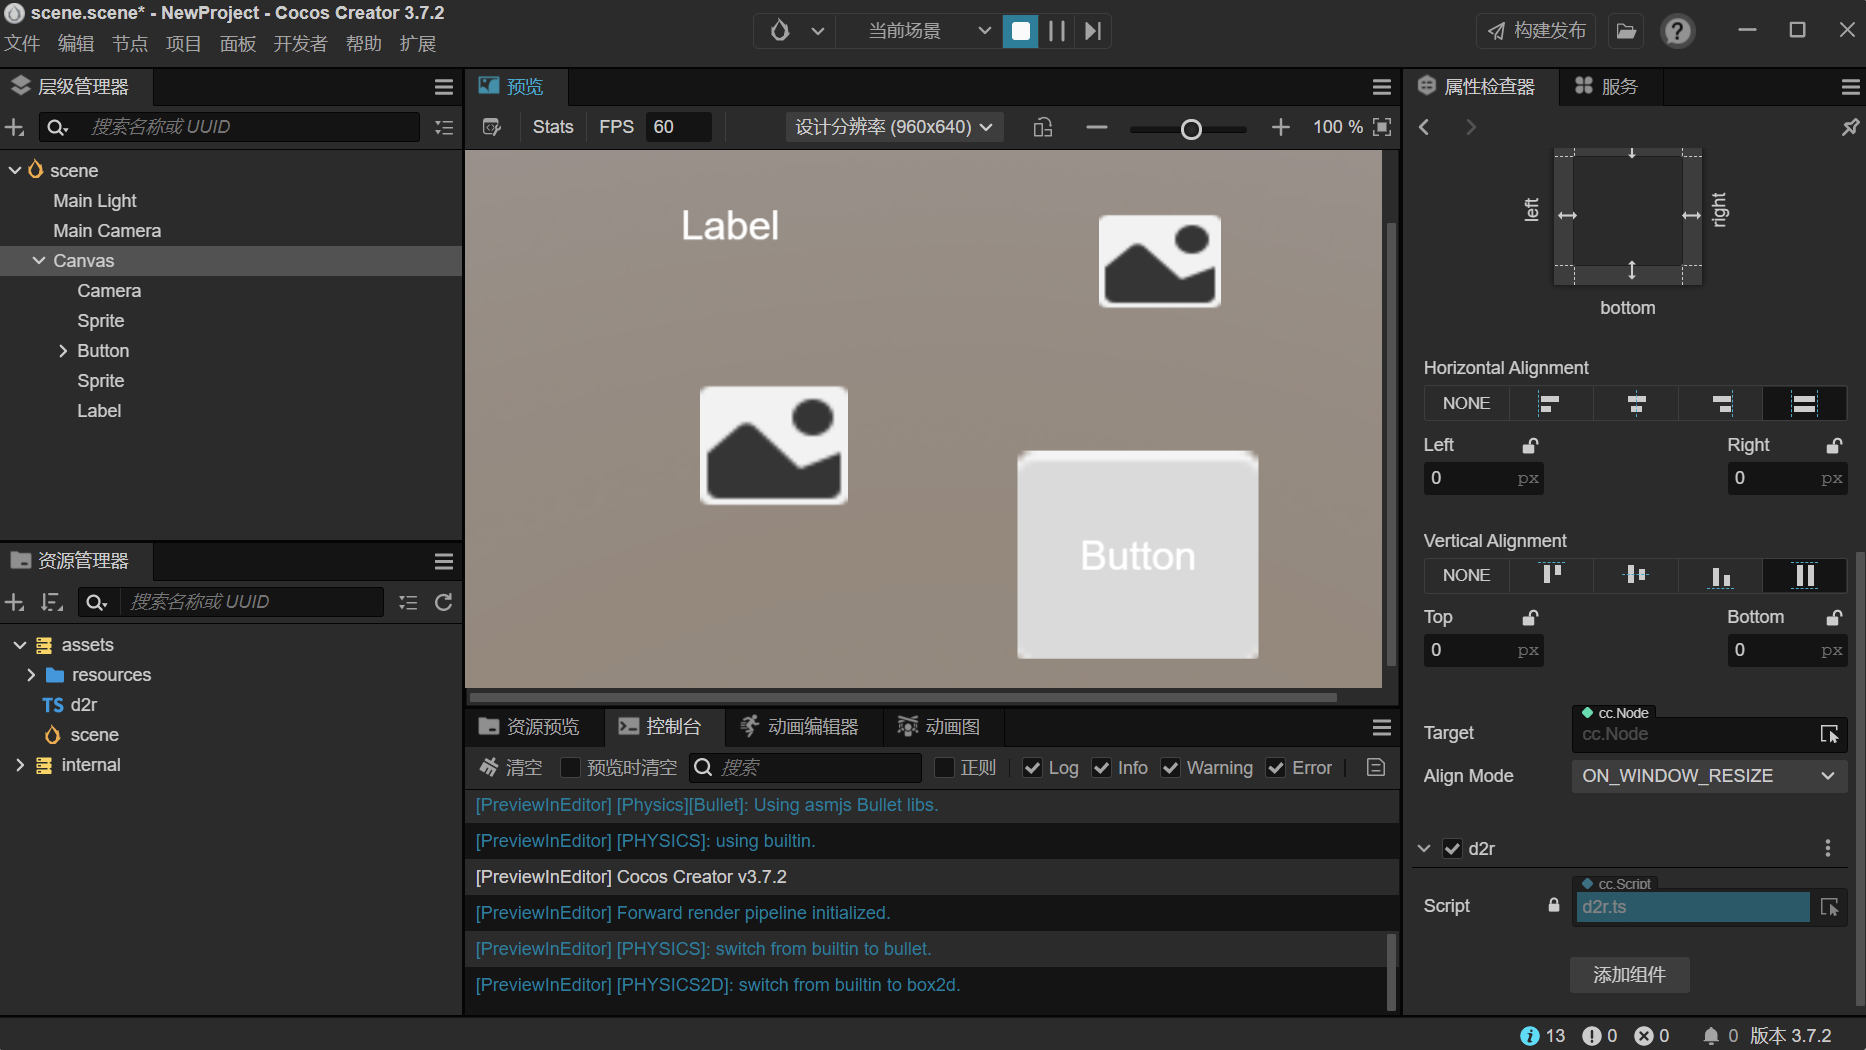
最后插件会根据该数据在assets中生成一个d2r.ts文件,我们将该ts文件挂载到画布上然后运行就可以看到效果了。
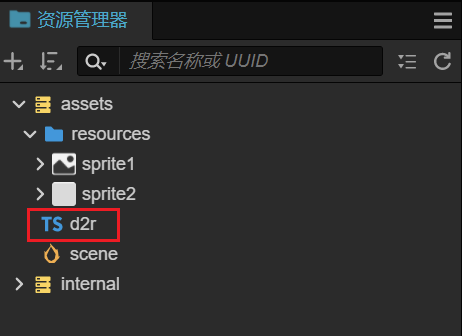
注: resources文件夹是插件在开启时自动生成的,其中包含着用于Sprite和Button组件的初始图片。
运行效果如下:
运行视频如下:
将草稿内容转为真实内容_哔哩哔哩_bilibili
总结与提高
我们通过AI将草稿内容识别了出来,然后提取并调整了必要数据,最后得到了一个可以生成真实组件和布局的代码。
有待提高的点:
1. 用于AI的训练数据量可以再大一些,这样可以提高识别精度,也可以生成更多种类的组件。
2. 个别草稿识别出来的结果不是很满意,有些组件在草稿上是分开的,但生成后却是重合的,还有方框的大小比例还需要更精确。所以在对提取的数据做调整时,调整方面的算法还有待改进。
3. 目前AI的作用就在识别,并不能很好的体现AIGC的魅力。可以加入自然语言处理(NLP)技术,获取用户意向,然后再用爬虫爬取相应的图片资源,生成一个更好看更完善的内容。
资源下载
后端代码下载地址,需要安装的库已经写在yolov5/requirements.txt文件中。因为包含AI模型以及训练图片,所以文件会比较大:
链接:https://pan.baidu.com/s/1Z-q2mc2jsX5h_fWD_QjaOA
提取码:cr9t
前端插件下载地址,Cocos Creator版本要>=3.6.0:
链接:https://pan.baidu.com/s/141gpeSjGunKMf9SlqY0H7Q
提取码:9e6t


