
C++与TypeScript共享内存方案实现
一、参考
根据官方提供的文章——跨语言传输数据,所利用的共享内存方案进行实现功能,进行优化传输过程导致的掉帧情况。
• 官网中关于共享内存的描述
• 原生引擎跨语言调用优化 | Cocos Creator
二、思路
Java与Typescript进行交互,如果使用共享内存那么必须经过C++层,因为只有C++有内存地址的概念。而两者之间的桥梁是V8引擎,其中Cocos中是封装了V8引擎的,所以就不需要单独编译。
Java与C++之间的交互需要JNI层进行实现,而C++与Typescript之间的数据传输交互需要V8引擎进行实现,其形式如下。
C++端利用V8引擎申请内存,由于V8本身有Uint8Array类型,且Typescript也有该类型,直接申请Uint8Array类型的内存uint8Array,并通过V8中的global函数,设置为全局变量,这样便传递给了Typescript端。
Typescript端将纹理数据传递给该申请的内存。
Java端将通过JNI层获取该申请内存的数据。
三、实现过程
1、C++端的实现
1)C++文件创建
将想要编写的C++代码,放入官方指定的路径中,如下所示:
*\native\engine\common\Classes中。
2)V8引擎实现代码
BufferBridge.h文件
C++
  #ifndef DATATRANSFORM_BUFFERBRIDGE_H
#define DATATRANSFORM_BUFFERBRIDGE_H

#include "cocos/cocos.h"
#include "bindings/utils/BindingUtils.h"
#include "bindings/jswrapper/SeApi.h"

uint8_t *accessUintArray();

class BufferBridge {

public:
    static uint8_t *pixelsData;
    BufferBridge();

~BufferBridge();

void createGlobalUint8Array();
public:
v8::Isolate *isolate = nullptr;
};
#endif //DATATRANSFORM_BUFFERBRIDGE_H
BufferBridge.cpp文件
C++
#include "BufferBridge.h"

#ifdef __ANDROID__

#include <jni.h>
#include <android/log.h>
#include <external/ohos/x86_64/include/v8/v8.h>
#include "cocos/core/scene-graph/Node.h"

#define LOG_DT(TAG, ...) __android_log_print(ANDROID_LOG_DEBUG, TAG, __VA_ARGS__);

#endif

uint8_t *BufferBridge::pixelsData = new uint8_t[360 * 240 * 4];

BufferBridge::BufferBridge() {
    this->isolate = v8::Isolate::GetCurrent();
    createGlobalUint8Array();
}

BufferBridge::~BufferBridge() {

}

void BufferBridge::createGlobalUint8Array() {
    v8::HandleScope handle_scope(this->isolate);
    // 创建一个 V8 的执行上下文
    v8::Local<v8::Context> context = this->isolate->GetCurrentContext();
    // 定义 ArrayBuffer 的大小(字节)
    size_t byteLength = 0;
    // 创建一个新的 ArrayBuffer
    v8::Local<v8::ArrayBuffer> arrayBuffer = v8::ArrayBuffer::New(this->isolate, byteLength);
    v8::Local<v8::Uint8Array> uint8Array = v8::Uint8Array::New(arrayBuffer,
                                                               0, byteLength);
    v8::Global<v8::Uint8Array> globalUint8Array(this->isolate, uint8Array);
    // 将 Uint8Array 赋值到全局对象
    v8::Local<v8::Object> global = context->Global();
    global->Set(context, v8::String::NewFromUtf8Literal(this->isolate, "uint8Array"),
                uint8Array).ToChecked();
    if (uint8Array.IsEmpty()) {
#ifdef __ANDROID__
        LOG_DT("test", "uint8Array is empty.");
#endif
    } else {
#ifdef __ANDROID__
        LOG_DT("test", "uint8Array is not empty.");
#endif
    }
}


uint8_t *accessUintArray() {
    v8::Isolate *isolate = v8::Isolate::GetCurrent();
    v8::HandleScope handle_scope(isolate);
    v8::Local<v8::Context> context = isolate->GetCurrentContext();
    // 获取全局对象
    v8::Local<v8::Object> global = context->Global();

// 使用全局对象的 Get 方法来获取之前设置的 uint8Array
v8::Local<v8::Value> globalUint8ArrayValue;
uint8_t *data = NULL;
if (global->Get(context, v8::String::NewFromUtf8Literal(isolate, "uint8Array")).ToLocal(
        &globalUint8ArrayValue)) {
    // 确保获取到的是一个 Uint8Array 对象
    if (globalUint8ArrayValue->IsUint8Array()) {
        // 转换为 Uint8Array 对象
        v8::Local<v8::Uint8Array> globalUint8Array = v8::Local<v8::Uint8Array>::Cast(
                globalUint8ArrayValue);

        uint32_t length = globalUint8Array->Length();
        if (length == 0) {
            return nullptr;
        }

        v8::Local<v8::ArrayBuffer> b = globalUint8Array->Buffer();
        data = static_cast<uint8_t *>(b->Data());
    } else {
       #ifdef __ANDROID__
        LOG_DT("test", "不是Uint8Array类型");
   #endif
    }
} else {
 #ifdef  __ANDROID__
    LOG_DT("test", "获取全局变量失败.");
 #endif
 }
return data;
 }
在编译完成的game.cpp中添加如下代码到int Game::init()中,保证搭建的桥能够被调用到。
BufferBridge mBridge{};
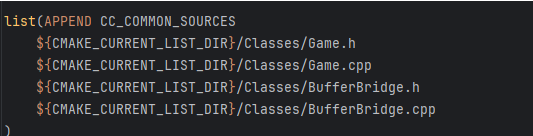
3)修改Camkelist进行编译
在此Cmakelist中添加BufferBridge
2、Typescript端的实现
关键代码如下:
TypeScript
if ((globalThis as any).uint8Array) {
(globalThis as any).uint8Array = this.texPixels;
console.log(“Uint8Array length:”, (globalThis as any).uint8Array.length);
// 进行其他操作…
} else {
console.error(“globalUint8Array 不存在”);
}
全部代码如下:
TypeScript
import { _decorator, Camera, Component, game, log, native, Node, RenderTexture, Sprite, SpriteFrame  } from 'cc';
import {uint8ArrayToBase64,base64ToUint8Array,convertLargeBufferToStringAsync,processAndSendBuffer,uint8ArrayToBase64v2} from './DataTransfer';
import { JSB, NATIVE } from 'cc/env';

const { ccclass, property } = _decorator;

@ccclass('Buffer')
export class Buffer extends Component {

// 挂载整个SR画面显示的相机
@property(Camera)
camera:Camera = null;

// 使用的渲染纹理
private renderTexture:RenderTexture|null=null;
// 获取到的纹理像素buffer
private texPixels:Uint8Array | null = null;

start() {
    if (!this.camera) {
        return;
    }
    // 初始化渲染纹理
    this.renderTexture = new RenderTexture();
    this.renderTexture.reset({
        width:360,
        height:240,
    });
    // 将相机的画面渲染到渲染纹理中
    this.camera.targetTexture = this.renderTexture;
}

update(deltaTime: number) {
    if (!this.camera) {
        return;
    }

    // 获取渲染数据画面buffer
    const width = this.renderTexture.width;
    const height = this.renderTexture.height;
    this.texPixels = this.renderTexture.readPixels(0, 0, width, height);

   // 访问全局的 Uint8Array 变量
    if ((globalThis as any).uint8Array) {
        (globalThis as any).uint8Array = this.texPixels;
        console.log("Uint8Array length:", (globalThis as any).uint8Array.length);
    // 进行其他操作...
    } else {
        console.error("globalUint8Array 不存在");
    }
}
}
3、JNI的实现
将JNI层的代码同样写在BufferBridge.cpp文件中,如下所示。
C++
extern "C"
JNIEXPORT void JNICALL
Java_com_cocos_game_AppActivity_updateBuffer(JNIEnv *env, jclass clazz) {
    // 访问ts端修改的全局变量uInt8Array
    uint8_t *data = accessUintArray();
    if (data == nullptr) return;
    memcpy(BufferBridge::pixelsData, data, 360 * 240 * 4);
}
extern "C"
JNIEXPORT jbyteArray JNICALL
Java_com_cocos_game_AppActivity_getPixelsData(JNIEnv *env, jclass clazz) {
    int dataSize = 360 * 240 * 4;
    jbyteArray byteArray = env->NewByteArray(dataSize);

if (byteArray == nullptr) {
    // 创建失败,返回空
    LOG_DT("test", "创建byte[]失败");
    return nullptr;
}

// 设置 jbyteArray 的内容
env->SetByteArrayRegion(byteArray, 0,
                        dataSize, reinterpret_cast<const jbyte *>(BufferBridge::pixelsData));
// 返回 jbyteArray,内存由 JVM 管理
return byteArray;
}
4、Java端的实现
在通过Cocos进行build编译后生成的Android平台上的Activity.java文件中进行编写调用数据代码。
Java
private byte[] mDecodedData;

private ScheduledThreadPoolExecutor threadPool = new ScheduledThreadPoolExecutor(1);
private static native void updateBuffer();

private static native byte[] getPixelsData();

private void sendData() {
    // 记录时间
    long timestamp = System.currentTimeMillis();
    // 将数据写入文件中
    try {
        createMemoryFile();
        memoryFile.writeBytes(mDecodedData, 0, 0, mDecodedData.length);
    } catch (IOException e) {
        throw new RuntimeException(e);
    }

    if (mSRCreatorAIDL != null) {
        try {
            mSRCreatorAIDL.onFrameData(frameId, mparcelFileDescriptor.getFd(), mparcelFileDescriptor);
        } catch (RemoteException e) {
            throw new RuntimeException(e);
        }
    }
}

private void createThread() {
    threadPool.scheduleWithFixedDelay(() -> {
        CocosHelper.runOnGameThread(AppActivity::updateBuffer);
        frameId++;
        mDecodedData = getPixelsData();
        sendData();
    }, 0, 16, TimeUnit.MILLISECONDS);
}

// 在OnCreate函数中进行调用上述的线程。
protected void onCreate(Bundle savedInstanceState) {
super.onCreate(savedInstanceState);
// DO OTHER INITIALIZATION BELOW
SDKWrapper.shared().init(this);
// 请求权限
if (Build.VERSION.SDK_INT >= Build.VERSION_CODES.M) {
    requestPermissions(new String[]{
            Manifest.permission.READ_EXTERNAL_STORAGE,
            Manifest.permission.WRITE_EXTERNAL_STORAGE
    }, 101);
}
createThread();
}
注意:线程安全问题。
在 Cocos Creator 发布的原生应用中,至少有两个线程:GL 线程 和 原生系统的 UI 线程。
• GL 线程:执行 Cocos 引擎的渲染相关代码和 JavaScript 脚本代码
• UI 线程:平台的原生 UI 创建、响应和更新
在本项目中,是在Android调用Cocos的线程内容,所以需要添加如下线程安全操作的示例代码:
Java
// 一定要在 GL 线程中执行
CocosHelper.runOnGameThread(new Runnable() {
@Override
public void run() {
CocosJavascriptJavaBridge.evalString(“cc.log(“Javascript Java bridge!”)”);
}
});


