接之前的教程:
小白也能写框架之【零、框架实际应用演示】 - Creator 3.x - Cocos中文社区
小白也能写框架之【一、新建框架工程】 - Creator 3.x - Cocos中文社区
小白也能写框架之【二、带颜色的日志管理器】 - Creator 3.x - Cocos中文社区
小白也能写框架之【三、带进度的分包管理器】 - Creator 3.x - Cocos中文社区
小白也能写框架之【四、带加密的数据管理器】 - Creator 3.x - Cocos中文社区
小白也能写框架之【五、资源管理器】 - Creator 3.x - Cocos中文社区
小白也能写框架之【六、音频管理器】 - Creator 3.x - Cocos中文社区
小白也能写框架之【七、事件管理器】 - Creator 3.x - Cocos中文社区
小白也能写框架之【八、任务管理器】 - Creator 3.x - Cocos中文社区
今天给大家分享常用的组件封装【文本和精灵实现多语言】
借鉴了商店里的多语言组件,结合【五、资源管理器】和【七、事件管理器】实现
一、上主菜:
1、文件代码一:assets\Core\Scripts\Components\I18n\I18nBase.ts
import { _decorator, Component } from 'cc';

import { eventMgr } from '../../Managers/EventMgr';

const { ccclass } = _decorator;

/** 多语言抽象组件基类 */

@ccclass('I18nBase')

export abstract class I18nBase extends Component {

    /** 组件加载时调用,注册语言更改事件 */

    onLoad(): void {

        eventMgr.on('langChange', this.refresh, this);

        this.refresh();

    }

    /** 组件销毁时调用,注销语言更改事件 */

    onDestroy(): void {

        eventMgr.off('langChange', this.refresh);

    }

    /** 刷新多语言,子类需实现具体逻辑 */

    public abstract refresh(): void;

}
2、文件代码二:assets\Core\Scripts\Components\I18n\I18nLabel.ts
import { _decorator, Label, RichText } from "cc";

import { EDITOR } from "cc/env";

import { I18nBase } from "./I18nBase";

import { logMgr } from "../../Managers/LogMgr";

import { langMgr } from "../../Managers/LangMgr";

const { ccclass, property, requireComponent } = _decorator;

/** 用于显示多语言文本,并根据语言变化自动更新内容 */

@ccclass("I18nLabel")

@requireComponent(Label)

@requireComponent(RichText)

export class I18nLabel extends I18nBase {

    @property({ displayName: "多语言 key" })

    private code: string = "";

    /** 多语言标签组件变量 */

    private lbl: Label | RichText | null = null;

    /** 获取多语言 key */

    public get key(): string {

        return this.code;

    }

    /** 设置多语言 key 并刷新内容 */

    public set key(value: string) {

        this.code = value;

        this.refresh();

    }

    /** 刷新文本内容,根据当前语言设置更新组件的 string 属性 */

    public refresh(): void {

        if (EDITOR) return; // 编辑器模式下不刷新

        if (!this.lbl) {

            this.lbl = this.getComponent(Label) || this.getComponent(RichText);

            if (!this.lbl) {

                logMgr.err("未找到 Label 或 RichText 组件。");

                return;

            }

        }

        this.lbl.string = langMgr.getLanguage(this.key);

    }

}
3、文件代码三:assets\Core\Scripts\Components\I18n\I18nSprite.ts
import { _decorator, Sprite, SpriteFrame } from "cc";

import { EDITOR } from "cc/env";

import { I18nBase } from "./I18nBase";

import { logMgr } from "../../Managers/LogMgr";

import { langMgr } from "../../Managers/LangMgr";

const { ccclass, property, requireComponent } = _decorator;

/** 存储语言代码与对应的精灵帧 */

@ccclass("I18nSpriteData")

export class I18nSpriteData {

    @property({ displayName: "语言代码", tooltip: "如:en、zh等" })

    langCode: string = "";

    @property({ displayName: "对应精灵", type: SpriteFrame })

    spriteFrame: SpriteFrame | null = null;

}

/** 根据当前语言自动更新精灵帧 */

@ccclass("I18nSprite")

@requireComponent(Sprite)

export class I18nSprite extends I18nBase {

    @property({ displayName: "多语言精灵数据列表", type: [I18nSpriteData] })

    public spList: I18nSpriteData[] = [];

    /** 多语言精灵组件变量 */

    private sp: Sprite | null = null;

    /** 刷新精灵帧,根据当前语言设置更新 Sprite 的 spriteFrame 属性 */

    public refresh(): void {

        if (EDITOR) return; // 编辑器模式下不刷新

        if (!this.sp) {

            this.sp = this.getComponent(Sprite);

            if (!this.sp) {

                logMgr.err("未找到 Sprite 组件。");

                return;

            }

        }

        const spriteData = this.spList.find(data => data.langCode === langMgr.lang);

        if (spriteData?.spriteFrame) {

            this.sp.spriteFrame = spriteData.spriteFrame;

        } else {

            logMgr.err(`未找到语言代码为 ${langMgr.lang} 的精灵帧。`);

        }

    }

}
4、文件代码四:assets\Core\Scripts\Managers\LangMgr.ts
import { JsonAsset, director, Director } from "cc";

import { EDITOR } from "cc/env";

import { dataMgr } from "./DataMgr";

import { resMgr } from "./ResMgr";

import { eventMgr } from "./EventMgr";

/**

 * 语言管理器

 * 提供语言本地化:加载语言包、更改语言设置、获取翻译文本或精灵。

 */

class LangMgr {

    /** 记录已加载的分包及其语言 */

    private loadedBundles: Record<string, Set<string>> = {};

    /** 当前选择的语言 */

    private currLang: string;

    /** 缓存的语言数据 */

    private langData: Record<string, Record<string, string>> = {};

    /** 私有构造函数,确保外部无法直接通过new创建实例 */

    private constructor() {

        if (!EDITOR) {

            director.once(Director.EVENT_AFTER_SCENE_LAUNCH, this.init, this);

        }

    }

    /** 单例实例 */

    public static readonly instance: LangMgr = new LangMgr();

    /** 初始化多语言 */

    private async init(): Promise<void> {

        this.currLang = dataMgr.getText("language") || "zh";

        await this.changeLang(this.currLang);

    }

    /** 获取当前语言 */

    public get lang(): string {

        return this.currLang;

    }

    /** 更改当前语言,并加载必要的语言包 */

    public async changeLang(langCode: string): Promise<void> {

        if (this.currLang === langCode) return;

        this.currLang = langCode;

        await Promise.all(

            Object.keys(this.loadedBundles).map(bundleName =>

                this.loadLanguageData(bundleName, langCode)

            )

        );

        dataMgr.setData("language", langCode);

        eventMgr.emit("langChange");

    }

    /** 异步加载指定分包的指定语言数据 */

    public async loadLanguageData(bundleName: string, langCode: string = this.currLang): Promise<void> {

        const loadedLanguages = this.loadedBundles[bundleName] || new Set<string>();

        if (loadedLanguages.has(langCode)) return;

        const path = `${bundleName}/Res/Lang/Lable/${langCode}`;

        const langAsset = await resMgr.loadRes<JsonAsset>(path);

        this.langData[langCode] = { ...this.langData[langCode], ...langAsset.json };

        loadedLanguages.add(langCode);

        this.loadedBundles[bundleName] = loadedLanguages;

    }

    /** 根据键获取对应的翻译文本 */

    public getLanguage(key: string, def: string = ""): string {

        return this.langData[this.currLang]?.[key] ?? def;

    }

}

/** 导出单例实例 */

export const langMgr = LangMgr.instance;
二、结构预览
三、代码示例
1、先建立一个分包,如下图:
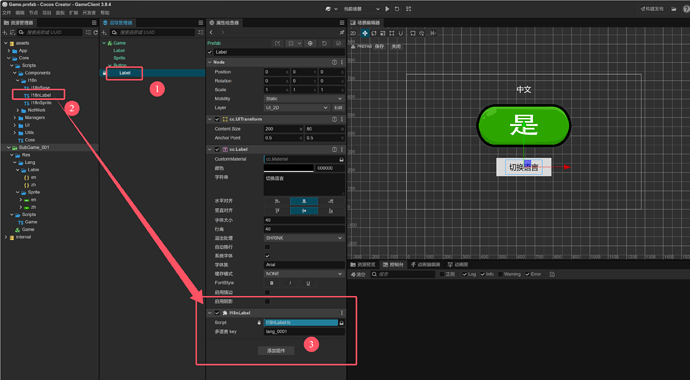
2、给分包添加UI,如下图:
先,绑定Game.ts到预制体根节点
然后,依次添加组件,如下图:
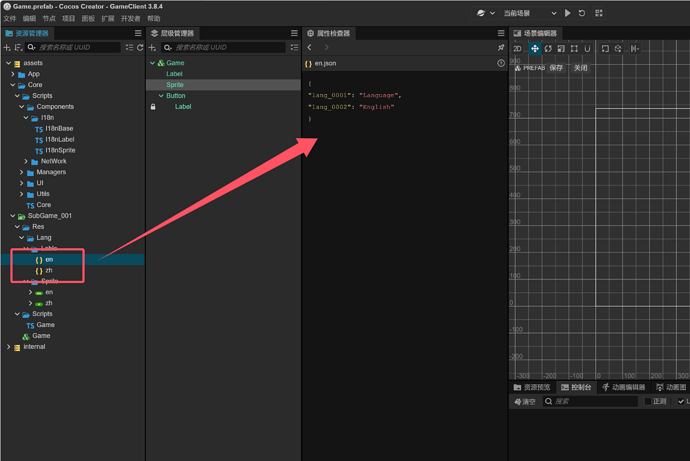
3、说明:上面过程中,多语言key和精灵来自分包里的资源,看图:
4、模拟一个游戏设置里,切换语言的功能,打开附加到Game预制体的Game.ts
import { _decorator, Component, Node, Button } from 'cc';

const { ccclass, property } = _decorator;

@ccclass('Game')

export class Game extends Component {

    /** 切换语言按钮 */

    private btn: Node = null;

    private lang: string = "zh";

    /** 加载 */

    onLoad() {

        this.btn = this.node.getChildByName('Button');

        if (this.btn) {

            this.btn.on(Button.EventType.CLICK, this.onButtonClick, this);

        }

    }

    /** 按钮点击事件处理 */

    private onButtonClick() {

        if (this.lang == 'zh') {

            this.lang = 'en';

        } else {

            this.lang = 'zh';

        }

        app.lang.changeLang(this.lang);

    }

}
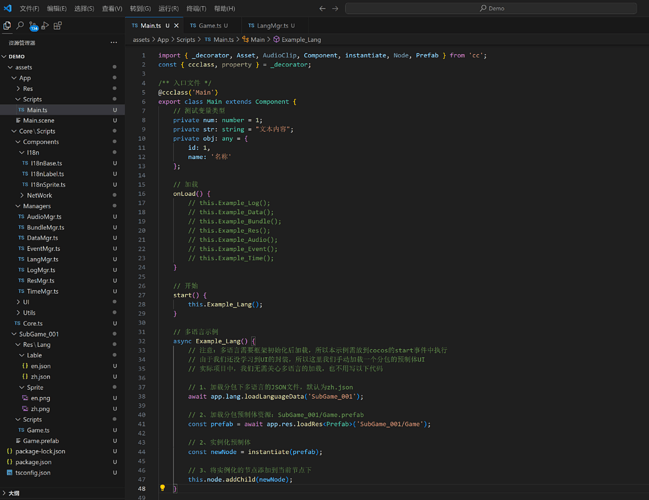
5、最后就是主场景对多语言的调用,看图:
四、效果展示:
五、简单说明:
1、支持Label、RichText、SpriteFrame的多语言
2、通过事件触发多语言的切换,立即生效,无需重启
3、每个分包都有自己独立的多语言资源文件,实现单独更新,减轻更新量
4、支持静态拖拽式多语言(示例中就是静态的),也支持动态调用app.lang.getLanguage(‘key’),一般Tip多语言提示消息使用


