《  Cocos 论坛首发 Bookmarklet 简略编写 + Snip 片段 + 自定义查看动态合图 + 简要自定义 WebGL 图形(有写插件)+ RVO避障简析 (附写源码) | 社区征文》
申明 [本文使用的技术很菜_仅供不太了解这块的朋友稍作阅读]

本文章使用的技术并不复杂, 想做深入技术研究的大佬可以略过了
文内并无比较高深的技术内容, 最后感谢各位大佬的阅读
本文主旨:言简意赅 · 词可达意  言之有理 · 言而有物
- 抛砖引玉 · 请君斧正 =>
- 本文超小杯插件(一折)地址:: detail/3648
 Cocos Creator 自定义 WebGL 渲染效果+2.x 拖拽合图 | Cocos Store
- 本文免费源码地址:: detail/3652
 Cocos Creator RVO 避障的简单理解 [源码] | Cocos Store
本文内容目录概览
使用方法和效果:::
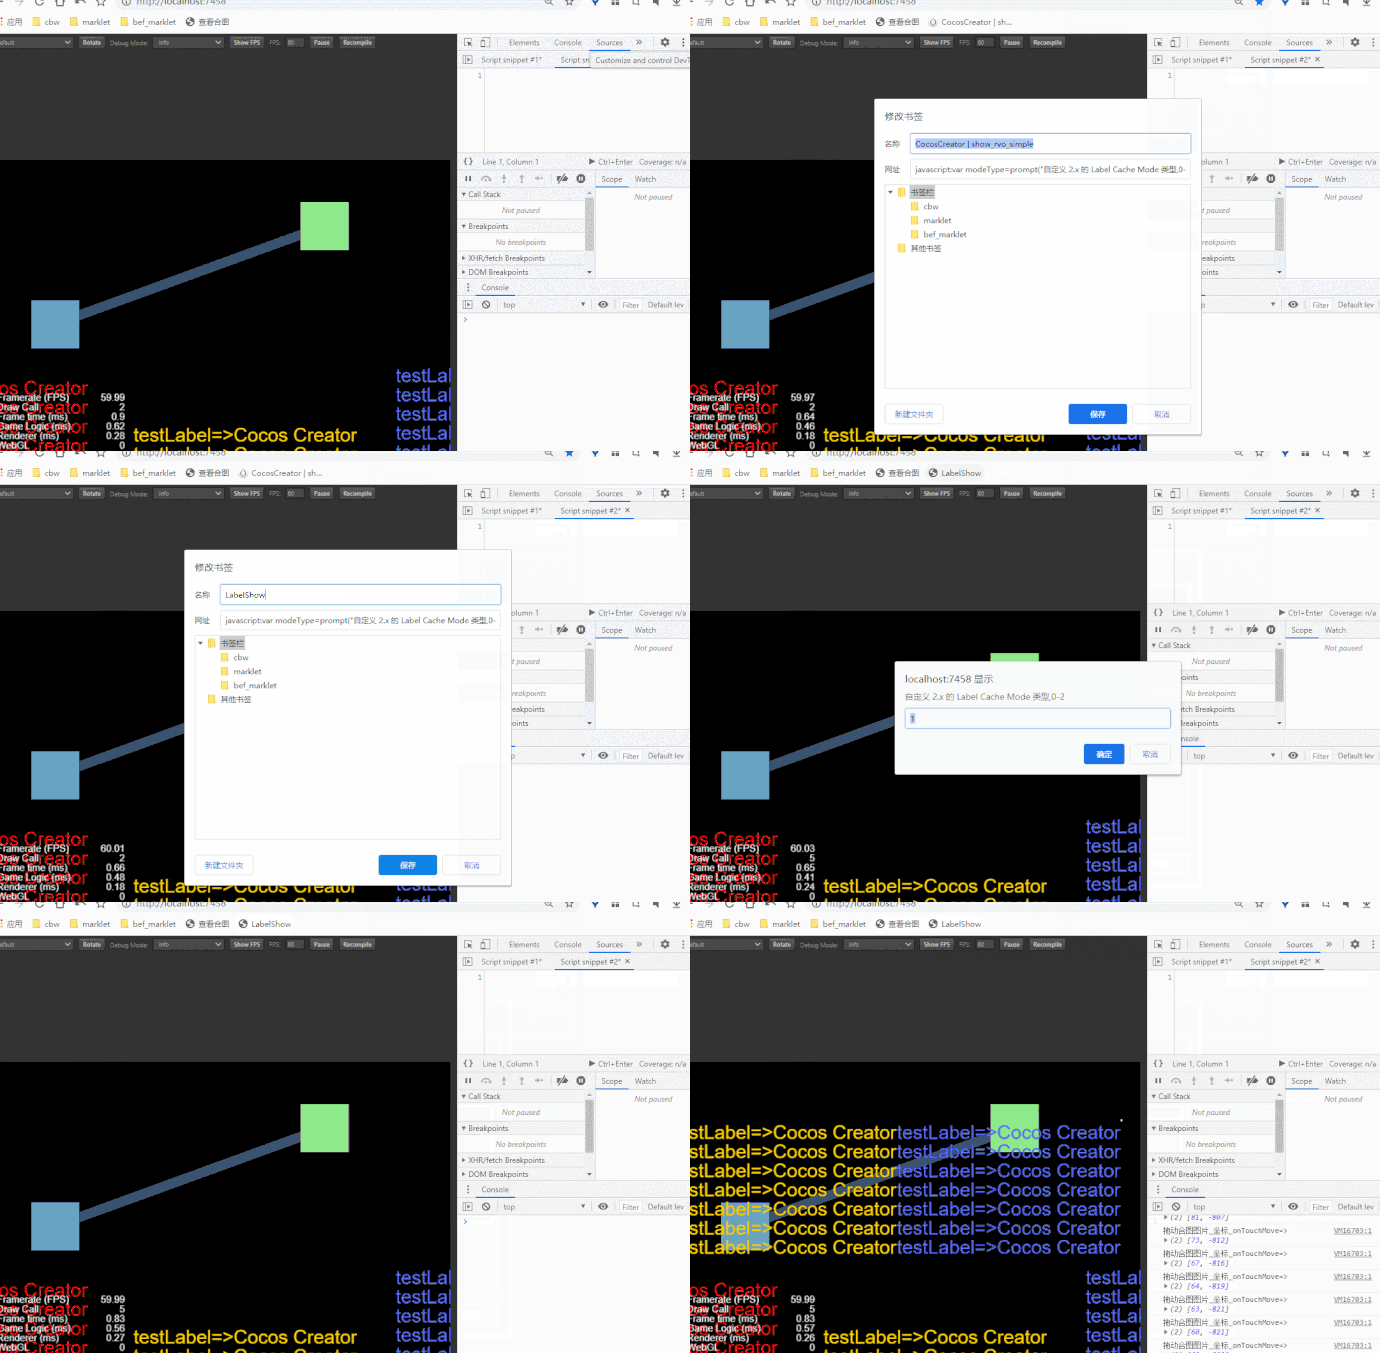
1.8.1使用 Bookmarklet + Snip 片段的 GIF 操作演示
1.8.2 演示=>自定义查看动态合图 (拓展 Cocos 2.x 的一个查看的功能) 及效果
正文:::
1.Cocos 论坛首发 Bookmarklet 简略编写 + Snip 片段介绍
1.1 在任何网页上运行 JavaScript 的代码片段
1.2 「引用」本条目参考自 Bookmarklet编写指南 - 阮一峰日志
1.3 什么是 Bookmarklet ?
1.4 Bookmarklet 的优点
1.5 Bookmarklet 的编写规则
1.6 Bookmarklet 的编写技巧
1.7 Snip 片段简介 (这里指的是浏览器控制台里面的 Snip 片段代码)
1.9 使用 Bookmarklet + Snip 片段的 GIF 操作演示代码
2.在 Cocos 内用代码写最简单的 WebGL图形(Ts) + 超小杯 [付费插件]
3. RVO 避障的简单理解 + [免费源码]
先看使用方法和效果:=>
1.8.1  使用 Bookmarklet + Snip 片段的 GIF 操作演示
1.8.2 演示=>自定义查看动态合图 (拓展 Cocos 2.x 的一个查看的功能) 及效果
1.8.3 在浏览器上使用 Bookmarklet 片段代码(先复制好要用的 Js 代码)
收藏书签, 书签的网址栏, 填入 Bookmarklet 片段代码, 点击书签即可使用
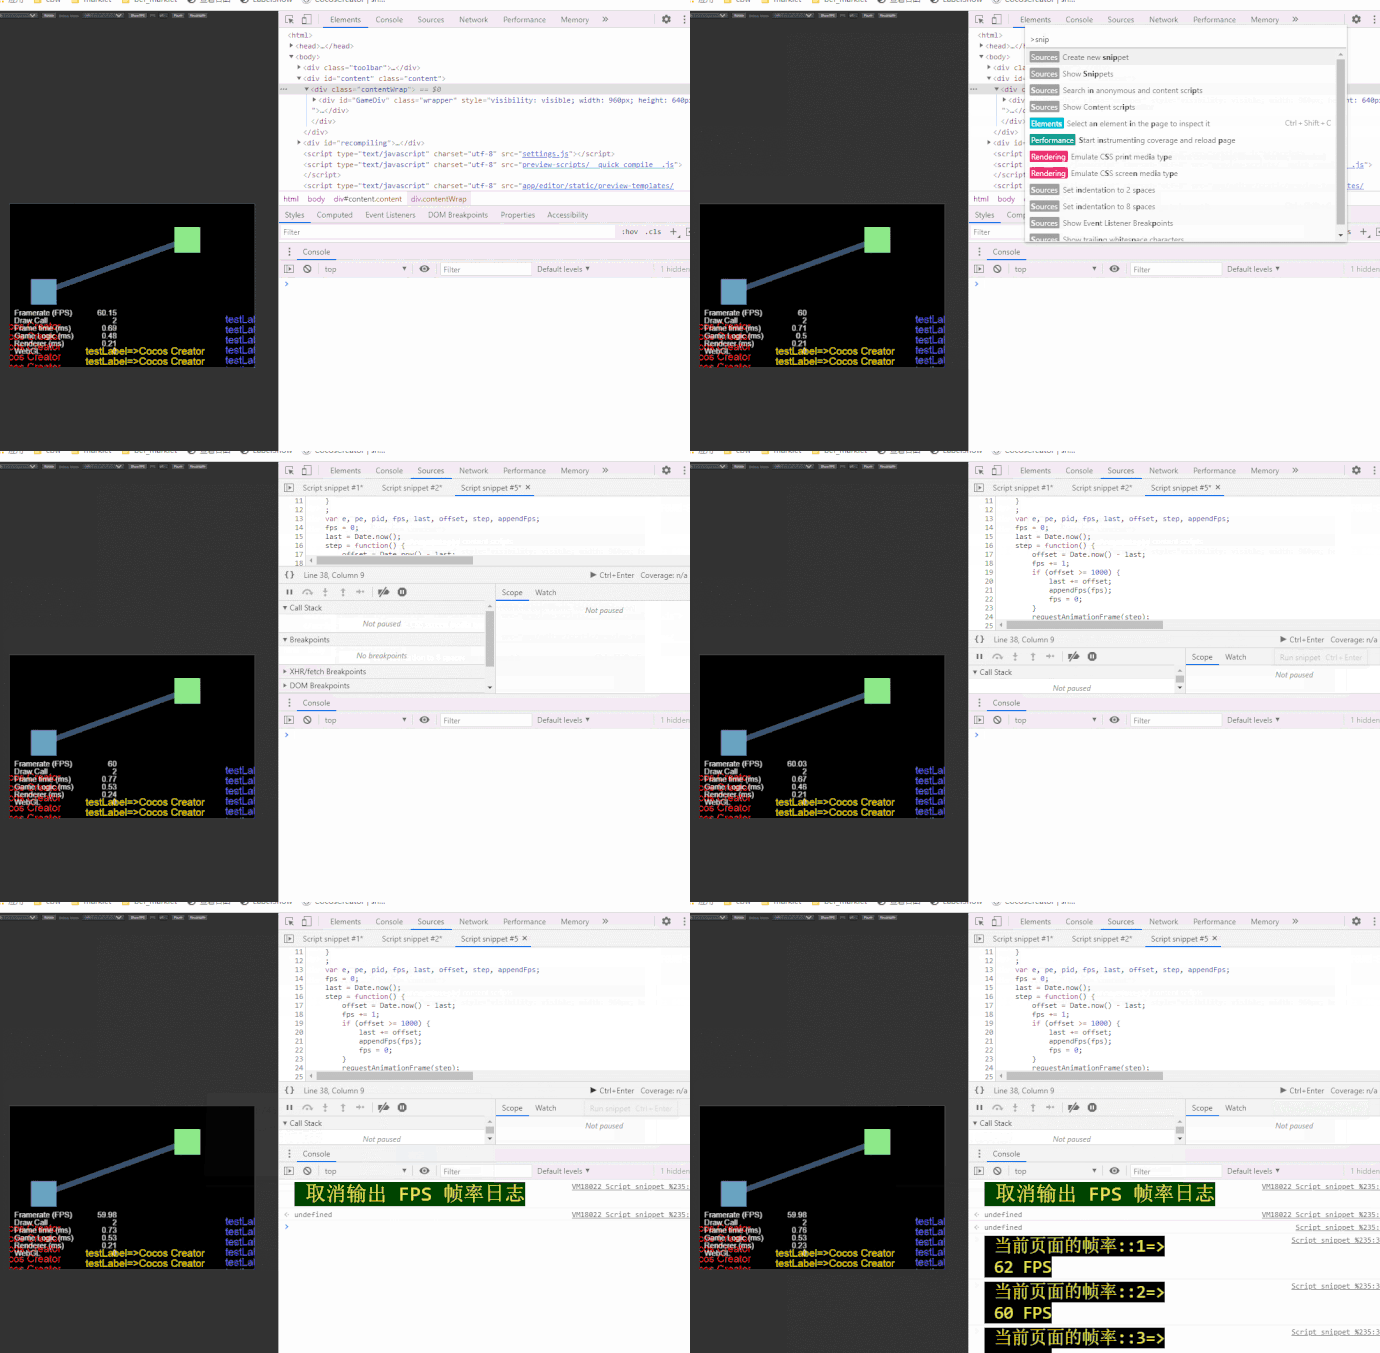
1.8.4 在浏览器上使用 Snip 片段代码(先复制好要用的 Js 代码)
ctrl+shift+p 输入 snip 选择新建 snip, 填入 Snip 片段代码, ctrl+enter 快捷键运行代码(可换行)
正文介绍:=>
1.  Cocos 论坛首发 Bookmarklet 简略编写 + Snip 片段介绍
- 本条目, 拓展之前讲的 在 Chrome 控制台性能调试·指东(略讲) 里面的这个内容
1.1 「引子」 看了下论坛内容, 并没有发现有讲述这个内容的大佬, 所以小弟来抛砖引玉 
1.1.1「述1」本文内的小图标采用用的是 Unicode 特殊编码格式表
1.1.2「述2」本文内录制的 GIF 图片,里面使用录屏软件, 参考之前写的这个介绍
1.2.1 「引用」本条目参考 Bookmarklet 编写指南 - 阮一峰日志
1.2.2 「引用」本条目参考 中文网最全 Bookmarklet 小书签 - 奔跑中的奶酪
1.2.3 「注」因为时间久远, 浏览器逐渐废除了很多相关代码, 所以使用老代码时需要考虑目前的执行环境(本文内的代码目前还能使用)
1.3 什么是 Bookmarklet ?
- 内容介绍
Bookmarklet ,由 Bookmark(书签)和-let(小的)构成,中文可以译成"书签工具"。它在形式上与"书签"一样,都保存在浏览器收藏夹里, 是一段Javascript代码,以"javascript:"开头。点击之后,会对当前页面执行某种操作。
Bookmarklet,由英文单词 Bookmark 和 Applet 组合而来,也就是书签小程序的意思。简单地说,小书签就是把一段带有特定功能的 JavaScript 代码保存到收藏夹,当你需要的时候,点击它可以实现这段 JavaScript 代码的功能。 - 功能介绍
小书签无需安装,也就不会对浏览器速度造成任何的影响,它和普通的书签一样放到书签栏里,只需要点击一下就能实现各式各样的功能,比如生成二维码,生成短链接,阅读模式等等功能,十分方便
1.4 Bookmarklet 的优点
1.4.1 安装快速
Bookmarklet的安装,就是在收藏夹中保存一段代码,一步就能完成。所有浏览器都原生支持。
1.4.2 使用方便
用的时候,点一下这个链接就行了。
1.4.3 开发容易
一段Javascript代码就是Bookmarklet的所有内容,不需要用到其他技术,比开发一个浏览器插件简单多了。
1.4.4 跨浏览器 (PS:在IOS系统里面的浏览器上也可以当做书签点击运行)
所有浏览器都支持Bookmarklet。如果写的正确,同样一个Bookmarklet在各种浏览器上都能正常使用。
1.5 Bookmarklet 的编写规则
1.5.1 必须以"javascript:"开头
浏览器把"javascript:"当做协议看待。有了它,
浏览器才知道要用javascript解释后面的代码。它的作用等同于将代码放在之间运行。
最简单的代码::
javascript:alert(‘Bookmarklets Cocos !’);
1.5.2 所有代码必须在同一行 (Snip 片段比这好,而且长度没限制)
因为浏览器把Bookmarklet当做网址保存,而网址是不能分行的,所以Bookmarklet也不能分行。
另一方面,网址是有长度限制的。IE的最长网址不能超过2083个字符(IE6不能超过508个字符),
这也就是Bookmarklet的最长长度。压缩工具 可以帮忙减少长度,
但是连接外部代码,可以避开这个限制。
1.5.3 使用单引号
根据Javascript的语法,单引号(‘xxx’)和双引号(“xxx”)都能使用。
但是由于html语言主要使用双引号,所以Bookmarklet优先使用单引号。
万一遇到必须使用双引号的情况,就采用它的URL编码形式"%22"。
1.5.4 不要污染全局变量
Bookmarklet最好不要生成新的全局变量,可以采用直接运行匿名函数的方式:
javascript: (function(){…})();
上面式子的第一个括号,定义了一个匿名函数;最后一个括号表示立即执行这个匿名函数。
所有的变量都是匿名函数的内部变量,不会生成任何新的全局变量。
如果必须设置全局变量,就取罕见的变量名(比如 CCoRCEoAsTOR2022 ),防止与已经存在的全局变量同名。
1.5.5 对文本和URL进行编码
为了防止出现非法字符,代码以外的文本都应该使用encodeURIComponent()函数进行编码,比如把空格变成%20。
1.6 Bookmarklet的编写技巧
1.6.1 获取网页信息 (可用)
1.6.1.2 获取当前网页信息-复制下方代码, 粘贴到浏览器控制台, 回车看效果
javascript:(()=>{var t;t = (function () {if (window.getSelection) {return window.getSelection().toString();} else if (document.getSelection) {return document.getSelection();} else if (document.selection) {return document.selection.createRange().text;};return '';})();alert('当前页面的标题:\n'+document.title+'\n当前页面的URL:\n'+location.href+'\n当前选中的文本\n\n'+t);})()
获取当前页面的标题:document.title
获取当前页面的URL: location.href
获取当前选中的文本:
var t;
t = (function () {
    if (window.getSelection) {
        return window.getSelection().toString();
    } else if (document.getSelection) {
        return document.getSelection();
    } else if (document.selection) {
        return document.selection.createRange().text;
    };
    return '';
})();
alert('当前页面的标题:\n'+document.title+'\n当前页面的URL:\n'+location.href+'\n当前选中的文本\n\n'+t);
1.6.2 防止刷新页面 (已失效)
如果代码对页面有改动(比如使用了document.write),浏览器就会用一个新页面替换原有页面。
所以最好用void()命令,把语句放在里面。
举例来说,下面这个 Bookmarklet 会导致原页面被一个新页面替代:
javascript:document.links[0].href=‘https://forum.cocos.org/’;
// 加上void以后,页面就不会跳转了:
javascript:void(document.links[0].href=‘https://forum.cocos.org/’);
1.7 Snip 片段简介 (这里指的是浏览器控制台里面的 Snip 片段代码)
- Code snippet (代码片段)在VS中指的是 基于IDE支持的利用快捷方式快速输入一小段 ,或者称之为一整块代码的功能,在日常编程,特别是在工作中写内容相似的业务代码时,利用Snippet功能,可以极大加快编程效率
1.9 使用 Bookmarklet + Snip 片段的 GIF 操作演示代码 (条目 1.8.1 的使用演示效果在最上面)
「注」代码前演示的是如何使用 Bookmarklet 和 Snip 片段以及其效果, (个人建议用 Snip 片段)
1.9.1 改写记录:::=>
- 改动来源:: 动态合图·调试文档 动态合图 · Cocos Creator · 2.x 文档
- 如果希望看到动态合图的效果,那么可以开启调试来看到最终生成的大图,这些大图会添加到一个 ScrollView 展示出来。
// 开启调试
cc.dynamicAtlasManager.showDebug(true);
// 关闭调试
cc.dynamicAtlasManager.showDebug(false);
1.9.2 先出自定义查看动态合图_核心代码( Bookmarklet 片段代码):::=>
javascript:(()=>{var getUserConfirm=confirm("是否查看合图?");window.showCodeInfoTime=" 【"+new Date().toLocaleString()+"=>星期"+['天','壹','贰','叁','肆','伍','陆'][new Date().getDay()]+"=>周"+['末','一','二','三','四','五','六'][new Date().getDay()]+"】 ";window.dragBlockOffset=cc.Vec2.ZERO;cc.dynamicAtlasManager.showDebug(getUserConfirm);if(getUserConfirm){var setNew_scroll=new cc.Node();var setNew_cont=new cc.Node();setNew_scroll.name="DYNAMIC_ATLAS_DEBUG_NODE_selfSet";setNew_cont.name="CONTENT";setNew_scroll.anchorX=0.5;setNew_scroll.anchorY=0.5;setNew_scroll.x=0;setNew_scroll.y=0;setNew_scroll.width=cc.winSize.width;setNew_scroll.height=cc.winSize.height;setNew_cont.anchorX=0.5;setNew_cont.anchorY=0.5;setNew_cont.x=0;setNew_cont.y=0;setNew_cont.width=cc.winSize.width;setNew_cont.height=cc.winSize.height;setNew_cont.parent=setNew_scroll;setNew_scroll.parent=cc.director.getScene().getComponentInChildren("cc.Canvas").node;setNew_scroll.zIndex=9;var getDEBUG_NODE=cc.find("DYNAMIC_ATLAS_DEBUG_NODE");var getAtlas=cc.find("DYNAMIC_ATLAS_DEBUG_NODE/CONTENT/ATLAS");var getAtlas2=setNew_cont;if(getAtlas){cc.log(window.showCodeInfoTime+"%c 已将动态合图的图集输出至 Canvas 节点下 => \n Canvas/DYNAMIC_ATLAS_DEBUG_NODE_selfSet/CONTENT/ATLAS \n 可以自由拖动屏幕上的新图集节点 \n 已自动贴边屏幕","font-size:18px;color:yellow;background-color:black;");var ins_atlas=cc.instantiate(getAtlas);ins_atlas.anchorX=0.5;ins_atlas.anchorY=0.5;ins_atlas.addComponent("cc.Widget");var ins_atlasWid=ins_atlas.getComponent("cc.Widget");ins_atlasWid.isAlignTop=true;ins_atlasWid.isAlignLeft=true;ins_atlasWid.top=55;ins_atlasWid.left=55;ins_atlas.on(cc.Node.EventType.TOUCH_START,onTouchStart,this);ins_atlas.on(cc.Node.EventType.TOUCH_MOVE,onTouchMove,this);ins_atlas.on(cc.Node.EventType.TOUCH_END,onTouchEnd,this);ins_atlas.on(cc.Node.EventType.TOUCH_CANCEL,onTouchCancel,this);if(getAtlas2){ins_atlas.parent=getAtlas2;getDEBUG_NODE.active=false}else{ins_atlas.parent=cc.director.getScene().getComponentInChildren("cc.Canvas").node;getDEBUG_NODE.active=false}}else{console.clear();cc.log(window.showCodeInfoTime+"%c 未找到=>动态合图的大贴图图集 (2048 * 2048) ATLAS ","font-size:25px;color:red;background-color:black;");setNew_scroll.parent=null;setNew_scroll.destroy()}}else{cc.log(window.showCodeInfoTime+"%c 已移除当前新增的 ATLAS 的 DYNAMIC_ATLAS_DEBUG_NODE_selfSet 节点","font-size:25px;color:red;background-color:black;");var getAtlas=cc.find("DYNAMIC_ATLAS_DEBUG_NODE");var getAtlas2=cc.director.getScene().getComponentInChildren("cc.Canvas").node.getChildByName("DYNAMIC_ATLAS_DEBUG_NODE_selfSet");if(getAtlas){getAtlas.parent=null;getAtlas.destroy()};if(getAtlas2){getAtlas2.parent=null;getAtlas2.destroy()}};function onTouchStart(event,customEventData){cc.log("拖动合图图片_坐标_onTouchStart=>",[event.target.getPosition().x,event.target.getPosition().y]);const positionInNode=event.target.getParent().convertToNodeSpaceAR(event.getLocation());window.dragBlockOffset=positionInNode.sub(event.target.getPosition())};function onTouchMove(event,customEventData){if(!window.dragBlockOffset){return};const positionInWorld=event.getLocation(),positionInNode=event.target.getParent().convertToNodeSpaceAR(positionInWorld);cc.log("拖动合图图片_坐标_onTouchMove=>",[positionInNode.sub(window.dragBlockOffset).x,positionInNode.sub(window.dragBlockOffset).y]);event.target.setPosition(positionInNode.sub(window.dragBlockOffset))};function onTouchCancel(event,customEventData){cc.log("拖动合图图片_坐标_onTouchCancel=>",[event.getLocation().x,event.getLocation().y]);onTouchEnd(event,"")};function onTouchEnd(event,customEventData){if(!window.dragBlockOffset){return};cc.log("拖动合图图片_坐标_onTouchEnd=>",[event.getLocation().x,event.getLocation().y]);window.dragBlockOffset=null}})();
1.9.3 再出自定义查看动态合图_核心代码( Snip 片段代码):::=>
// 这个头写法就可以省略不写了
// javascript: (()=>{
    var getUserConfirm = confirm("是否查看合图?");
    window.showCodeInfoTime = " 【" + new Date().toLocaleString() + "=>星期" + ['天', '壹', '贰', '叁', '肆', '伍', '陆'][new Date().getDay()] + "=>周" + ['末', '一', '二', '三', '四', '五', '六'][new Date().getDay()] + "】 ";
    window.dragBlockOffset = cc.Vec2.ZERO;
    cc.dynamicAtlasManager.showDebug(getUserConfirm);
    if (getUserConfirm) {
        var setNew_scroll = new cc.Node();
        var setNew_cont = new cc.Node();

        setNew_scroll.name = "DYNAMIC_ATLAS_DEBUG_NODE_selfSet";
        setNew_cont.name = "CONTENT";

        setNew_scroll.anchorX = 0.5;
        setNew_scroll.anchorY = 0.5;
        setNew_scroll.x = 0;
        setNew_scroll.y = 0;
        setNew_scroll.width = cc.winSize.width;
        setNew_scroll.height = cc.winSize.height;

        setNew_cont.anchorX = 0.5;
        setNew_cont.anchorY = 0.5;
        setNew_cont.x = 0;
        setNew_cont.y = 0;
        setNew_cont.width = cc.winSize.width;
        setNew_cont.height = cc.winSize.height;

        setNew_cont.parent = setNew_scroll;
        setNew_scroll.parent = cc.director.getScene().getComponentInChildren("cc.Canvas").node;
        setNew_scroll.zIndex = 9;
        var getDEBUG_NODE = cc.find("DYNAMIC_ATLAS_DEBUG_NODE");
        var getAtlas = cc.find("DYNAMIC_ATLAS_DEBUG_NODE/CONTENT/ATLAS");
        var getAtlas2 = setNew_cont;
        if (getAtlas) {
            cc.log(window.showCodeInfoTime + "%c  已将动态合图的图集输出至 Canvas 节点下 => \n Canvas/DYNAMIC_ATLAS_DEBUG_NODE_selfSet/CONTENT/ATLAS \n 可以自由拖动屏幕上的新图集节点 \n 已自动贴边屏幕", "font-size:18px;color:yellow;background-color:black;");
            var ins_atlas = cc.instantiate(getAtlas);

            ins_atlas.anchorX = 0.5;
            ins_atlas.anchorY = 0.5;
            ins_atlas.addComponent("cc.Widget");
            var ins_atlasWid = ins_atlas.getComponent("cc.Widget");
            ins_atlasWid.isAlignTop = true;
            ins_atlasWid.isAlignLeft = true;
            ins_atlasWid.top = 55;
            ins_atlasWid.left = 55;

            ins_atlas.on(cc.Node.EventType.TOUCH_START, onTouchStart, this);
            ins_atlas.on(cc.Node.EventType.TOUCH_MOVE, onTouchMove, this);
            ins_atlas.on(cc.Node.EventType.TOUCH_END, onTouchEnd, this);
            ins_atlas.on(cc.Node.EventType.TOUCH_CANCEL, onTouchCancel, this);
            if (getAtlas2) {
                ins_atlas.parent = getAtlas2;
                getDEBUG_NODE.active = false;
            } else {
                ins_atlas.parent = cc.director.getScene().getComponentInChildren("cc.Canvas").node;
                getDEBUG_NODE.active = false;
            }
            ;
        } else {
            console.clear();
            cc.log(window.showCodeInfoTime + "%c  未找到=>动态合图的大贴图图集 (2048 * 2048) ATLAS ", "font-size:25px;color:red;background-color:black;");
            setNew_scroll.parent = null;
            setNew_scroll.destroy();
        }
        ;
    } else {
        cc.log(window.showCodeInfoTime + "%c  已移除当前新增的 ATLAS 的 DYNAMIC_ATLAS_DEBUG_NODE_selfSet 节点", "font-size:25px;color:red;background-color:black;");
        var getAtlas = cc.find("DYNAMIC_ATLAS_DEBUG_NODE");
        var getAtlas2 = cc.director.getScene().getComponentInChildren("cc.Canvas").node.getChildByName("DYNAMIC_ATLAS_DEBUG_NODE_selfSet");
        if (getAtlas) {
            getAtlas.parent = null;
            getAtlas.destroy();
        }
        ;if (getAtlas2) {
            getAtlas2.parent = null;
            getAtlas2.destroy();
        }
        ;
    }
    ;function onTouchStart(event, customEventData) {
        cc.log("拖动合图图片_坐标_onTouchStart=>", [event.target.getPosition().x, event.target.getPosition().y]);
        const positionInNode = event.target.getParent().convertToNodeSpaceAR(event.getLocation());
        window.dragBlockOffset = positionInNode.sub(event.target.getPosition());
    }
    ;function onTouchMove(event, customEventData) {
        if (!window.dragBlockOffset) {
            return;
        }
        ;const positionInWorld = event.getLocation()
          , positionInNode = event.target.getParent().convertToNodeSpaceAR(positionInWorld);
        cc.log("拖动合图图片_坐标_onTouchMove=>", [positionInNode.sub(window.dragBlockOffset).x, positionInNode.sub(window.dragBlockOffset).y]);
        event.target.setPosition(positionInNode.sub(window.dragBlockOffset));
    }
    ;function onTouchCancel(event, customEventData) {
        cc.log("拖动合图图片_坐标_onTouchCancel=>", [event.getLocation().x, event.getLocation().y]);
        onTouchEnd(event, "");
    }
    ;function onTouchEnd(event, customEventData) {
        if (!window.dragBlockOffset) {
            return;
        }
        ;cc.log("拖动合图图片_坐标_onTouchEnd=>", [event.getLocation().x, event.getLocation().y]);
        window.dragBlockOffset = null;
    }
    ;

// })();
1.9.4 自定义输出 FPS 帧率日志( Snip 片段代码):::=>
// javascript: (()=>{
    var getShowFps = confirm("是否实时输出 FPS 帧率日志?");
    if (!getShowFps) {
        console.log("%c 取消输出 FPS 帧率日志", "background-color:#040;color:#f1e75a !important;font-size:calc(64px/2);");
        // return;
    }else{
    ;var timerNum = 0
      , tempShowNum = 100;
    var requestAnimationFrame = window.requestAnimationFrame || window.webkitRequestAnimationFrame || window.mozRequestAnimationFrame || window.oRequestAnimationFrame || window.msRequestAnimationFrame || function(callback) {
        window.setTimeout(callback, 1000 / 60);
    }
    ;
    var e, pe, pid, fps, last, offset, step, appendFps;
    fps = 0;
    last = Date.now();
    step = function() {
        offset = Date.now() - last;
        fps += 1;
        if (offset >= 1000) {
            last += offset;
            appendFps(fps);
            fps = 0;
        }
        requestAnimationFrame(step);
    }
    ;
    appendFps = function(fps) {
        if (timerNum > tempShowNum) {
            timerNum = 0;
            console.clear();
        }
        ;timerNum++;
        console.log('%c 当前页面的帧率::' + timerNum + '=>\n ' + fps + ' FPS', "background-color:#000;color:#f1e05a !important;font-size:calc(55px/2);");
    }
    ;
    step();
};
// })();
1.9.5 自定义场景内节点的 Label Cache Mode 类型_核心代码( Bookmarklet 片段代码):::=>
这个 getComponentInChildren 代码也可以使用
// 先写 2.x 的::
javascript:var modeType=prompt("自定义 2.x 的 Label Cache Mode 类型,0-2",1);cc.director.getScene().children[0].getComponentsInChildren(cc.Label).forEach((nod)=>{nod.cacheMode=modeType;});

// 这个是 3.x 的::
javascript:var modeType=prompt("自定义 3.x 的 Label Cache Mode 类型,0-2",1);cc.director.getScene().getChildByName("Canvas").getComponentsInChildren(cc.LabelComponent).forEach((nod)=>{nod.cacheMode=modeType;});
1.9.6 自定义场景内节点的 Label Cache Mode 类型_核心代码( Snip 片段代码):::=>
关键使用的是 getComponentsInChildren 代码
- 其实, getComponentsInChildren 可以用在很多的场景里面, 大家可以自行研究
// 先写 2.x 的::
// javascript:
var modeType = prompt("自定义 2.x 的 Label Cache Mode 类型,0-2", 1);
cc.director.getScene().children[0].getComponentsInChildren(cc.Label).forEach((nod)=>{
    nod.cacheMode = modeType;
});

// 这个是 3.x 的::
// javascript:
var modeType = prompt("自定义 3.x 的 Label Cache Mode 类型,0-2", 1);
cc.director.getScene().getChildByName("Canvas").getComponentsInChildren(cc.LabelComponent).forEach((nod)=>{
    nod.cacheMode = modeType;
});
2.  在 Cocos 内用代码写最简单的 WebGL图形(Ts) + 超小杯 [付费插件]
2.1 直接出核心代码( html 写法代码):::=>
// Cocos 的写法请参考插件内的代码
// 简单调用 GL 绘制画布变成红色
const gl0 = document.querySelector('canvas').getContext('webgl');
gl0.clearColor(1, 0, 0, 1);
gl0.clear(gl0.COLOR_BUFFER_BIT);

// 简单绘制多个不同颜色的矩形
const gl = document.querySelector('#c').getContext('webgl');
gl.enable(gl.SCISSOR_TEST);
function drawRect(x, y, width, height, color) {
  gl.scissor(x, y, width, height);
  gl.clearColor(...color);
  gl.clear(gl.COLOR_BUFFER_BIT);
};
for (let i = 0; i < 100; ++)) {
  const x = rand(0, 300);
  const y = rand(0, 150);
  const width = rand(0, 300 - x);
  const height = rand(0, 150 - y);
  drawRect(x, y, width, height, [rand(1), rand(1), rand(1), 1]);
};
function rand(min, max) {
  if (max === undefined) {
    max = min;
    min = 0;
  }
  return Math.random() * (max - min) + min;
};
参考:: WebGL 最小的程序 (webglfundamentals.org)
// 简单来说,就是获取一下 GL ,然后调用 WebGL 的代码绘制小矩形
2.2 看看这个简单的 十万(1000*100)++ 往上的不断重绘 WebGL 图, 可以知道, Cocos 会越来越好
3. RVO 避障的简单理解 + [免费源码] 
- 本条目行文参考论坛代码如下
3.1.1 半参考(仅作研究) 金币落袋效果
3.1.2 半参考(仅作研究) 50 行代码,优化列表draw call
3.1.3 半参考(仅作研究) 50 行写个简单的状态机
原理解析: 简略来说,就是一个圆周运动计算后,中点 坐标偏移
简单来说: 避障, 就是一个方向+速度的一个坐标计算的过程
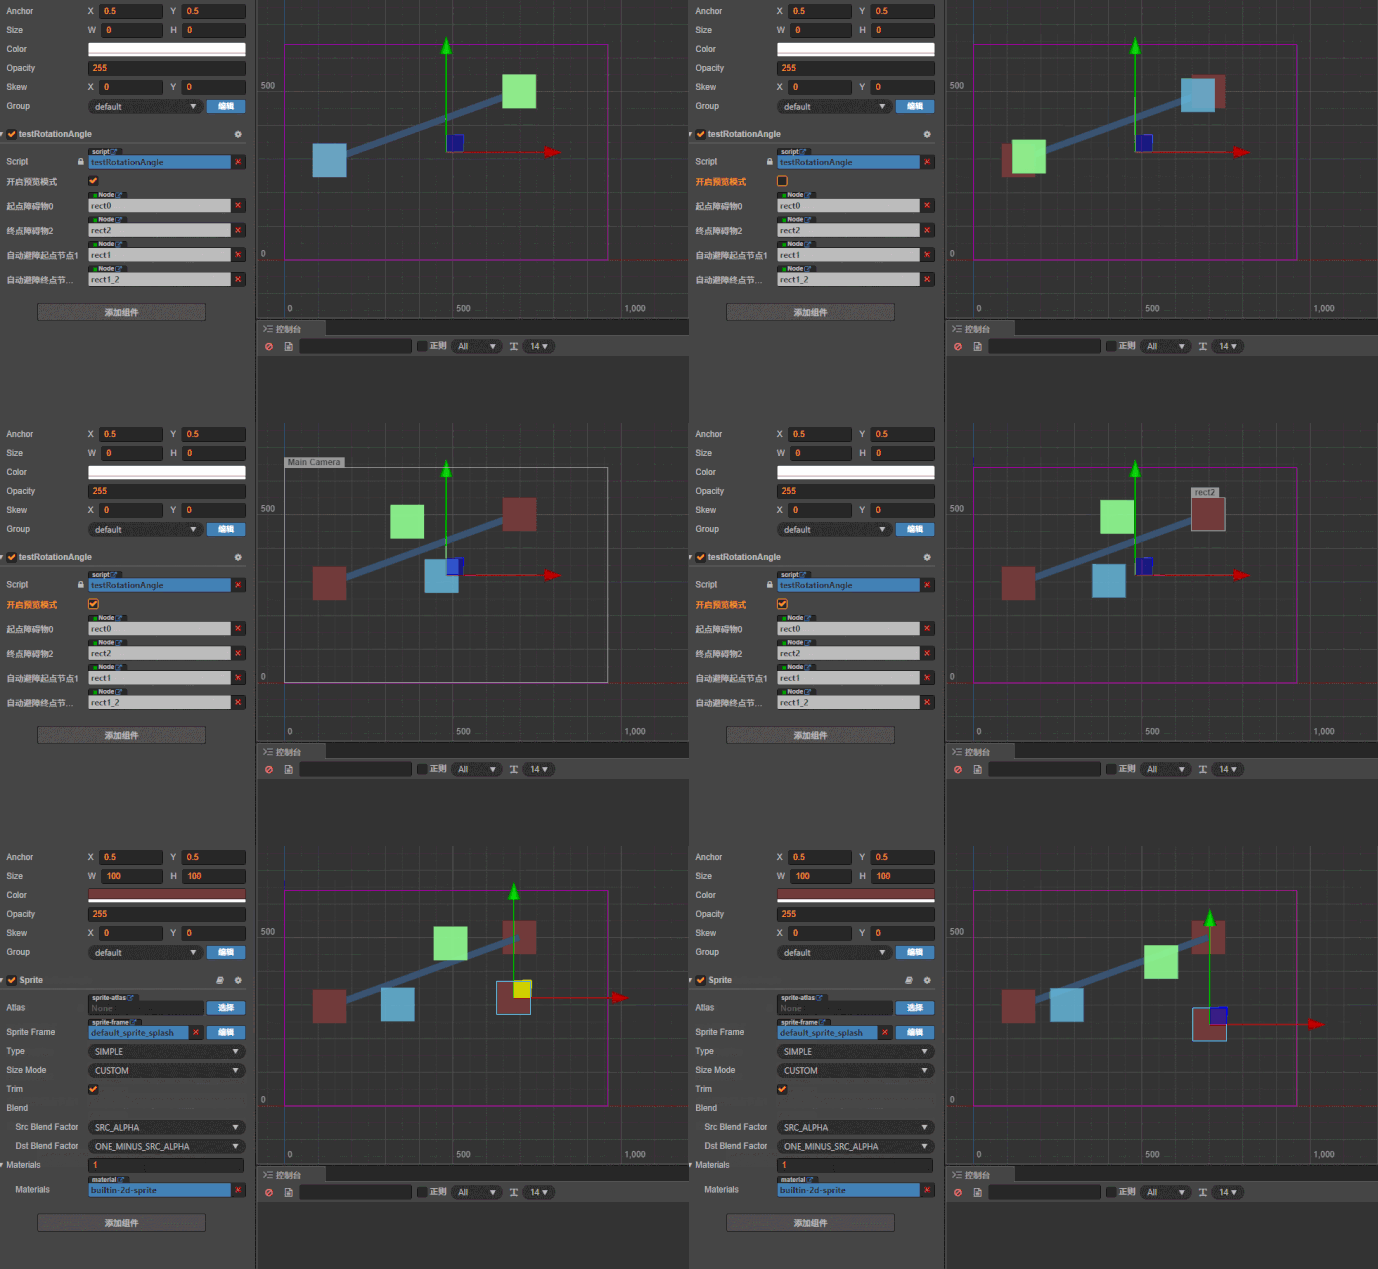
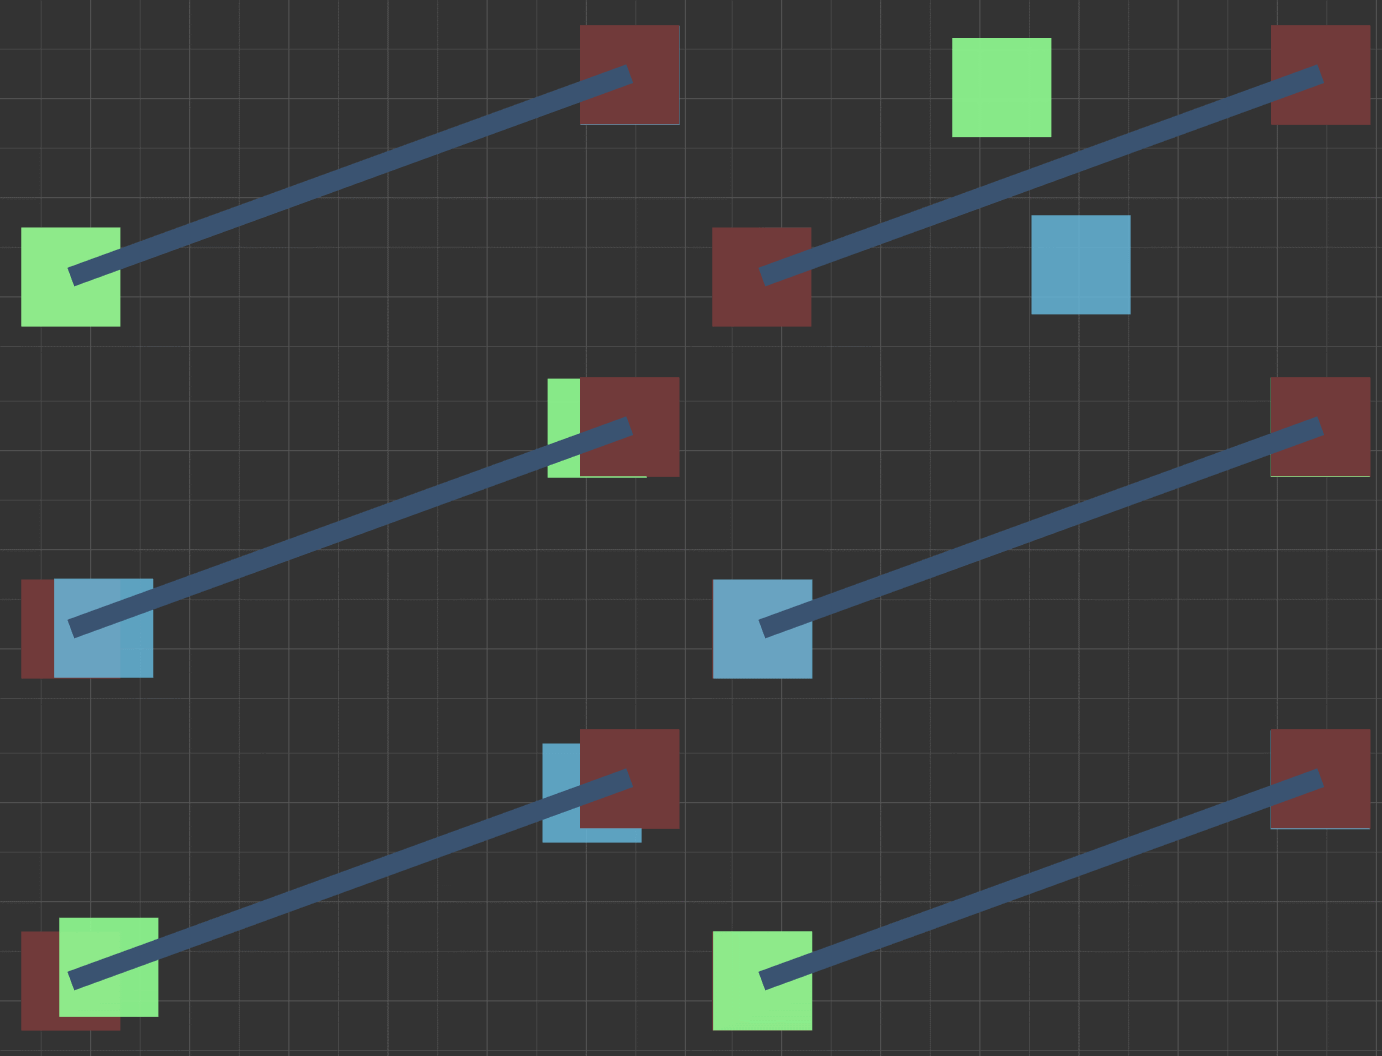
3.2 RVO 避障的简单理解效果展示
3.2.1 开启此效果
3.2.2 场景内拖动节点后的效果
本文总结:::=>
想说的太多, 说的多了就成废话了, 因为本人懂得太少, 所以, 都在代码里了
小疑惑:::=>
各位大佬, 请问 3.x 的插件开发还有比较好的能参考的地方吗?
比如 2.x 插件可以自由读取场景内的节点数据并操作, 还有 run-time 展示插件内的 ts 代码.
请问 3.x 的这两个功能有什么地方说的比较详细的吗 ?
在下才疏学浅, 多有不足之处, 还请各位大佬多多见谅, 欢迎提出您宝贵的见解, 感谢




 请问是有什么地方写的太复杂了吗?我再改改?


